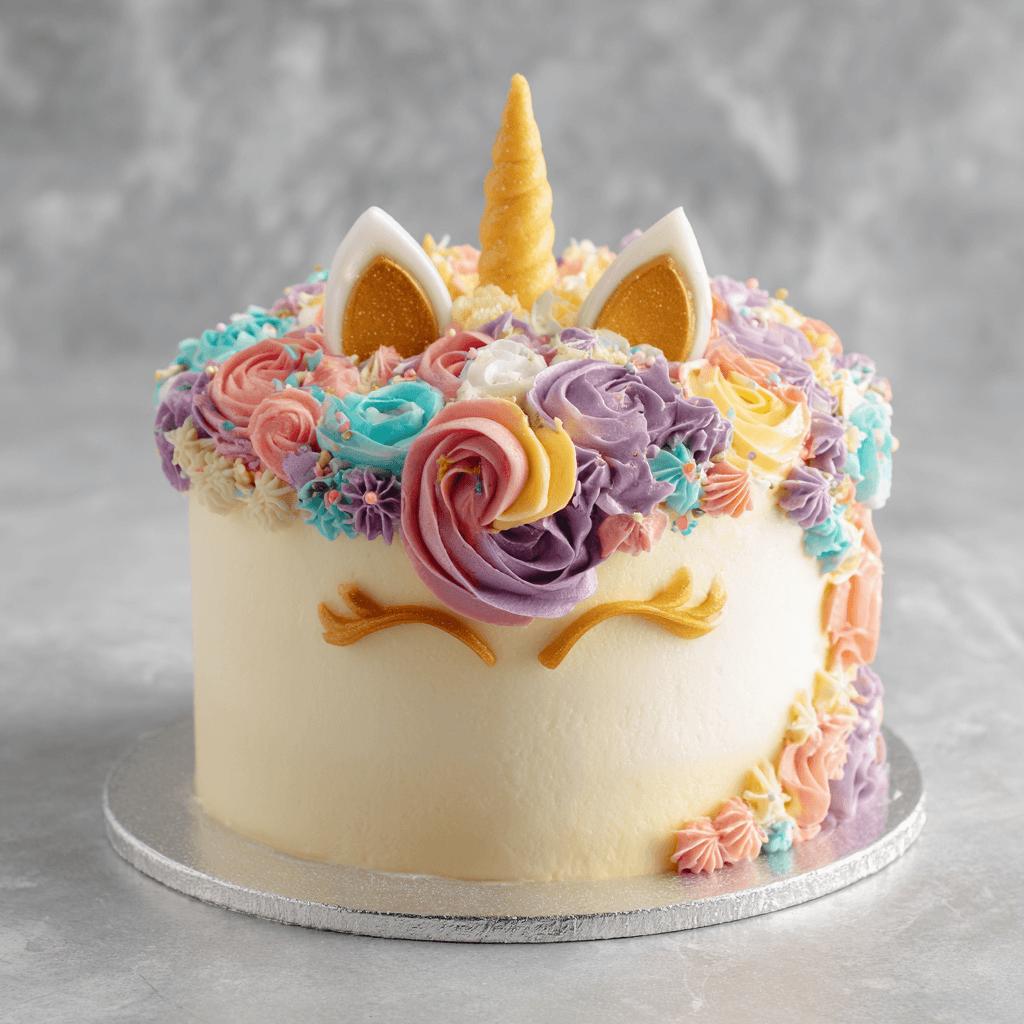
Unicorn Fantasy Buttercream Cake: A Whimsical Treat for All Ages
The Unicorn Fantasy Buttercream Cake is more than just a dessert — it’s an enchanting experience that brings magic to your table. Whether you’re celebrating a birthday, baby shower, or simply indulging in the joy of baking, this cake captures the essence of fantasy and fun with its vibrant colors and creamy texture. Inspired by the mythical unicorn, this cake is designed to dazzle with layers of soft pastel hues and swirls of rich buttercream frosting.
A Brief History of the Unicorn Fantasy Cake
While unicorns have long been part of folklore and mythology, their popularity in modern pop culture has surged in recent years. The Unicorn Fantasy Buttercream Cake emerged as a trend in the late 2010s when social media platforms like Instagram and Pinterest became saturated with whimsical food creations. Bakers around the world embraced the trend, creating cakes that combined color, creativity, and charm. This particular version focuses on using buttercream instead of fondant for a softer, creamier finish — perfect for those who prefer a lighter, less sweet frosting option.
Ingredients Breakdown
- For the Cake:
- All-purpose flour – 2 cups (for a light and fluffy base)
- Baking powder – 1 tsp (to help the cake rise)
- Salt – ½ tsp (to balance sweetness)
- Unsalted butter – 1 cup (room temperature, for richness)
- Granulated sugar – 1.5 cups (for sweetness and structure)
- Eggs – 3 large (for moisture and binding)
- Milk – 1 cup (adds moisture and tenderness)
- Vanilla extract – 2 tsp (enhances flavor)
- Food coloring (gel preferred) – pink, blue, yellow, purple (for unicorn effect)
- For the Buttercream Frosting:
- Unsalted butter – 1.5 cups (room temperature, for creamy texture)
- Confectioners’ sugar – 4–5 cups (adjustable to desired sweetness and thickness)
- Heavy whipping cream – 2–3 tbsp (for smoothness and lightness)
- Vanilla extract – 1 tsp
- Food coloring (gel preferred) – rainbow colors for swirling
- Optional decorations: edible glitter, unicorn horns, pastel sprinkles, candy pearls
Step-by-Step Recipe
- Preheat oven to 350°F (175°C). Grease and line three 8-inch round cake pans.
- In a medium bowl, sift together flour, baking powder, and salt. Set aside.
- In a separate large bowl, use an electric mixer to beat butter and sugar until light and fluffy (about 3–4 minutes).
- Add eggs one at a time, mixing well after each addition. Stir in vanilla extract.
- Gradually add the dry ingredients to the wet mixture, alternating with milk. Begin and end with dry ingredients.
- Divide the batter evenly into 4–5 bowls. Add a different gel food coloring to each and mix until fully incorporated.
- Pour each colored batter into the prepared pans in random layers (no need to spread evenly; this creates a marbled effect).
- Bake for 25–30 minutes, or until a toothpick inserted comes out clean.
- Let the cakes cool completely before removing from pans.
- To make the frosting, beat the butter until creamy (about 2 minutes). Gradually add confectioners’ sugar, then heavy cream and vanilla. Beat until light and fluffy.
- Divide the frosting into several bowls and tint each with a different color.
- Place one cake layer on a serving plate and frost with a layer of buttercream. Repeat with remaining layers.
- Cover the entire cake with a crumb coat, chill for 15 minutes, then apply the final layer of frosting.
- Use piping bags or spatulas to create a rainbow swirl on top and decorate with optional extras.
Tips for Perfect Results
- Use gel food coloring instead of liquid for vibrant colors without affecting the texture.
- If your frosting becomes too soft, chill it for 10–15 minutes before continuing.
- For a smoother finish, use an offset spatula and bench scraper to frost the sides of the cake.
- Chill the cake between layers if working in a warm environment.
- Don’t overmix the batters once divided — this helps maintain the magical marble effect inside.
Variations and Customizations
- Chocolate version: Replace ½ cup of flour with unsweetened cocoa powder for a chocolate unicorn cake.
- Layer options: Make mini unicorn cupcakes or a single-tier sheet cake for parties.
- Dietary adaptations: Use vegan butter and non-dairy milk for a vegan-friendly version. Substitute gluten-containing flour with a 1:1 gluten-free flour blend.
- Flavor twists: Add almond extract or lemon zest to the batter or frosting for extra flavor.
- Theme ideas: Decorate with edible flowers, fairy lights, or themed figurines for a unicorn party centerpiece.
Health Considerations and Nutritional Value
While the Unicorn Fantasy Buttercream Cake is a celebration treat best enjoyed occasionally, it’s important to be mindful of its nutritional content. Each slice (based on 12 servings) contains approximately:
- Calories: ~450–550 kcal
- Total Fat: ~20–25g
- Saturated Fat: ~13g
- Carbohydrates: ~65–75g
- Sugar: ~45–50g
- Protein: ~4–6g
- Fiber: ~0–1g
Due to the high sugar and fat content from butter and powdered sugar, it’s best enjoyed in moderation. For a healthier twist, consider reducing the sugar in both the cake and frosting by 25% or substituting with alternative sweeteners like erythritol (note: results may vary).
Complete List of Ingredients
Cake: All-purpose flour, baking powder, salt, unsalted butter, granulated sugar, eggs, milk, vanilla extract, gel food coloring (pink, blue, yellow, purple).
Buttercream Frosting: Unsalted butter, confectioners’ sugar, heavy whipping cream, vanilla extract, gel food coloring (rainbow), optional decorations (glitter, sprinkles, unicorn horn pick).
Directions Recap
- Prepare cake pans and preheat oven.
- Mix dry ingredients separately from wet ingredients.
- Color batter in multiple hues and pour randomly into pans.
- Bake until done and cool completely.
- Make buttercream frosting and divide into colors.
- Assemble cake with layers and frosting, applying a crumb coat first.
- Decorate creatively with swirls and sparkly touches.
Frequently Asked Questions (FAQ)
Can I make this cake ahead of time?
Yes! You can bake the cake layers up to two days in advance and store them wrapped in plastic wrap at room temperature. Frost the cake the day of serving for best appearance.
How do I store leftovers?
Store the frosted cake in the refrigerator for up to 3 days. Bring to room temperature before serving for optimal taste and texture.
Can I freeze this cake?
Yes. Wrap unfrosted cake layers tightly in plastic wrap and foil, then freeze for up to 2 months. Thaw completely before frosting and decorating.