Introduction
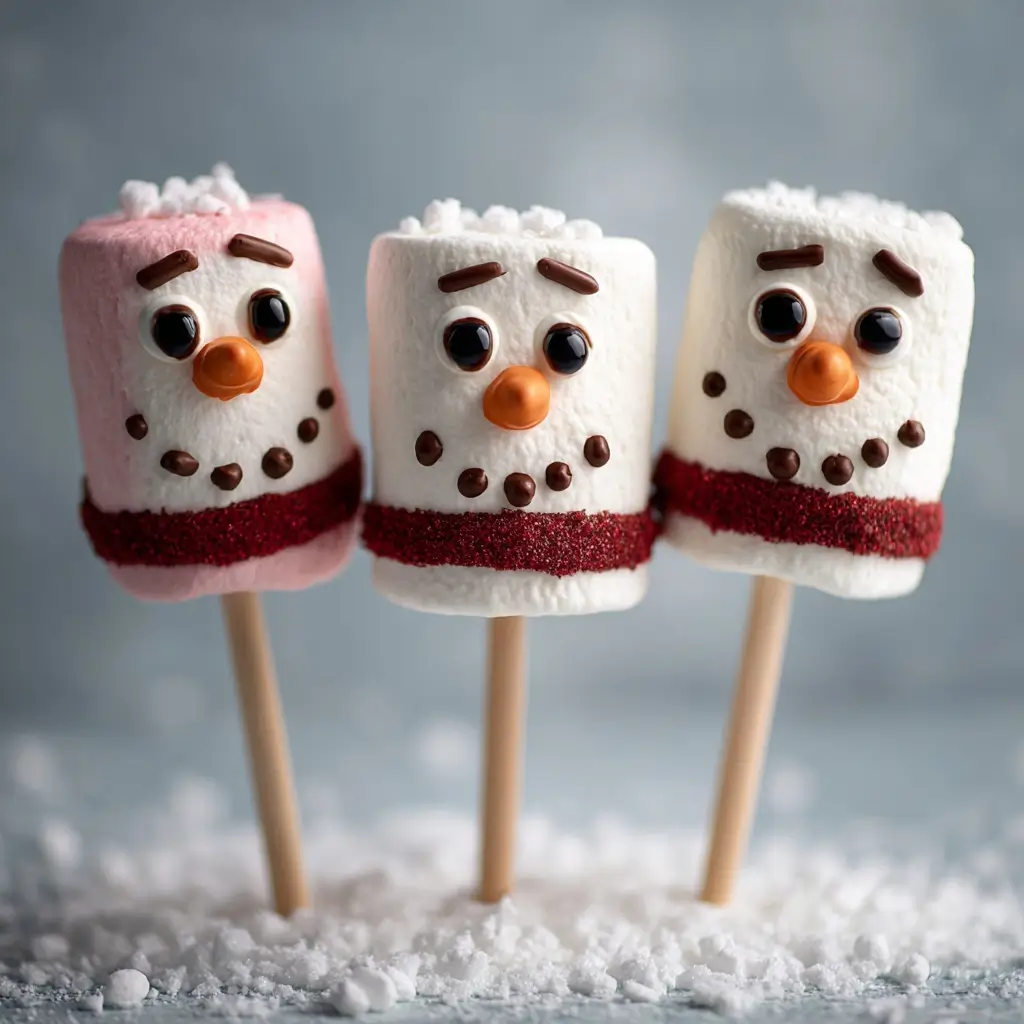
Snowman Marshmallow Pops are the ultimate festive treat that brings joy, creativity, and a touch of whimsy to any holiday celebration. Whether you’re hosting a winter-themed party, organizing a kids’ craft activity, or simply looking for a fun dessert to make with family during the colder months, these adorable edible snowmen on sticks are guaranteed to charm everyone who sees them. Made from simple ingredients like marshmallows, chocolate, candy decorations, and wooden sticks, Snowman Marshmallow Pops are not only delicious but also double as delightful handmade décor. Their soft, sweet base combined with colorful embellishments makes them perfect for all ages—especially those who love combining baking with crafting. In this comprehensive guide, we’ll walk you through every aspect of making Snowman Marshmallow Pops, from their origins and ingredient breakdown to detailed instructions, creative variations, health considerations, and answers to common questions.
The History
While there isn’t a well-documented historical origin specifically for Snowman Marshmallow Pops, they are part of a broader tradition of holiday confections and edible crafts that gained popularity in the late 20th century. Marshmallows themselves have ancient roots—the original version was made from the mallow plant (Althaea officinalis) by the Egyptians over 2,000 years ago. However, modern gelatin-based marshmallows emerged in France in the 1800s and became widely available in the United States by the early 1900s. As home baking and holiday crafting surged in popularity post-World War II, especially during the 1950s and 60s, people began experimenting with marshmallows in new ways—from Rice Krispie Treats to festive holiday treats. The idea of turning marshmallows into snowmen likely originated from classroom crafts and holiday party activities where children decorated large marshmallows using edible markers, chocolate chips, and candies. By the 1990s and 2000s, with the rise of Pinterest, food blogs, and seasonal crafting culture, Snowman Marshmallow Pops evolved into a mainstream DIY dessert staple, often featured at Christmas parties, school events, and winter festivals. Today, they represent the joyful fusion of culinary art and seasonal cheer, embodying the playful spirit of the holidays.
Ingredients Breakdown
The magic of Snowman Marshmallow Pops lies in their simplicity and accessibility. Most ingredients can be found in a typical pantry or easily picked up at a local grocery store. Here’s a detailed look at each component:
- Large Marshmallows: These form the body of the snowman. Typically three per pop (stacked to create head, torso, and base), large marshmallows are soft, chewy, and perfect for holding decorations.
- Wooden Craft Sticks or Lollipop Sticks: Inserted through the center of the stacked marshmallows, these act as both structural support and handles, transforming the creation into a “pop.”
- Melting Chocolate (Dark, Milk, or White): Used as “glue” to attach pieces and for decorative drizzling. Chocolate adds flavor and helps secure accessories.
- Candy Eyes: Pre-made edible googly eyes or small round candies (like mini M&Ms or white chocolate drops with pupils drawn in food-safe ink) give your snowman a lifelike expression.
- Orange Candy for Carrot Noses: Orange mini jelly beans, small fondant cones, or even orange-tinted marzipan are commonly used to craft the classic carrot nose.
- Black Edible Markers or Mini Chocolate Chips: For facial features such as buttons down the front or eyebrows/eyelashes. Chocolate chips can double as eyes if candy eyes aren’t available.
- Mini Pretzels: Broken into short twigs to resemble arms. They add a salty crunch contrast to the sweetness.
- Shredded Coconut (Optional): Dyed blue or white, it can simulate snow when placed at the base of the pops on a serving tray.
- Fondant or Modeling Chocolate (Optional): Used to create hats, scarves, or other accessories for more advanced decorators.
- Food Coloring Pens or Gel: Ideal for adding fine details like rosy cheeks, mouth lines, or scarf patterns.
- Sprinkles, Nonpareils, or Sanding Sugar: For extra sparkle and texture—great for decorating scarves or giving the snowman a frosty appearance.
- Candy Melts (Various Colors): Easier to work with than regular chocolate, candy melts come in many colors and set smoothly, ideal for coating or drizzling.
All ingredients should be food-grade and safe for consumption. Always check labels for allergens, especially when serving children or guests with dietary restrictions.
Step-by-Step Recipe
Creating Snowman Marshmallow Pops is an engaging, family-friendly process that combines assembly, decoration, and a little imagination. Follow these detailed steps for perfect results every time:
- Gather Supplies: Before beginning, ensure all ingredients and tools are ready. You’ll need a clean workspace, wax paper or parchment sheets, small bowls for melted chocolate, toothpicks, spoons, and decorating supplies.
- Prepare the Workstation: Line a baking sheet or tray with wax paper. This will hold the finished pops and prevent sticking.
- Melt the Chocolate: Use a double boiler or microwave to melt your chosen chocolate or candy melts. If using a microwave, heat in 20-second intervals, stirring between each, until smooth. Avoid overheating.
- Assemble the Snowman Body: Take one large marshmallow and carefully insert a wooden stick about halfway into the bottom. Then, apply a small dab of melted chocolate to the top of this marshmallow and stack a second one on top. Repeat by adding a third marshmallow on top of the second. Hold gently for a few seconds to allow the chocolate to set slightly and stabilize the structure.
- Let the Stack Set: Place the assembled trio upright on the wax paper and let it rest for 2–3 minutes so the chocolate glue begins to harden.
- Add the Face: Using melted chocolate or edible markers, draw on a smiling mouth beneath where the eyes will go. Attach two candy eyes just below the top edge of the uppermost marshmallow. Press an orange jelly bean or fondant piece gently into the center for the nose.
- Create Arms: Break mini pretzel sticks into 1–2 inch pieces. Dip one end of each into melted chocolate and insert them into the sides of the middle marshmallow, angling them outward like arms.
- Decorate Buttons: Use small dots of melted chocolate or mini chocolate chips down the front of the lower marshmallow to mimic buttons. Three to four buttons work best for proportion.
- Add Accessories (Optional): Get creative! Roll thin ropes of black fondant for a top hat, use red licorice strings as scarves wrapped around the neck, or pipe colored candy melts to make bowties or mittens.
- Final Touches: Drizzle contrasting-colored candy melts over the pops for a snowy effect. Allow the chocolate to fully harden before handling or packaging.
- Set and Serve: Let the pops sit at room temperature for 10–15 minutes until all decorations are firm. They can be stored in a cool, dry place until ready to serve.
This entire process takes approximately 30–45 minutes, depending on the level of detail and number of pops being made. It’s ideal for group activities, allowing each person to personalize their own snowman.
Tips
- Use Fresh Marshmallows: Older or stale marshmallows may be too dry and brittle, making stacking difficult. Look for plump, soft marshmallows with a springy texture.
- Chill Sticks Before Use: Wooden sticks can sometimes splinter or absorb moisture. Wipe them clean and let them air-dry completely before inserting into marshmallows.
- Dip Sticks in Chocolate First: For added stability, dip the tip of the stick in chocolate before inserting it into the first marshmallow. This creates a stronger bond.
- Work in Batches: Melt chocolate in small amounts to prevent it from cooling or thickening too quickly. Reheat as needed.
- Use Toothpicks for Precision: When placing tiny candies or drawing fine lines with chocolate, use a toothpick for better control.
- Avoid Humidity: High humidity can cause chocolate to seize or become dull. Try to make these on dry days or in climate-controlled rooms.
- Keep Kids Engaged: Assign simple tasks to younger helpers—like placing eyes, noses, or buttons—while adults handle melting and stacking.
- Label Allergens: If serving at a party, label pops that contain common allergens like nuts (in some chocolates) or gluten (in pretzels).
- Store Properly: Keep finished pops in a single layer in an airtight container at room temperature for up to 5 days. Avoid refrigeration unless necessary, as condensation can make marshmallows soggy.
- Photography Tip: Arrange pops on a bed of coconut “snow” with holiday props for Instagram-worthy photos.
Variations and Customizations
One of the best things about Snowman Marshmallow Pops is how easy they are to customize. Here are some creative twists to inspire your next batch:
- Themed Snowmen: Create Santa snowmen (red hats and white trim), Elf snowmen (green and red outfits), or Rudolph-inspired versions (with red noses and antlers made from pretzels).
- Dietary Adaptations: Use vegan marshmallows (like Dandies brand) and dairy-free chocolate for a plant-based version. Gluten-free pretzels are also widely available.
- Colorful Snowmen: Tint marshmallows with food coloring spray or roll them in colored sugar before assembling for rainbow or pastel snowmen.
- Mini Versions: Use regular-sized marshmallows instead of jumbo ones to make bite-sized pops—perfect for dessert tables or favors.
- Chocolate-Coated Pops: Dip the entire marshmallow stack in melted chocolate and let harden before decorating for a richer flavor and smoother canvas.
- Edible Marker Art: Skip glued-on candies and use food-safe markers to draw faces, scarves, and accessories directly onto the marshmallows.
- Holiday Message Pops: Add small signs made from fondant or paper flags with messages like “Happy Holidays,” “Snow Much Fun,” or personalized names.
- Seasonal Twists: Make pumpkin-spice flavored marshmallows in autumn or pastel-colored versions for Easter as “bunny pops.”
- Gift Packaging: Wrap pops individually in cellophane bags tied with ribbon and include them in gift baskets or as teacher/student gifts.
- Non-Candy Alternatives: For healthier options, use raisins for eyes, banana chips for hats, and dried apricot strips for scarves (though less durable).
Health Considerations and Nutritional Value
While Snowman Marshmallow Pops are undeniably fun and festive, it’s important to consider their nutritional content and potential health impacts:
- Sugar Content: Marshmallows are primarily made of sugar and corn syrup. A single large marshmallow contains roughly 24–30 calories and 6–7 grams of sugar. With multiple marshmallows and added chocolate, a full pop can reach 100–150 calories, mostly from sugars.
- Dental Health: Due to high sugar and sticky texture, these treats can contribute to tooth decay if consumed frequently or without proper oral hygiene.
- Allergens: Common allergens include dairy (in chocolate), gluten (in pretzels), soy (in some chocolate), and tree nuts (if nut-containing chocolates are used). Always verify ingredient labels.
- Gelatin: Traditional marshmallows contain gelatin (derived from animal collagen), making them unsuitable for vegetarians and vegans. Plant-based alternatives exist but may behave differently when stacked or decorated.
- Portion Control: Because they’re small and cute, it’s easy to eat several. Encourage moderation, especially among children.
- Balanced Indulgence: Best enjoyed occasionally as part of a balanced diet. Pair with healthier snacks like fruit or nuts when serving at parties.
- Artificial Ingredients: Some candy coatings and food dyes contain artificial colors (e.g., Red 40, Blue 1) which some individuals prefer to avoid, particularly parents of young children.
To make a slightly healthier version, consider using reduced-sugar marshmallows, dark chocolate (which has antioxidants), and natural food dyes. However, keep in mind that taste and texture may vary.
Ingredients
- 9 large marshmallows (3 per pop)
- 3 wooden lollipop sticks or craft sticks
- 1/2 cup chocolate chips (milk, dark, or white) or candy melts
- 6 candy eyes (or substitute with mini chocolate chips)
- 3 orange jelly beans (for noses)
- 6 mini pretzel sticks (for arms)
- 9 mini chocolate chips (for buttons – 3 per snowman)
- Edible marker (black, optional for mouths)
- Food-safe brush or small spoon (for applying chocolate)
- Wax paper or silicone mat
- Toothpicks (for detailing)
- Optional: shredded coconut (for snow base), red licorice (scarves), fondant (hats)
Directions
- Line a tray with wax paper and set aside.
- Melt the chocolate chips or candy melts using a double boiler or microwave. Stir until completely smooth.
- Take one large marshmallow and insert a wooden stick halfway into the bottom. This will be the base of the snowman.
- Using a toothpick or small spoon, apply a dime-sized amount of melted chocolate to the top of the first marshmallow.
- Carefully place a second marshmallow on top and press gently to adhere. Repeat by adding a third marshmallow on top of the second.
- Stand the stack upright on the wax paper and repeat the process for remaining pops.
- Allow the stacks to sit for 2–3 minutes so the chocolate begins to set.
- Attach two candy eyes just below the top edge of the top marshmallow.
- Press an orange jelly bean into the center area below the eyes to form the nose.
- Use an edible marker or a tiny dot of chocolate to draw a small curved line underneath the nose for a smile.
- Dip the ends of two mini pretzel sticks into melted chocolate and insert one into each side of the middle marshmallow for arms.
- Place three mini chocolate chips vertically down the front of the bottom marshmallow to create buttons.
- (Optional) Use fondant to shape a top hat or scarf and attach with melted chocolate.
- Drizzle additional melted chocolate over the pops for a wintry effect, if desired.
- Let all pops sit for 10–15 minutes until decorations are fully set.
- Serve immediately or store in a cool, dry place.
FAQ
Can I make Snowman Marshmallow Pops ahead of time?
Yes! You can make them up to 5 days in advance. Store in an airtight container at room temperature away from direct sunlight or heat.
How do I prevent the chocolate from seizing?
Avoid getting any water into the chocolate while melting. Use dry utensils and bowls. If using a microwave, heat slowly and stir frequently.
Can I use regular marshmallows instead of jumbo ones?
Absolutely! Just use 3 regular marshmallows per pop. The final product will be smaller but equally adorable.
Are these suitable for kids to make?
Yes, with adult supervision—especially when melting chocolate or using sharp objects. Assign age-appropriate tasks to keep it safe and fun.
What can I use instead of pretzels for arms?
Alternatives include broken cinnamon sticks, licorice laces, wafer cookies, or even small breadsticks.
Can I freeze Snowman Marshmallow Pops?
Freezing is not recommended, as thawing can cause condensation, making the marshmallows soggy and the chocolate bloom.
How do I package them as gifts?
Place each pop in a clear cellophane bag, twist the top, and tie with ribbon. Add a holiday tag for a personal touch.
Why did my marshmallows fall apart?
This usually happens if the chocolate glue wasn’t used properly or if the marshmallows were too old/dry. Ensure fresh marshmallows and sufficient chocolate between layers.
Can I make these nut-free?
Yes—just use nut-free chocolate and verify all candy components are processed in a nut-free facility if allergies are a concern.
Do I have to use candy eyes?
No. You can use mini chocolate chips, draw eyes with edible markers, or omit them entirely for a minimalist design.
Summary
Snowman Marshmallow Pops are a delightful, no-bake holiday treat that combines sweet flavors with creative fun, perfect for family gatherings, school events, or festive gifting. Easy to customize and enjoyable for all ages, they turn simple ingredients into magical edible snowmen that bring seasonal smiles.