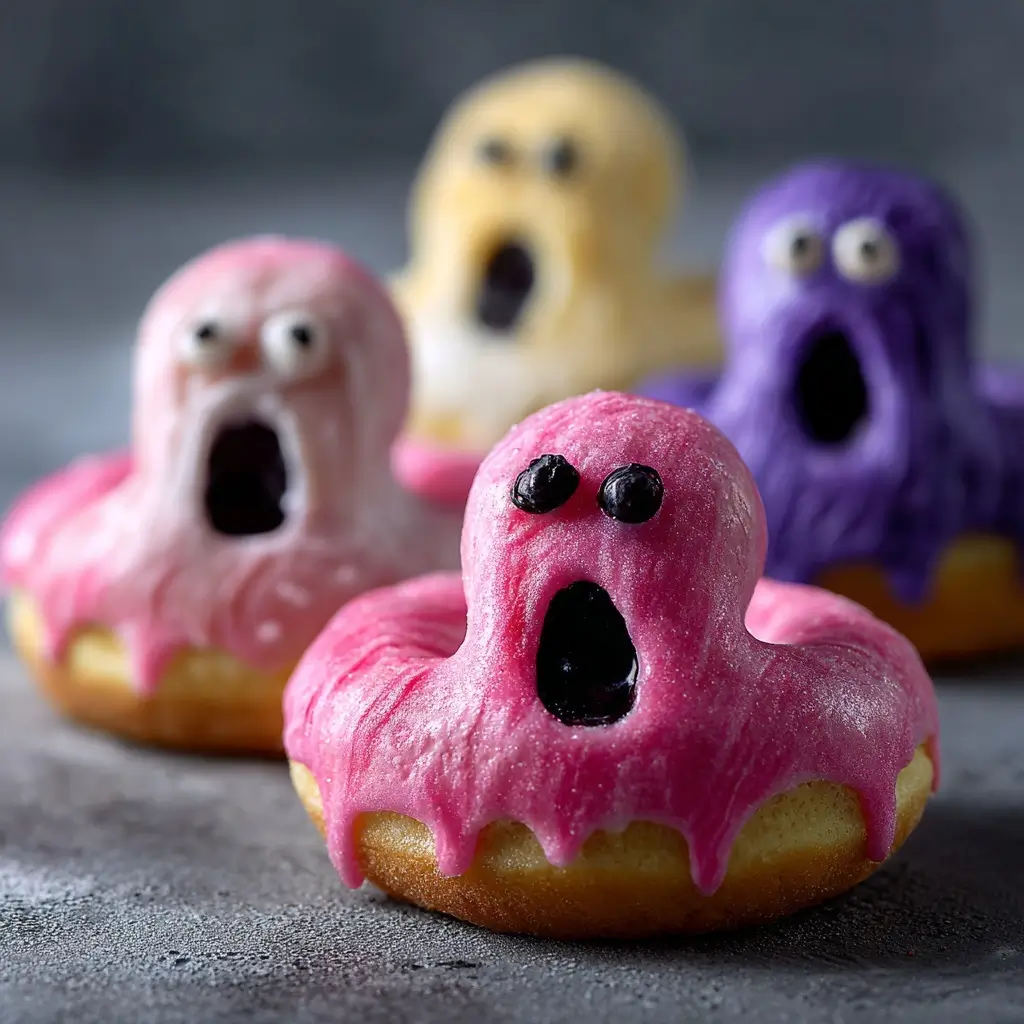
Screaming Ghost Donuts: A Spooktacular Halloween Treat
When the autumn leaves fall and the nights grow longer, there’s no better way to celebrate the spooky spirit than with a batch of Screaming Ghost Donuts. These whimsical, eerie-sweet delights are not only a feast for the eyes but also a delicious indulgence that brings joy to kids and adults alike. Perfect for Halloween parties, haunted house events, or just a fun family baking afternoon, these donuts transform classic pastries into playful specters straight out of a cartoon graveyard. With their fluffy texture, ghostly white glaze, and hauntingly cute expressions, Screaming Ghost Donuts are guaranteed to be the talk of your next ghoulish gathering.
The History of Screaming Ghost Donuts
While donuts themselves have a long and rich history—originating in Dutch settlers’ “olykoeks” (oily cakes) in early America—the concept of themed, character-based donuts is a relatively modern twist. The rise of social media, food artistry, and seasonal celebrations like Halloween has given birth to creative dessert designs that blend storytelling with flavor. Screaming Ghost Donuts emerged as part of this culinary trend in the early 2010s, popularized by bakeries and home bakers looking to capture the playful side of Halloween.
Inspired by classic cartoon ghosts like Casper and the more comically terrified spirits from shows like “Scooby-Doo,” these donuts evolved from simple powdered sugar-dusted treats into fully decorated confections with expressive faces. The “screaming” aspect adds drama and humor—wide-open mouths, wide eyes, and wavy edges mimicking fluttering sheets make them appear mid-ghostly wail. Over time, bakers began incorporating edible markers, fondant features, and flavored glazes, turning them into both a visual and gastronomic experience. Today, Screaming Ghost Donuts are a staple on Pinterest boards, Instagram feeds, and at festive Halloween tables across the country.
Ingredients Breakdown: What Makes These Ghosts So Delicious?
The magic of Screaming Ghost Donuts lies not just in their appearance but in the carefully selected ingredients that create a tender, airy donut base paired with a smooth, sweet glaze. Here’s a detailed look at each component:
- All-Purpose Flour: Provides the structure for the donuts. It contains moderate protein levels, ensuring a soft crumb without toughness.
- Baking Powder & Baking Soda: These leavening agents help the donuts rise beautifully during frying, giving them that signature lightness.
- Sugar: Granulated sugar adds sweetness and helps with browning during frying. Some recipes use brown sugar for a hint of molasses depth.
- Salt: Balances the sweetness and enhances overall flavor complexity.
- Nutmeg (optional): A pinch adds warmth and pairs wonderfully with vanilla and dairy.
- Eggs: Bind the ingredients together and contribute richness and color to the donut.
- Butter (unsalted): Adds moisture and a luxurious mouthfeel. Melted and cooled before use.
- Milk: Hydrates the dough and contributes tenderness. Whole milk is preferred for creaminess.
- Vanilla Extract: Enhances sweetness and adds aromatic depth.
- Vegetable Oil (for frying): Neutral-flavored oils like canola or sunflower work best—they don’t interfere with taste and maintain consistent heat.
- Powdered Sugar: The base of the glaze. Sifted finely to avoid lumps.
- Heavy Cream or Milk (for glaze): Thins the glaze to the perfect drizzling consistency.
- White Chocolate (optional): Used for detailing or extra richness in the coating.
- Fondant or Edible Markers: For creating expressive ghost faces—especially useful if you want precise, long-lasting details.
Each ingredient plays a role in balancing texture, flavor, and visual appeal, making these donuts as delightful to eat as they are to look at.
Step-by-Step Recipe: How to Make Screaming Ghost Donuts at Home
Ready to conjure up some kitchen magic? Follow this detailed guide to create your own batch of Screaming Ghost Donuts—from mixing the batter to decorating your spectral squad.
- Prepare Your Workspace: Gather all ingredients and equipment. You’ll need mixing bowls, a whisk, a spatula, a piping bag or resealable plastic bag, a deep fryer or heavy-bottomed pot, a slotted spoon, paper towels, and cooling racks.
- Make the Donut Batter: In a large bowl, sift together 2 cups all-purpose flour, 1 tablespoon baking powder, 1/4 teaspoon baking soda, 1/2 teaspoon salt, 1/4 teaspoon nutmeg (if using), and 1/2 cup granulated sugar. Whisk to combine.
- Add Wet Ingredients: In another bowl, beat 1 large egg, then mix in 1/4 cup melted unsalted butter, 1/2 cup warm milk, and 1 teaspoon vanilla extract. Pour this into the dry ingredients and stir until just combined. Do not overmix—it’s okay if there are small lumps. The batter should be thick but pipeable.
- Rest the Batter: Cover and let it rest for 15–20 minutes. This allows the flour to hydrate fully and improves texture.
- Heat the Oil: Pour 2–3 inches of vegetable oil into a deep, heavy pot. Heat over medium flame to 350°F (175°C). Use a candy thermometer for accuracy.
- Fill the Piping Bag: Transfer the batter to a piping bag fitted with a large round tip (about 1/2 inch). Alternatively, snip a corner off a resealable plastic bag.
- Fry the Donuts: Carefully pipe 2-inch circles of batter directly into the hot oil. Fry 2–3 at a time, depending on pot size. Cook for about 60–90 seconds per side, until golden brown. Flip gently with tongs or a slotted spoon.
- Cool Completely: Remove donuts and place on a wire rack over paper towels to drain excess oil. Let cool entirely before glazing—warm donuts will melt the coating.
- Prepare the Glaze: In a bowl, whisk 2 cups sifted powdered sugar with 3–4 tablespoons heavy cream or milk until smooth. Add 1/2 teaspoon vanilla extract. Adjust thickness: thicker for coating, thinner for drizzling.
- Dip and Coat: One by one, dip the top half of each cooled donut into the glaze. Allow excess to drip off, then place glazed-side-up on a clean rack.
- Create the Ghost Faces: While the glaze is still wet, use black icing (made from powdered sugar, water, and food coloring), edible markers, or small pieces of black fondant to draw wide eyes and open-mouth screams. Get creative—some ghosts look surprised, others terrified!
- Let Set: Allow the glaze to harden completely, about 15–20 minutes. For faster setting, place in the refrigerator briefly.
- Serve and Enjoy: Arrange on a platter, perhaps with dry ice fog for dramatic effect, and serve immediately.
Pro Tips for Perfect Screaming Ghost Donuts
- Temperature Control: Keep oil between 345°F and 355°F. Too hot = burnt outside, raw inside. Too cool = greasy, soggy donuts.
- Don’t Overmix: Overworking the batter develops gluten, leading to tough donuts. Mix until just combined.
- Use a Template: Print or draw a 2-inch circle on paper and place under parchment to guide consistent sizing when piping.
- Double Glaze for Opacity: If the donut color shows through, let the first layer dry, then dip again for a pure white finish.
- Edible Eyes Hack: Use mini chocolate chips or black sesame seeds for instant eyes if drawing freehand feels intimidating.
- Kid-Friendly Decorating: Set up a “ghost station” with different icing colors, sprinkles, and tools so children can personalize their own screaming spirits.
- Avoid Crowding: Fry in small batches to maintain oil temperature and even cooking.
- Gluten-Free Option: Substitute with a 1:1 gluten-free flour blend and add 1/2 teaspoon xanthan gum for structure.
- Vegan Twist: Replace egg with flax egg (1 tbsp ground flax + 3 tbsp water), use plant-based milk and butter, and ensure powdered sugar is bone-char-free.
Variations and Customizations: Haunt Your Own Way
Once you’ve mastered the classic Screaming Ghost Donut, the spectral possibilities are endless! Try these fun twists to keep your Halloween menu fresh and exciting:
- Rainbow Ghosts: Tint the glaze with vibrant food gels and give each ghost a colorful hue—perfect for Pride-themed Halloween events or joyful gatherings.
- Chocolate-Covered Ghosts: After glazing, dip half the donut in melted dark, milk, or white chocolate. Add sprinkles before it sets.
- Stuffed Surprise Ghosts: Inject the center with fillings like vanilla custard, raspberry jam, or peanut butter using a bismark tip before glazing.
- Mini Ghost Bites: Pipe smaller rounds (1 inch) for bite-sized treats ideal for parties or treat bags.
- Glow-in-the-Dark Effect: Use UV-reactive edible dust or paint and display under black light for an otherworldly glow.
- Spooky Flavors: Infuse the batter with pumpkin spice, orange zest, or espresso for seasonal flair.
- Decorated Themes: Turn ghosts into specific characters—add hats, capes, or names like “Boo,” “Moanica,” or “Howlin’ Hank.”
- No-Fry Oven Version: Bake the batter in mini donut pans at 350°F for 8–10 minutes, then glaze. Less traditional, but easier and healthier.
- Cookie Cutter Shapes: Roll out dough and cut into ghost silhouettes with a knife or cutter for flat, cookie-style ghosts.
- Interactive Donuts: Attach googly eyes with toothpicks or edible glue for movable features—great for photo ops!
Health Considerations and Nutritional Value
Screaming Ghost Donuts are undeniably a treat, best enjoyed in moderation. However, understanding their nutritional profile can help you make informed choices—especially when serving children or guests with dietary needs.
Nutritional Breakdown (per average-sized donut, approx. 3 oz / 85g):
- Calories: ~280–320
- Total Fat: 12–15g (mostly from frying oil and butter)
- Saturated Fat: 4–6g
- Cholesterol: ~35mg
- Sodium: 180–220mg
- Total Carbohydrates: 45–50g
- Sugars: 25–30g (primarily from glaze and added sugar)
- Protein: 3–4g
Health Notes:
- High in Refined Sugars: The glaze and batter contain significant added sugars. Consider using monk fruit-sweetened powdered sugar alternatives or reducing sugar content slightly in the recipe.
- Fried Food Concerns: Deep-frying increases fat and calorie content. For a lighter version, try air-fried donuts (using spray oil and a donut mold) or baked versions.
- Allergens: Contains common allergens: wheat (gluten), eggs, dairy, soy (in some oils). Always label clearly if serving at events.
- Dietary Modifications: Gluten-free, vegan, and lower-sugar options are available with ingredient swaps. Just be mindful of texture changes.
- Portion Control: Serve smaller mini donuts to reduce calorie intake while maintaining fun factor.
Full Ingredient List
Makes approximately 12–15 Screaming Ghost Donuts
Dough:
- 2 cups (250g) all-purpose flour (or GF blend)
- 1 tbsp baking powder
- 1/4 tsp baking soda
- 1/2 tsp salt
- 1/4 tsp ground nutmeg (optional)
- 1/2 cup (100g) granulated sugar
- 1 large egg, room temperature
- 1/4 cup (60ml) whole milk (or non-dairy alternative)
- 1/4 cup (60g) unsalted butter, melted and cooled
- 1 tsp vanilla extract
Glaze:
- 2 cups (240g) powdered sugar, sifted
- 3–4 tbsp heavy cream or milk
- 1/2 tsp vanilla extract
Decoration:
- Black gel food coloring or edible ink marker
- OR pre-made black icing in a squeeze bottle
- OR small pieces of black fondant
- Optional: edible glitter, sprinkles, or colored sugars
Frying:
- Vegetable, canola, or sunflower oil (enough for 2–3 inches in pot)
Detailed Directions
Follow these instructions carefully for perfectly shaped, evenly cooked, and beautifully decorated Screaming Ghost Donuts.
- Combine Dry Ingredients: In a large mixing bowl, sift together flour, baking powder, baking soda, salt, nutmeg, and granulated sugar. Whisk thoroughly to distribute leavening agents evenly.
- Mix Wet Ingredients: In a separate bowl, whisk the egg lightly. Add cooled melted butter, warm milk, and vanilla extract. Stir until smooth and emulsified.
- Form the Batter: Gradually pour the wet mixture into the dry ingredients. Gently fold with a spatula until just combined. Lumps are acceptable; overmixing will result in dense donuts.
- Rest the Batter: Cover the bowl with a clean kitchen towel or plastic wrap. Let sit at room temperature for 15–20 minutes. This relaxes the gluten and improves rise.
- Heat the Oil: Pour oil into a deep, heavy pot (Dutch oven works well). Heat over medium until it reaches 350°F (175°C). Use a thermometer to monitor—this is crucial for consistent results.
- Prepare Piping Setup: Transfer batter to a piping bag fitted with a 1/2-inch round tip. If you don’t have one, use a resealable plastic bag and snip a 1/2-inch opening from one corner.
- Fry the Donuts: Once oil is ready, carefully pipe 2-inch diameter circles directly into the oil. Cut the batter with scissors or a knife as you pipe. Fry 2–3 donuts at a time. Cook 60–90 seconds per side, flipping once, until golden brown. Avoid overcrowding.
- Drain and Cool: Use a slotted spoon to transfer donuts to a wire rack set over paper towels. Let cool completely—about 20–30 minutes. Warm donuts will cause glaze to slide off.
- Make the Glaze: In a medium bowl, sift powdered sugar. Add 3 tablespoons of cream and vanilla. Whisk until smooth. Add more cream, 1/2 tsp at a time, until it reaches a thick but drippy consistency.
- Glaze the Donuts: Dip the top half of each donut into the glaze, allowing excess to drip back into the bowl. Place glazed-side-up on a clean wire rack.
- Decorate Immediately: Before the glaze sets, use black icing, edible markers, or fondant to draw wide-open screaming mouths and large, panicked eyes. Be expressive—each ghost should have its own personality!
- Set and Serve: Allow 15–20 minutes for the glaze to harden. For a glossy finish, avoid refrigeration unless necessary. Serve fresh for best texture.
Frequently Asked Questions (FAQ)
Q: Can I bake these instead of frying?
A: Yes! Pipe or spoon the batter into greased or lined mini donut pans. Bake at 350°F for 8–10 minutes. Cool, then glaze. Texture will be more muffin-like, but still tasty.
Q: How do I store Screaming Ghost Donuts?
A: Best eaten within 24 hours. Store in an airtight container at room temperature for up to 2 days. Avoid stacking to prevent smudging decorations.
Q: Can I freeze them?
A: Yes! Freeze unglazed donuts in a single layer, then transfer to a freezer bag. Thaw, warm slightly, glaze, and decorate. Do not freeze after glazing.
Q: Why did my donuts come out greasy?
A: Likely due to oil temperature being too low. Maintain 350°F consistently. Also, allow proper draining time on paper towels.
Q: Can I make the batter ahead of time?
A: Yes, refrigerate for up to 24 hours. Let it warm to room temperature before piping for best texture.
Q: Are these safe for kids to eat?
A: Absolutely! Just supervise younger children due to choking risk from hard glaze. Use food-safe markers and avoid small, detachable decorations.
Q: Can I use a donut maker?
A: Yes! Fill each cavity halfway and cook according to manufacturer instructions. Then glaze and decorate.
Q: How can I make them less sweet?
A: Reduce sugar in the batter by 1–2 tbsp and use a thinner glaze with less powdered sugar. Add a pinch of sea salt on top for balance.
Summary
Screaming Ghost Donuts are a playful, delicious Halloween treat that combines fluffy fried donuts with eerie white glaze and hilarious ghostly faces—perfect for spreading spooky cheer. Easy to customize and fun for all ages, they’re guaranteed to haunt your holiday menu in the best way possible.