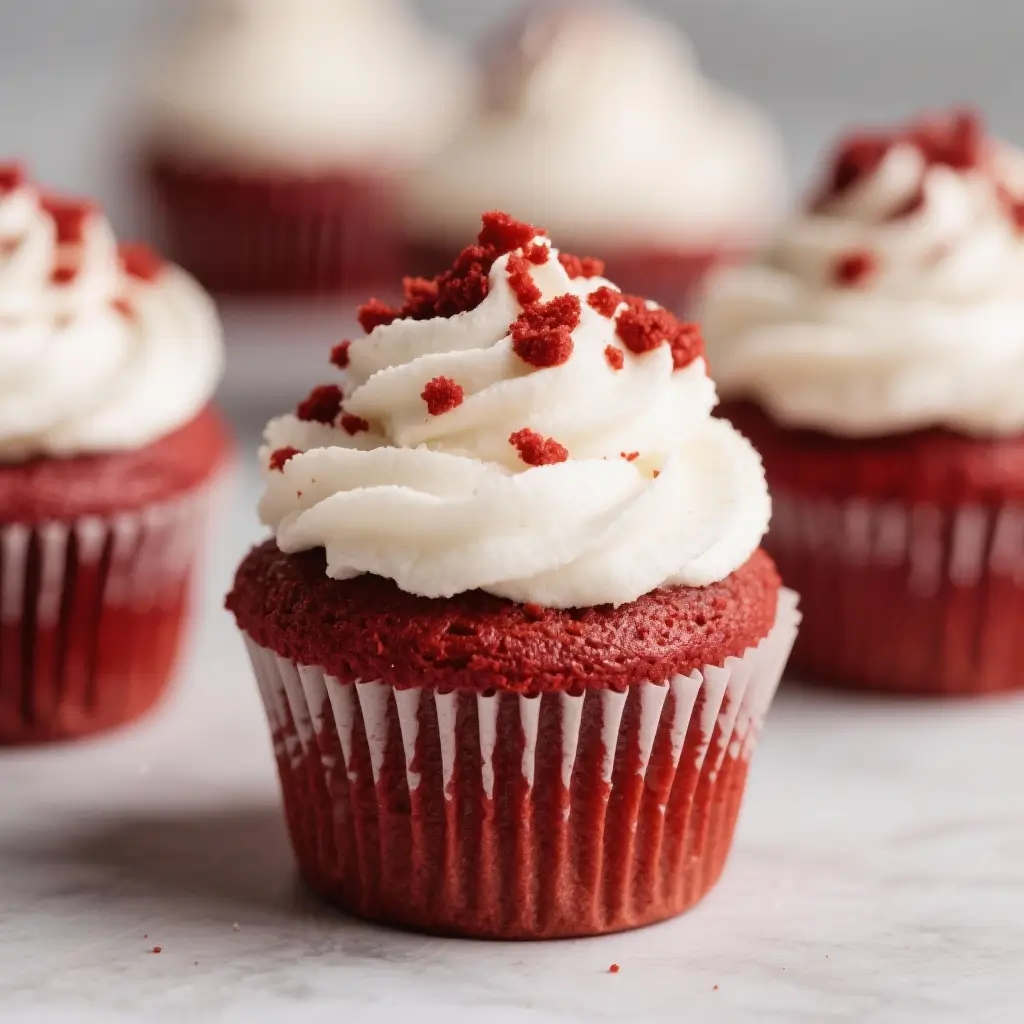
Red Velvet Cupcakes: A Classic Southern Delight
Red Velvet Cupcakes are a beloved dessert that combines the elegance of a classic cake with the convenience and charm of individual servings. With their striking red hue, soft crumb, and creamy frosting, these cupcakes have become a staple at celebrations ranging from birthdays to weddings. Their rich history, balanced flavor profile, and eye-catching appearance make them a favorite among bakers and dessert lovers alike. In this comprehensive guide, we’ll dive deep into everything you need to know about Red Velvet Cupcakes—from their mysterious origins to the perfect recipe, variations, health considerations, and expert tips to ensure baking success every time.
The History of Red Velvet Cupcakes
The origins of Red Velvet Cupcakes trace back to the early 20th century in the American South, particularly in regions like Louisiana and Texas. The term “velvet” referred to the fine, soft texture of the cake, which was achieved through the use of cocoa powder and buttermilk. The red color, however, has a more complex story. Originally, the slight reddish tint came from an unalkalized form of cocoa powder, which is naturally acidic and reacts with other ingredients—especially vinegar or buttermilk—to create a rusty red hue. This natural chemical reaction gave rise to what would later be known as “red velvet.”
The legend of the Waldorf-Astoria Hotel in New York City further popularized the dessert in the mid-1900s. According to popular lore, a guest fell in love with the hotel’s red velvet cake, requested the recipe, and was later charged for it. When she received the bill, she angrily sent copies of the recipe to everyone she knew, leading to widespread distribution. While this tale may be more myth than fact, it underscores the allure and mystique surrounding the cake.
The modern version of Red Velvet Cupcakes gained national attention when food companies began promoting recipes using red food coloring to enhance the vibrant look. During the Great Depression and World War II, red dye became a way to make cakes appear richer and more luxurious despite ingredient shortages. Today, Red Velvet Cupcakes are a symbol of celebration, sophistication, and Southern hospitality, enjoyed year-round across the United States and around the world.
Ingredients Breakdown: What Makes Red Velvet Special?
The magic of Red Velvet Cupcakes lies in the careful balance of ingredients that contribute to their unique flavor, texture, and color. Here’s a detailed breakdown:
- All-Purpose Flour: Provides structure to the cupcakes. It contains gluten, which forms a network that traps air and gives the cupcakes their rise and tender crumb.
- Cocoa Powder (Unsweetened): Adds a subtle chocolate flavor without overpowering the cake. It also contributes to the slightly acidic environment needed for the color reaction.
- Baking Soda & Baking Powder: Work together as leavening agents. Baking soda reacts with the acid in buttermilk and vinegar to produce carbon dioxide, helping the cupcakes rise. Baking powder provides additional lift.
- Salt: Enhances flavor and balances sweetness.
- Granulated Sugar: Sweetens the cupcakes and helps retain moisture. It also aids in browning during baking.
- Butter (Unsalted): Adds richness, tenderness, and flavor. Creaming butter with sugar incorporates air into the batter, contributing to a light texture.
- Eggs: Provide structure, moisture, and help emulsify the ingredients. They also contribute to leavening and golden color.
- Buttermilk: A key ingredient that adds tanginess and moisture. Its acidity activates the baking soda and enhances the red color when combined with cocoa.
- Vinegar (White or Apple Cider): Boosts the acidity of the batter, reacting with baking soda for extra rise and intensifying the red hue.
- Vanilla Extract: Enhances overall flavor and adds aromatic depth.
- Red Food Coloring (Liquid or Gel): Gives the cupcakes their signature crimson shade. While historically derived from natural reactions, today’s bright red comes primarily from food dye. Gel coloring is preferred for deeper color with less liquid.
- Cream Cheese Frosting Ingredients (Cream Cheese, Butter, Powdered Sugar, Vanilla): The classic pairing for red velvet, offering a tangy contrast to the sweet, soft cake.
This precise combination creates a cupcake that is moist, slightly tangy, delicately chocolate-infused, and visually stunning.
Step-by-Step Recipe: How to Make Perfect Red Velvet Cupcakes
Follow this detailed recipe to bake bakery-quality Red Velvet Cupcakes at home. Yield: 24 standard cupcakes
Ingredients
- 2 ½ cups (315g) all-purpose flour
- 1 ½ cups (300g) granulated sugar
- 1 tsp baking soda
- 1 tsp salt
- 2 tbsp unsweetened cocoa powder
- 1 ½ cups (360ml) vegetable oil or melted unsalted butter (cooled)
- 1 cup (240ml) buttermilk, room temperature
- 2 large eggs, room temperature
- 2 tsp vanilla extract
- 1 tbsp white vinegar or apple cider vinegar
- 1 – 2 tbsp red food coloring (gel recommended for intense color)
Cream Cheese Frosting
- 8 oz (225g) full-fat cream cheese, softened
- ½ cup (115g) unsalted butter, softened
- 4 cups (480g) powdered sugar, sifted
- 1 ½ tsp vanilla extract
- Pinch of salt
Directions
- Preheat Oven: Preheat your oven to 350°F (175°C). Line two 12-cup muffin tins with paper liners.
- Mix Dry Ingredients: In a medium bowl, whisk together flour, sugar, cocoa powder, baking soda, and salt until well combined.
- Combine Wet Ingredients: In a large mixing bowl or stand mixer fitted with a paddle attachment, combine oil (or cooled melted butter), buttermilk, eggs, vanilla, vinegar, and red food coloring. Mix on medium speed until smooth and emulsified.
- Incorporate Dry into Wet: Gradually add the dry ingredients to the wet mixture, mixing on low speed just until combined. Do not overmix—this can lead to dense cupcakes.
- Fill Cupcake Liners: Divide the batter evenly among the 24 cupcake liners, filling each about ⅔ full to allow room for rising.
- Bake: Bake for 18–22 minutes, or until a toothpick inserted into the center comes out clean or with a few moist crumbs.
- Cool: Allow cupcakes to cool in the pans for 5 minutes, then transfer them to a wire rack to cool completely before frosting.
- Prepare Frosting: While cupcakes cool, beat cream cheese and butter together on medium speed until smooth and fluffy (about 2 minutes). Gradually add powdered sugar, one cup at a time, mixing well after each addition. Add vanilla and salt, and beat until creamy and spreadable.
- Frost: Once cupcakes are completely cool, pipe or spread frosting generously on top using a piping bag with a star tip or offset spatula.
- Serve or Store: Serve immediately or refrigerate until ready to serve. Bring to room temperature before serving for best texture.
Tips for Baking the Best Red Velvet Cupcakes
- Use Room Temperature Ingredients: Cold eggs or buttermilk can cause the batter to curdle or result in uneven baking. Allow all refrigerated ingredients to sit out for 30–60 minutes before starting.
- Don’t Overmix: Overmixing develops gluten, leading to tough cupcakes. Mix only until ingredients are incorporated.
- Choose Gel Food Coloring: Gel colors are more concentrated and won’t alter the consistency of your batter like liquid dyes can.
- Measure Flour Correctly: Spoon flour into your measuring cup and level it off with a knife. Scooping directly from the bag compacts the flour, resulting in dry cupcakes.
- Avoid Overbaking: Check cupcakes at the 18-minute mark. Overbaking leads to dryness.
- Cool Completely Before Frosting: Warm cupcakes will melt the frosting and create a messy appearance.
- Chill Frosted Cupcakes: For cleaner piping and set frosting, chill cupcakes for 15–20 minutes after frosting.
- Use Buttermilk Substitute if Needed: No buttermilk? Mix 1 cup milk with 1 tbsp lemon juice or vinegar and let sit for 5–10 minutes.
Variations and Customizations
Red Velvet Cupcakes are incredibly versatile. Here are some creative ways to customize them:
- Mini or Giant Cupcakes: Adjust baking time accordingly—mini cupcakes take 10–12 minutes; jumbo ones may need 25–30 minutes.
- Gluten-Free: Substitute all-purpose flour with a 1:1 gluten-free baking blend. Ensure cocoa powder and food coloring are certified gluten-free.
- Dairy-Free: Use dairy-free butter, coconut oil, almond milk + vinegar (for buttermilk substitute), and vegan cream cheese for frosting.
- Less Sugar: Reduce sugar by ¼ cup in the batter and use low-sugar cream cheese and powdered erythritol in the frosting.
- Nutty Twist: Add chopped pecans or walnuts to the batter or as a garnish on top.
- Stuffed Centers: Fill the center with cream cheese, raspberry jam, or chocolate ganache before baking.
- Flavor Infusions: Add orange zest, cinnamon, or espresso powder for a unique twist.
- Colored Frosting: Tint frosting different shades for themed parties—pink for Valentine’s Day, green for St. Patrick’s, etc.
- Cookie Dough Topping: Place a small ball of edible cookie dough on top before baking for a gooey surprise.
- Alcohol-Infused: Add a splash of bourbon or Kahlua to the batter for an adult version.
Health Considerations and Nutritional Value
While undeniably delicious, Red Velvet Cupcakes are a treat best enjoyed in moderation. Here’s a nutritional overview per cupcake (including frosting):
- Calories: ~350–400 kcal
- Fat: 18–22g (mostly from butter, oil, and cream cheese)
- Saturated Fat: 8–10g
- Carbohydrates: 45–50g
- Sugars: 30–35g (high due to both cake and frosting)
- Protein: 3–4g
- Sodium: ~250–350mg
Health Notes:
- High in added sugars and saturated fats, which should be limited in a balanced diet.
- Low in fiber, vitamins, and essential nutrients.
- Can be modified for dietary needs—gluten-free, dairy-free, lower-sugar versions exist.
- Portion control is key. Consider making mini cupcakes to reduce serving size.
- Pair with fresh fruit or a side salad to balance a dessert-heavy meal.
- Not suitable for those with egg, dairy, or wheat allergies unless substituted carefully.
Frequently Asked Questions (FAQ)
Q: Why are my Red Velvet Cupcakes dry?
A: Overbaking, too much flour, or overmixing the batter are common causes. Measure flour correctly and check for doneness early.
Q: Can I make the batter ahead of time?
A: It’s not recommended. Letting the batter sit can deflate air bubbles and affect rise. Bake immediately after mixing.
Q: Why use both baking soda and baking powder?
A: Baking soda reacts with acid (buttermilk/vinegar), while baking powder provides additional lift. Together, they ensure a light, fluffy texture.
Q: Can I freeze Red Velvet Cupcakes?
A: Yes! Freeze unfrosted cupcakes in an airtight container for up to 3 months. Thaw at room temperature and frost before serving.
Q: Is red food coloring safe?
A: Most commercial dyes are FDA-approved. However, some people prefer natural alternatives like beet juice or red beet powder, though the color may be less vibrant.
Q: Can I use cake flour instead of all-purpose?
A: Yes, cake flour will yield a softer, more delicate crumb. Replace all-purpose flour with cake flour in a 1:1 ratio.
Q: Why did my cupcakes sink in the middle?
A: Possible reasons include underbaking, opening the oven door too early, too much leavening, or overfilling the liners.
Q: Can I make this into a cake?
A: Absolutely! Pour the batter into two 9-inch round pans and bake for 25–30 minutes at 350°F.
Summary
Red Velvet Cupcakes are a timeless dessert that blends rich cocoa, tangy buttermilk, and a hint of acidity to create a uniquely soft and flavorful treat, crowned with luscious cream cheese frosting. Whether you’re baking for a special occasion or simply indulging in a sweet craving, this classic recipe delivers elegance, taste, and visual appeal in every bite.