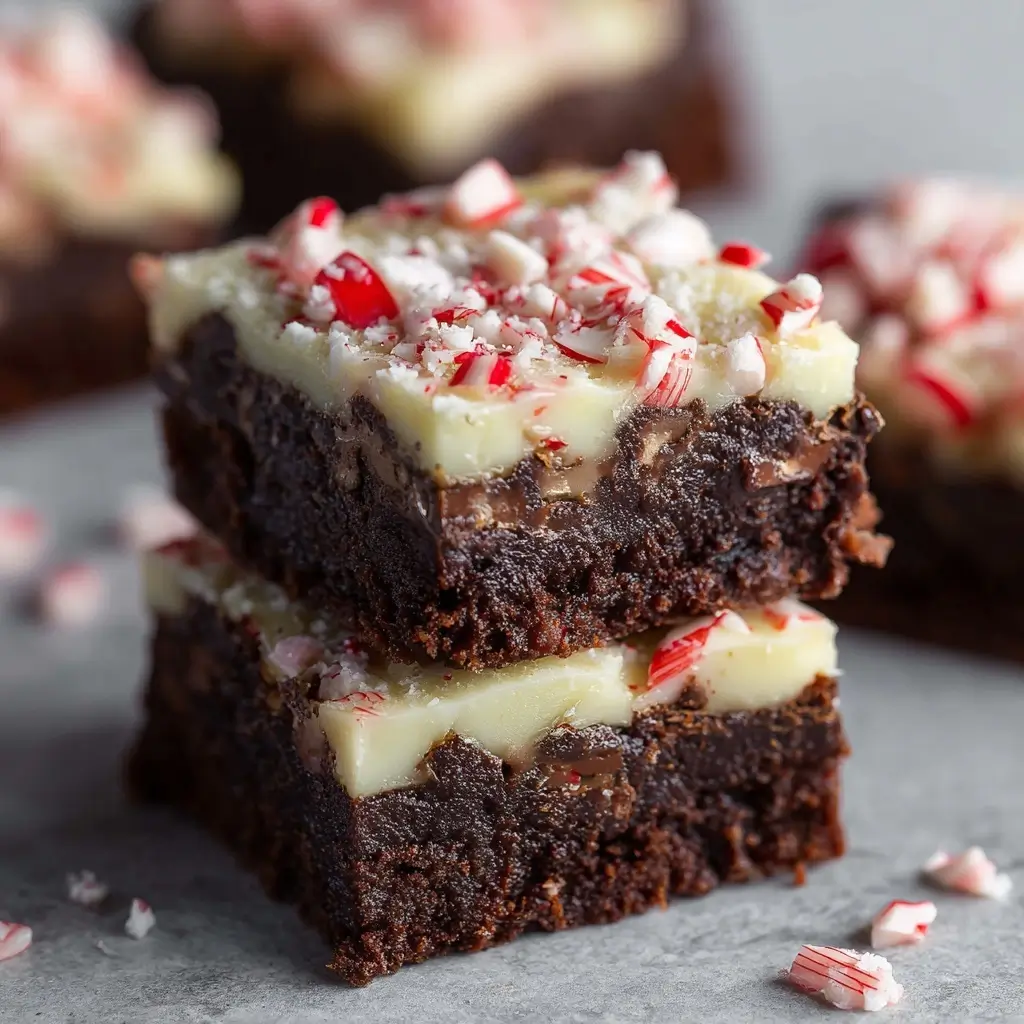
Peppermint Bark Brownies: A Festive Twist on a Classic Treat
Indulge in the rich, chocolatey decadence of brownies with a cool, minty twist—Peppermint Bark Brownies are the ultimate holiday dessert that combines fudgy cocoa-laden brownies with layers of creamy white chocolate and crushed candy canes. Whether you’re baking for a festive gathering, holiday party, or just craving a sweet treat with seasonal flair, these brownies deliver an irresistible blend of textures and flavors. With their deep dark chocolate base, snowy white chocolate topping, and vibrant red speckles from crushed peppermint, they’re as visually stunning as they are delicious.
The History Behind Peppermint Bark and Brownies
Peppermint bark, a beloved holiday confection, traces its roots back to the 1990s when it was popularized by gourmet chocolatiers like Williams Sonoma. This simple yet elegant treat typically consists of layers of dark or milk chocolate and white chocolate, topped with crushed peppermint candies. Its refreshing mint-chocolate flavor quickly became a staple during the winter season.
Brownies, on the other hand, have a longer culinary history dating back to the late 19th century in the United States. First appearing in cookbooks around the 1890s, brownies were designed to be a dense, fudgy alternative to cake, often enhanced with walnuts or chocolate chips. Over time, bakers began experimenting with mix-ins and toppings, leading to creative variations like the now-iconic Peppermint Bark Brownies—a modern fusion that marries two classic desserts into one sensational treat.
Ingredients Breakdown: What Makes These Brownies Irresistible?
The magic of Peppermint Bark Brownies lies in their layered ingredients, each contributing to the final taste, texture, and visual appeal:
- Dark Chocolate: Provides a deep, rich cocoa flavor and forms the foundation of the fudgy brownie base.
- Butter: Adds moisture and richness, helping create that melt-in-your-mouth texture.
- Sugar: Granulated sugar sweetens the batter while aiding in achieving a crackly top.
- Eggs: Bind the ingredients together and contribute to structure and lift.
- Vanilla Extract: Enhances overall flavor and adds warmth to the chocolate notes.
- Flour: All-purpose flour gives the brownies slight structure without making them cakey.
- Cocoa Powder: Intensifies the chocolate flavor for a truly indulgent experience.
- Salt: Balances sweetness and enhances all the other flavors.
- White Chocolate: Melted and spread over the cooled brownies, it creates a smooth, creamy layer reminiscent of traditional peppermint bark.
- Peppermint Extract (optional): Amplifies the mint flavor for those who love a stronger cool sensation.
- Candy Canes or Peppermint Candies: Crushed and sprinkled on top, they add crunch, festive color, and that signature wintery mint kick.
These ingredients work in harmony to create a dessert that’s both familiar and excitingly new.
Step-by-Step Recipe: How to Make Peppermint Bark Brownies
Follow this detailed guide to bake perfect Peppermint Bark Brownies every time:
- Preheat and Prepare: Preheat your oven to 350°F (175°C). Line an 8×8-inch or 9×9-inch baking pan with parchment paper, leaving an overhang on two sides for easy removal. Lightly grease the paper and sides of the pan.
- Melt Chocolate and Butter: In a medium heatproof bowl set over a pot of simmering water (double boiler method), melt 1 cup (about 6 oz) chopped dark chocolate and ½ cup (1 stick) unsalted butter. Stir frequently until smooth. Remove from heat and let cool slightly.
- Mix Wet Ingredients: Whisk in 1 cup granulated sugar and ¾ cup packed brown sugar into the melted chocolate mixture until well combined. Add 3 large eggs, one at a time, whisking thoroughly after each addition. Stir in 1 teaspoon vanilla extract and (optional) ¼ teaspoon peppermint extract.
- Add Dry Ingredients: Sift in ½ cup all-purpose flour, ⅓ cup cocoa powder, and ¼ teaspoon salt. Gently fold with a spatula until just combined. Do not overmix—this ensures fudgy brownies.
- Pour and Bake: Pour the batter into the prepared pan, spreading evenly with the spatula. Bake for 25–30 minutes (for 8×8) or 20–25 minutes (for 9×9), or until a toothpick inserted into the center comes out with moist crumbs—not wet batter. Avoid overbaking.
- Cool Completely: Allow the brownies to cool in the pan on a wire rack for at least 1 hour. Then, transfer to the refrigerator for 30–60 minutes to firm up.
- Prepare the Peppermint Bark Layer: In a microwave-safe bowl or using a double boiler, melt 1 cup high-quality white chocolate chips or chunks in 30-second intervals, stirring between each, until smooth. Stir in a pinch of salt to balance sweetness.
- Top the Brownies: Once the brownies are completely cool and firm, pour the melted white chocolate over the top. Use an offset spatula or the back of a spoon to spread it into an even layer.
- Crush and Sprinkle: Crush 4–6 candy canes (or peppermint candies) in a plastic bag using a rolling pin or mallet until coarsely broken. Immediately sprinkle the crushed peppermint over the white chocolate before it sets.
- Chill and Set: Refrigerate the brownies for at least 30 minutes to allow the white chocolate to harden completely.
- Cut and Serve: Using the parchment overhang, lift the brownies out of the pan. Place on a cutting board and slice into squares using a sharp knife wiped clean between cuts for neat edges.
Tips for Perfect Peppermint Bark Brownies
- Use High-Quality Chocolate: The flavor of your brownies hinges on the quality of chocolate used. Opt for real chocolate bars instead of lower-grade chips for richer taste.
- Don’t Overbake: For ultra-fudgy centers, remove the brownies from the oven when the center still looks slightly underdone. They continue cooking as they cool.
- Chill Before Cutting: Chilling helps achieve clean cuts and prevents crumbling, especially through the hard white chocolate layer.
- Crush Candy Canes Fresh: Crush right before adding to prevent moisture absorption and maintain crispness.
- Double the White Chocolate (Optional): For a thicker peppermint bark layer, increase the white chocolate to 1½ cups.
- Room Temperature Eggs: Using room-temperature eggs helps them incorporate better into the batter, reducing the risk of curdling.
- Even Spreading: Tap the pan gently on the counter after pouring the batter to eliminate air bubbles and ensure an even surface.
Variations and Customizations
Peppermint Bark Brownies are highly adaptable—here are some fun ways to switch things up:
- Gluten-Free Version: Substitute the all-purpose flour with a 1:1 gluten-free baking flour blend. Ensure all other ingredients are certified gluten-free.
- Dairy-Free Option: Use dairy-free chocolate and vegan butter or coconut oil. Replace white chocolate with dairy-free alternatives available in stores.
- Double-Layer Chocolate: Add a middle layer of melted dark chocolate between the brownie and white chocolate for extra intensity.
- Swirl Technique: After pouring the white chocolate, drizzle with melted dark chocolate and use a toothpick to create marbled swirls.
- Nutty Crunch: Fold ½ cup chopped walnuts or pecans into the brownie batter before baking.
- Peppermint Infusion: Steep crushed candy canes in warm cream before mixing into white chocolate for deeper mint flavor.
- Seasonal Colors: Use green and red crushed candies for Christmas, pastel mints for Easter, or clear sparkling sugar for New Year’s elegance.
- Mini Muffin Tin Version: Bake in lined muffin tins for individual brownie bites—perfect for gift boxes!
Health Considerations and Nutritional Value
While Peppermint Bark Brownies are undeniably a treat, it’s helpful to understand their nutritional profile so you can enjoy them mindfully:
- Calories: One standard square (1/16 of a 9×9 pan) contains approximately 220–260 calories, depending on ingredient sizes and additions.
- Fat Content: Around 14–18g per serving, mostly from butter and chocolate. Using dark chocolate with higher cocoa content may offer more heart-healthy antioxidants.
- Sugar: Approximately 20–25g per serving. Consider reducing sugar by ¼ cup in the batter if desired, though this may affect texture.
- Protein & Fiber: Minimal amounts (2–3g protein, 1–2g fiber), unless nuts are added.
- Caffeine: Dark chocolate contains small amounts of caffeine (~20mg per serving), so sensitive individuals should consume in moderation.
To make a slightly healthier version:
- Use dark chocolate with 70%+ cocoa for less sugar and more flavonoids.
- Replace half the butter with unsweetened applesauce (though texture will be less fudgy).
- Opt for natural sweeteners like coconut sugar, though results may vary.
- Portion control is key—serve smaller squares with a dollop of whipped cream or alongside fresh berries.
Ingredients
Makes 16 servings
- 6 oz (1 cup) chopped dark chocolate (at least 60% cocoa)
- ½ cup (1 stick / 113g) unsalted butter
- 1 cup (200g) granulated sugar
- ¾ cup (150g) packed light brown sugar
- 3 large eggs, at room temperature
- 1 tsp pure vanilla extract
- ¼ tsp peppermint extract (optional, for enhanced mint flavor)
- ½ cup (60g) all-purpose flour
- ⅓ cup (30g) unsweetened cocoa powder
- ¼ tsp salt
- 1 cup (175g) high-quality white chocolate chips or chopped bar
- 4–6 candy canes or peppermint candies, crushed
Directions
- Preheat oven to 350°F (175°C). Line an 8×8-inch or 9×9-inch square baking pan with parchment paper and lightly grease.
- In a heatproof bowl over simmering water, melt dark chocolate and butter together. Stir until smooth. Remove from heat and let cool slightly.
- Whisk in granulated and brown sugars until combined. Add eggs one at a time, mixing well after each. Stir in vanilla and peppermint extract (if using).
- Sift in flour, cocoa powder, and salt. Fold gently until no dry streaks remain. Do not overmix.
- Pour batter into prepared pan and smooth the top. Bake 25–30 min (8×8) or 20–25 min (9×9) until a toothpick comes out with moist crumbs.
- Cool completely on a wire rack, then chill in the refrigerator for 30–60 minutes.
- Melt white chocolate in 30-second bursts, stirring until smooth. Spread evenly over cooled brownies.
- Immediately sprinkle crushed candy canes over the white chocolate.
- Refrigerate for 30 minutes until set. Lift out using parchment and cut into 16 squares.
- Serve chilled or at room temperature. Store in an airtight container.
FAQ
Can I make these brownies ahead of time?
Yes! Bake and assemble up to 3 days in advance. Store in the refrigerator in an airtight container. Bring to room temperature before serving for best texture.
How long do Peppermint Bark Brownies last?
They keep well for up to 5 days in the fridge or 2 weeks in the freezer. Layer between parchment paper to prevent sticking.
Can I freeze them?
Absolutely. Wrap individual brownies or the whole slab tightly in plastic wrap and foil. Thaw in the refrigerator overnight or at room temperature for 30 minutes.
Why did my white chocolate seize?
This happens when moisture gets into the chocolate. Always use dry utensils and bowls, and avoid steam when melting.
Can I use chocolate bars instead of chips?
Yes—and it’s actually recommended! Bars often contain more cocoa butter and provide a smoother melt.
What can I use instead of candy canes?
Crushed peppermint candies, wintergreen mints, or even colored rock candy work well. Avoid sticky or gummy candies.
Are these brownies naturally gluten-free?
No, but they can easily be made gluten-free with a 1:1 GF flour blend. Be sure all other ingredients are certified GF.
Summary
Peppermint Bark Brownies combine fudgy chocolate brownies with a creamy layer of white chocolate and festive crushed candy canes for a show-stopping holiday dessert. Easy to make and endlessly customizable, they’re a guaranteed crowd-pleaser at any winter celebration.