Painted Peonies Cascade Cake
Introduction
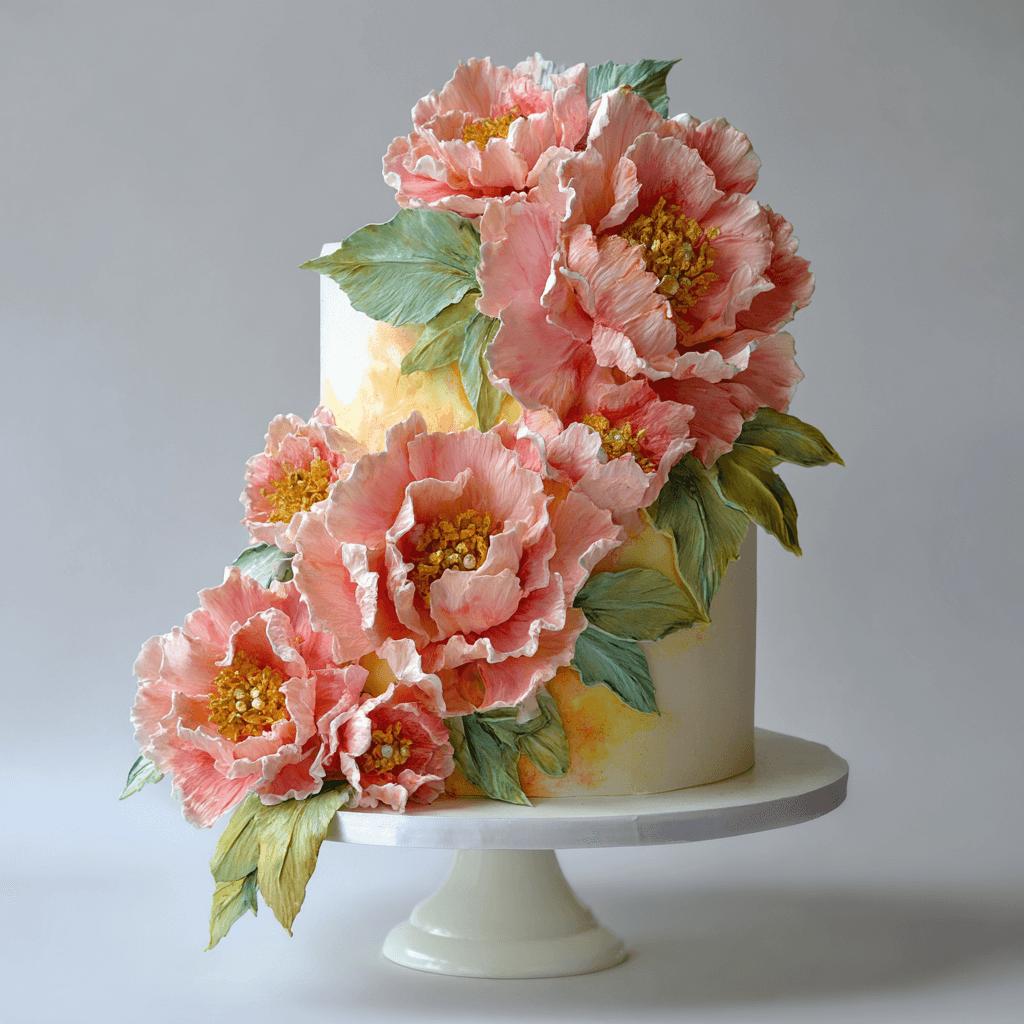
The Painted Peonies Cascade Cake is a breathtaking blend of artistry and indulgence. This cake isn’t just a dessert; it’s a statement piece, perfect for weddings, bridal showers, or any event that calls for elegance and sophistication. The cascading peony flowers painted in soft pastels and rich jewel tones make this cake look like a masterpiece straight out of an artist’s canvas. Whether you’re a professional baker or an ambitious home decorator, this guide will walk you through the entire process of creating your own edible work of art.
The History
Cake decorating has evolved significantly over the years, from simple sugar paste designs to intricate hand-painted florals and cascading arrangements. The cascade style of floral arrangement made its way into cake design from traditional bouquet styles, where flowers flow down the tiers in a natural, romantic manner. Peonies, with their lush blooms and soft edges, have become a favorite among modern decorators for their ability to convey both luxury and timelessness. The painted peonies technique adds another layer of realism and creativity, allowing bakers to mimic the delicate hues and gradients found in nature.
Ingredients Breakdown
- All-purpose flour – for structure
- Baking powder – to help the cake rise
- Unsalted butter – for richness and moisture
- Sugar – sweetness and texture
- Eggs – binding agent and leavening
- Milk – adds moisture and tenderness
- Vanilla extract – enhances flavor
- Food coloring (gel-based) – vibrant yet non-diluting
- Buttercream frosting – base for painting and shaping
- Fondant – for sculpting peonies and covering the cake
- Edible paint colors or airbrush colors – for realistic floral effects
- Flower-forming tools – ball tools, veiners, wire cutters, etc.
Step-by-Step Recipe
- Bake the cake layers: Prepare your favorite vanilla or red velvet cake batter. Bake each tier separately, ensuring even baking and cooling before assembly.
- Cover the cake with fondant: Once cooled, crumb coat with buttercream and then apply a smooth layer of white fondant on each tier.
- Prepare the floral palette: Tint fondant in shades of pink, coral, cream, and green for petals and leaves.
- Create the peonies: Use petal formers and shaping tools to mold each flower. Layer smaller petals inside larger ones to create fullness.
- Paint the flowers: With edible paints and fine brushes, add shading, highlights, and depth to each bloom.
- Assemble the cascade: Attach flowers using floral wire or toothpicks, starting from the top and letting them drape naturally down the cake.
- Add final touches: Dust with luster dust or pearl dust for a shimmering effect and secure the arrangement with edible glue if necessary.
Tips
- Use gel food coloring for deeper, more vivid colors without altering the fondant texture.
- Let painted flowers dry overnight before arranging to prevent smudging.
- Apply a light mist of water or edible glaze to give a dewy finish to petals.
- Use a variety of sizes and shades to add dimension and realism to the cascade.
- Practice petal shaping and painting techniques on test pieces before working on the actual cake.
Variations and Customizations
This cake can be customized to fit any theme or color scheme. Swap peonies for roses, hydrangeas, or even tropical flowers. You can also change the background fondant color for dramatic contrast or use metallic accents for a more opulent feel. For seasonal variations, consider adding berries and leaves in fall, or bright citrus blossoms in spring.
Health Considerations and Nutritional Value
While the Painted Peonies Cascade Cake is visually stunning, it’s important to note that it contains refined sugars, fats, and carbohydrates. A typical slice may range between 400–700 calories depending on the size and richness of the frosting and filling. To make it slightly healthier, consider using whole wheat pastry flour, coconut sugar, or reducing the amount of buttercream used. However, keep in mind that structural integrity and taste might be affected by such substitutions.
Ingredients
For the cake:
- 3 cups all-purpose flour
- 1 tbsp baking powder
- 1 cup unsalted butter, softened
- 2 cups granulated sugar
- 4 large eggs
- 1 cup whole milk
- 1 tsp vanilla extract
For the decorations:
- 2 lbs white fondant
- Gel food coloring (pink, coral, green, yellow)
- Buttercream frosting
- Edible paint colors (red, orange, green, etc.)
- Paintbrushes (food-safe)
- Floral wires and picks
- Petal dusts or luster dusts
Directions
- Make the cake: Preheat oven to 350°F (175°C). In a bowl, mix flour and baking powder. In another bowl, beat butter and sugar until fluffy. Add eggs one at a time, then mix in vanilla. Alternately add flour mixture and milk, beginning and ending with flour. Pour into prepared pans and bake until a toothpick comes out clean.
- Assemble the tiers: Stack and frost layers with buttercream. Chill assembled tiers before applying fondant.
- Cover with fondant: Roll out white fondant and cover each tier smoothly. Trim excess and ensure a neat finish.
- Shape the peonies: Roll small balls of tinted fondant, flatten into circles, and thin the edges with a ball tool. Layer petals and curl edges gently.
- Paint details: Using food-safe brushes, add gradients, shadows, and highlights to each petal.
- Arrange the cascade: Secure flowers with picks or wires and arrange them to cascade naturally down the sides of the cake.
FAQ
- Can I make this cake ahead of time?
Yes! Baked tiers can be made 1–2 days in advance and stored wrapped in plastic. Fondant-covered cakes should be decorated no more than 24 hours before serving to maintain freshness. - How do I store the cake after decorating?
Keep the cake in a cool, dry place away from direct sunlight. Refrigeration may cause condensation and damage the fondant. - Are the painted flowers edible?
Absolutely! All materials used are food-grade and safe to eat, though some may prefer removing the flowers before slicing the cake. - What if I don’t have edible paints?
You can use high-quality gel food coloring diluted with a bit of vodka or lemon extract to create custom shades for painting. - Can I use fresh flowers instead?
Fresh flowers can be used but must be wired and wrapped in floral tape to avoid direct contact with the cake. Ensure they are pesticide-free and non-toxic.
Summary
The Painted Peonies Cascade Cake is a show-stopping centerpiece that combines elegant cake design with lifelike floral artistry. It’s a celebration of beauty, skill, and creativity, perfect for making unforgettable memories.