Introduction
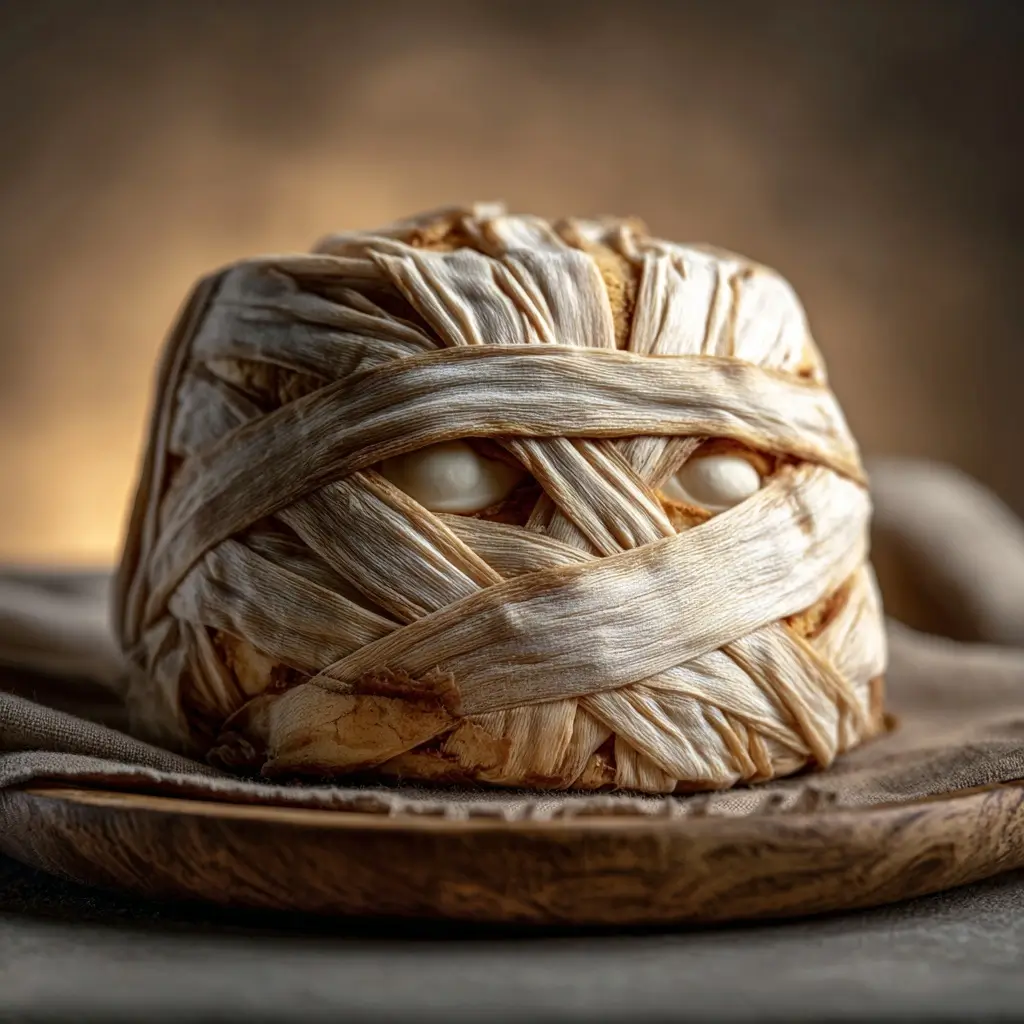
Mummy Wrapped Brie is a show-stopping appetizer that combines rich, creamy brie cheese with flaky, golden puff pastry in the shape of a spooky mummy—perfect for Halloween gatherings, holiday parties, or any festive occasion where you want to impress your guests with both flavor and fun. This dish gets its name from the pastry strips wrapped around the cheese, resembling ancient Egyptian mummy bandages, complete with “eyes” peeking through for a playful, eerie effect. Not only is it visually captivating, but the contrast between the warm, gooey melted brie and the crisp, buttery pastry creates an irresistible taste sensation. Whether you’re hosting a themed party or simply looking for a creative twist on classic baked brie, Mummy Wrapped Brie delivers elegance, whimsy, and deliciousness in one stunning package.
The History
While the exact origins of Mummy Wrapped Brie are difficult to trace, it is a modern culinary creation born from the tradition of baked brie en croute—a French dish where brie cheese is wrapped in puff pastry and baked until molten. Baked brie has long been a staple at dinner parties and holiday spreads, dating back to at least the 1970s in North America, when imported French cheeses became more widely available. The “mummy” version emerged as a seasonal twist, likely during the early 2000s, coinciding with the rise of Pinterest and food blogs that popularized themed, visually engaging recipes for holidays like Halloween. Creative home cooks began decorating baked brie with pastry strips and edible features to resemble mummies, drawing inspiration from horror films, children’s books, and pop culture. Over time, this playful presentation evolved into a beloved tradition, especially among families and hosts who enjoy combining cooking with seasonal festivities. Today, Mummy Wrapped Brie stands as a symbol of culinary creativity—where gourmet flavors meet whimsical presentation.
Ingredients Breakdown
The magic of Mummy Wrapped Brie lies in its simplicity and high-quality ingredients. Each component plays a vital role in achieving the perfect balance of texture and flavor:
- Brie Cheese: A round wheel of ripe brie (typically 8–10 oz) serves as the centerpiece. When baked, the cheese softens into a luxuriously creamy consistency with a mild, buttery, slightly nutty flavor that pairs beautifully with sweet and savory add-ons.
- Puff Pastry: Store-bought or homemade puff pastry provides the flaky, golden “bandages.” It puffs up during baking, creating airy layers that contrast wonderfully with the melted cheese. Thaw frozen pastry according to package instructions before use.
- Flour: Used lightly for dusting the work surface to prevent the pastry from sticking while rolling and cutting.
- Egg Wash: A mixture of beaten egg and a splash of water or milk brushed over the pastry before baking gives it a deep golden shine and helps the strips adhere.
- Toppings for “Eyes”: Miniature chocolate chips, black sesame seeds, olives, or even small pieces of dried fruit can be used to create the mummy’s eyes, adding a cute yet spooky detail.
- Optional Fillings/Enhancers: To elevate the flavor, many bakers add a layer of jam (such as fig, apricot, or cranberry), honey, chopped nuts, fresh herbs (like thyme or rosemary), garlic, or even cooked bacon or caramelized onions beneath the pastry or on top of the brie before wrapping.
These ingredients come together to form a harmonious blend of indulgence and artistry, making Mummy Wrapped Brie not just a dish, but an experience.
Step-by-Step Recipe
- Preheat the Oven: Begin by preheating your oven to 400°F (200°C). Line a baking sheet with parchment paper or a silicone baking mat to prevent sticking and ensure easy cleanup.
- Prepare the Brie: Remove the rind from the top of the brie wheel if desired (though it’s edible, some prefer a smoother melt). Place the brie on the prepared baking sheet. If using additional fillings, spread a thin layer of jam, drizzle honey, or sprinkle herbs and nuts over the top of the cheese now.
- Roll Out the Pastry: On a lightly floured surface, roll out the puff pastry into a rectangle large enough to comfortably wrap around the brie with some overlap. Aim for about 1/8-inch thickness to ensure even cooking.
- Cut the Strips: Using a sharp knife or pizza cutter, cut the pastry into long, even strips—approximately ½ inch wide and 6–8 inches long. You’ll need about 10–15 strips depending on the size of your brie and how densely you want to wrap it.
- Wrap the Brie: Begin laying the pastry strips vertically over the brie, spacing them evenly and pressing the ends gently onto the bottom of the cheese to secure. Then, wrap horizontal strips across to create a crisscross mummy effect. Leave a small opening at the top center for the “eyes” to peek through. Don’t worry if it’s not perfect—the rustic look adds charm!
- Seal and Trim: Tuck any loose ends underneath the brie and gently press to seal. Ensure the pastry is snug but not too tight, allowing room for expansion during baking.
- Egg Wash: In a small bowl, beat one egg with a tablespoon of water or milk. Lightly brush this egg wash over all exposed pastry surfaces for a glossy, golden finish.
- Add the Eyes: Press two small chocolate chips, sesame seeds, or olives into the uncovered center area to create the mummy’s eyes.
- Bake: Transfer the baking sheet to the preheated oven and bake for 20–25 minutes, or until the pastry is puffed, deeply golden brown, and fully cooked, and the brie inside is soft and oozing.
- Cool Slightly and Serve: Allow the Mummy Wrapped Brie to rest for 3–5 minutes after removing it from the oven. This helps stabilize the molten cheese for safer serving. Serve warm with crackers, sliced baguette, apple slices, or crostini for dipping.
Tips
- Chill the Brie Before Wrapping: For easier handling and cleaner cuts, chill the brie in the refrigerator for 15–20 minutes before assembling. This also helps maintain its shape during baking.
- Don’t Overfill: While it’s tempting to load the brie with extras, too many wet ingredients (like excessive jam or honey) can make the pastry soggy. Use a light hand to preserve flakiness.
- Use Sharp Tools: A sharp knife or pizza cutter ensures clean, even pastry strips without tearing.
- Even Spacing: Take time to space the pastry strips evenly for a symmetrical, professional-looking mummy wrap.
- Watch the Bake Time: Puff pastry can go from golden to burnt quickly. Keep a close eye during the final 5–10 minutes of baking.
- Serve Immediately: Mummy Wrapped Brie is best enjoyed fresh out of the oven when the cheese is perfectly melty and the pastry is crisp.
- Double Batch?: If serving a crowd, consider making two smaller mummies instead of one large one for easier sharing and faster baking.
- Leftover Storage: While leftovers are rare, store any uneaten portion in an airtight container in the refrigerator for up to 3 days. Reheat in a 350°F oven for 10–15 minutes to restore warmth and texture.
Variations and Customizations
Mummy Wrapped Brie is highly adaptable to different tastes, dietary needs, and occasions:
- Sweet Version: Spread a layer of fig jam or apricot preserves over the brie and drizzle with honey before wrapping. Top with chopped walnuts or pecans for crunch.
- Savory Version: Mix minced garlic, fresh thyme, and cracked black pepper into softened brie before wrapping. Add crispy bacon bits or sun-dried tomatoes for a bold flavor punch.
- Spicy Kick: Add a pinch of cayenne pepper or a few drops of hot sauce to the cheese, or place thin jalapeño slices on top before wrapping.
- Festive Themes: Adapt the concept for other holidays—use red and green pastry strips for Christmas, heart-shaped cutouts for Valentine’s Day, or colorful sprinkles for birthday parties.
- Dietary Adjustments: Use vegan brie and plant-based puff pastry for a dairy-free version. Gluten-free puff pastry options are also available for those avoiding gluten.
- Mini Mummies: Use baby brie rounds or cambozola cheese and smaller pastry pieces to create individual servings—ideal for buffets or party trays.
- Herb-Crusted: Mix finely chopped rosemary, parsley, or chives into the egg wash for an aromatic, flavorful crust.
- Almond Joy Style: Use almond paste or marzipan instead of puff pastry for a nutty, chewy alternative (though not traditional, it offers a unique twist).
Health Considerations and Nutritional Value
Mummy Wrapped Brie is undeniably indulgent, so it’s best enjoyed in moderation as part of a balanced diet. Here’s a general nutritional breakdown per serving (assuming 6 servings from one wheel):
- Calories: ~300–400 kcal
- Fat: 25–30g (including saturated fat from cheese and buttery pastry)
- Carbohydrates: 20–25g (primarily from pastry)
- Protein: 8–10g (from cheese)
- Sodium: 400–600mg
Considerations:
- High in Saturated Fat: Both brie and puff pastry contain significant amounts of saturated fat. Opt for reduced-fat brie or whole-grain puff pastry (if available) to make it slightly healthier.
- Lactose Content: Brie contains lactose, which may be problematic for those with lactose intolerance. Lactose-free brie alternatives exist.
- Calorie Density: Due to the combination of cheese and butter-rich pastry, this dish is calorie-dense. Pair with fresh fruit, vegetables, or whole-grain crackers to add fiber and nutrients.
- Pregnancy Warning: Unpasteurized brie should be avoided during pregnancy due to the risk of listeria. Always check labels and use pasteurized cheese if needed.
- Allergens: Contains dairy, gluten, and eggs—common allergens. Be mindful when serving to guests with sensitivities.
To make a lighter version, consider using phyllo dough instead of puff pastry (lower in fat, though less flaky) or reducing the amount of added sugars and fats in toppings.
Ingredients
- 1 wheel of brie cheese (8–10 oz)
- 1 sheet of puff pastry (thawed if frozen)
- 1 tablespoon all-purpose flour (for dusting)
- 1 large egg (for egg wash)
- 1 tablespoon water or milk (for egg wash)
- 2 small chocolate chips, black sesame seeds, or olive slices (for eyes)
- Optional: 2 tablespoons fig jam, honey, chopped nuts, fresh herbs, garlic, or bacon
Directions
- Preheat oven to 400°F (200°C). Line a baking sheet with parchment paper.
- Place brie on the baking sheet. If using optional ingredients, add them on top of the brie now.
- On a floured surface, roll out puff pastry to a 10×10 inch square. Cut into ½-inch wide strips.
- Begin wrapping the brie with pastry strips vertically, then horizontally, leaving a small opening at the top for the eyes.
- Tuck ends under and press gently to secure. Brush entire surface with egg wash (egg + water/milk).
- Insert two “eyes” into the opening at the top.
- Bake for 20–25 minutes until pastry is golden brown and brie is soft and warm inside.
- Let cool for 3–5 minutes before serving with crackers, bread, or fruit.
FAQ
Can I make Mummy Wrapped Brie ahead of time?
Yes! Assemble the mummy-wrapped brie (without baking) up to 24 hours in advance, cover tightly, and refrigerate. Bake just before serving for the freshest results.
Can I freeze Mummy Wrapped Brie?
You can freeze the assembled (unbaked) version for up to 1 month. Place on a tray to freeze solid, then wrap in plastic. Bake from frozen, adding 5–10 minutes to the cook time.
What can I use instead of puff pastry?
Phyllo dough, crescent roll dough, or biscuit dough can be substituted, though textures will vary. Phyllo is crisp and light; crescent dough is softer and richer.
Why is my pastry soggy?
This usually happens if the brie is too soft or if wet ingredients (like excess jam) are used. Chill the brie before wrapping and use toppings sparingly.
Can I reheat leftover Mummy Wrapped Brie?
Yes. Reheat in a 350°F oven for 10–15 minutes until warmed through. Avoid microwaving, as it can make the pastry rubbery.
Is the rind on brie edible?
Absolutely. The white rind (Penicillium candidum) is safe and adds texture and earthy flavor. Remove only if preferred.
Can kids help make this?
Definitely! This recipe is family-friendly and great for involving children in cooking—especially the wrapping and adding the eyes.
Summary
Mummy Wrapped Brie is a deliciously decadent and visually enchanting appetizer that brings together creamy melted cheese and flaky golden pastry in a spooky, festive design perfect for Halloween or any celebration. Easy to customize and a guaranteed crowd-pleaser, it’s a recipe that blends gourmet taste with playful presentation.