Melt-in-Your-Mouth Peanut Butter Cookies
There’s something undeniably magical about the rich, nutty aroma of freshly baked peanut butter cookies wafting through the air. These melt-in-your-mouth peanut butter cookies are a timeless classic—soft, tender, and bursting with flavor in every bite. Whether you’re baking them for a family gathering, holiday celebration, or simply to satisfy a sweet craving, these cookies promise to deliver comfort and joy with each delicate crumble.
The History
Peanut butter cookies have deep roots in American culinary history, dating back to the early 20th century when peanut butter began gaining popularity as an affordable and nutritious food source. The invention of peanut butter is often credited to Dr. John Harvey Kellogg (yes, the cereal magnate) in the late 1800s, who used it as a protein-rich supplement for patients at his health sanitarium. As peanut butter became more accessible to households across America, home bakers started experimenting with ways to incorporate it into desserts.
The first known peanut butter cookie recipe appeared in a cookbook published in 1916, but the now-iconic fork-crossed pattern wasn’t standardized until later. During World War II, sugar and rationing restrictions led to simplified recipes, making peanut butter cookies even more popular due to their minimal ingredient list. By the 1960s, they had become a staple in American homes, celebrated for their ease of preparation and comforting taste. Today, they remain one of the most beloved cookie varieties worldwide—a testament to their enduring appeal and nostalgic charm.
Ingredients Breakdown
What makes these melt-in-your-mouth peanut butter cookies so irresistibly tender? It all comes down to the careful selection and balance of ingredients:
- Peanut Butter: Use creamy, unsweetened, and unsalted peanut butter for full control over flavor. Natural peanut butter works well too, though it may alter texture slightly due to oil separation.
- Butter: Unsalted butter ensures richness and helps create that soft, melt-away texture. Softened to room temperature for easy creaming.
- Sugars: A combination of granulated sugar and brown sugar adds sweetness while contributing to chewiness. Brown sugar brings moisture and a subtle caramel note.
- Eggs: Large eggs bind the dough together and add structure without making the cookies tough.
- Vanilla Extract: Pure vanilla enhances the overall flavor profile, rounding out the nuttiness of the peanut butter.
- Flour: All-purpose flour provides the necessary gluten structure. Sifted for lump-free mixing.
- Baking Soda: Acts as a leavening agent, giving the cookies a slight rise and airy crumb.
- Salt: Balances sweetness and intensifies the savory notes in the peanut butter.
Each ingredient plays a vital role in achieving the perfect balance between softness, flavor, and texture—making these cookies truly unforgettable.
Step-by-Step Recipe
- Preheat Oven: Begin by preheating your oven to 350°F (175°C). Line two large baking sheets with parchment paper or silicone baking mats to prevent sticking.
- Cream Butter and Sugars: In a large mixing bowl, beat together ½ cup (1 stick) of softened unsalted butter and ½ cup granulated sugar until light and fluffy, about 2–3 minutes. Add ½ cup packed brown sugar and continue beating until well combined.
- Incorporate Wet Ingredients: Add ½ cup creamy peanut butter to the butter-sugar mixture and beat on medium speed until fully incorporated and smooth. Scrape down the sides of the bowl as needed.
- Add Eggs and Vanilla: Beat in 1 large egg and 1 teaspoon of pure vanilla extract. Mix until the mixture is creamy and uniform in texture.
- Combine Dry Ingredients: In a separate bowl, whisk together 1¼ cups all-purpose flour, ½ teaspoon baking soda, and ¼ teaspoon salt. Ensure even distribution of leavening agents.
- Mix Dry into Wet: Gradually add the dry ingredients to the wet mixture, mixing on low speed just until the dough comes together. Do not overmix—this can lead to tough cookies.
- Chill Dough (Optional): For thicker cookies, cover the dough and refrigerate for 30–60 minutes. This step prevents excessive spreading during baking.
- Shape the Cookies: Scoop tablespoon-sized portions of dough and roll into smooth balls. Place them about 2 inches apart on the prepared baking sheets.
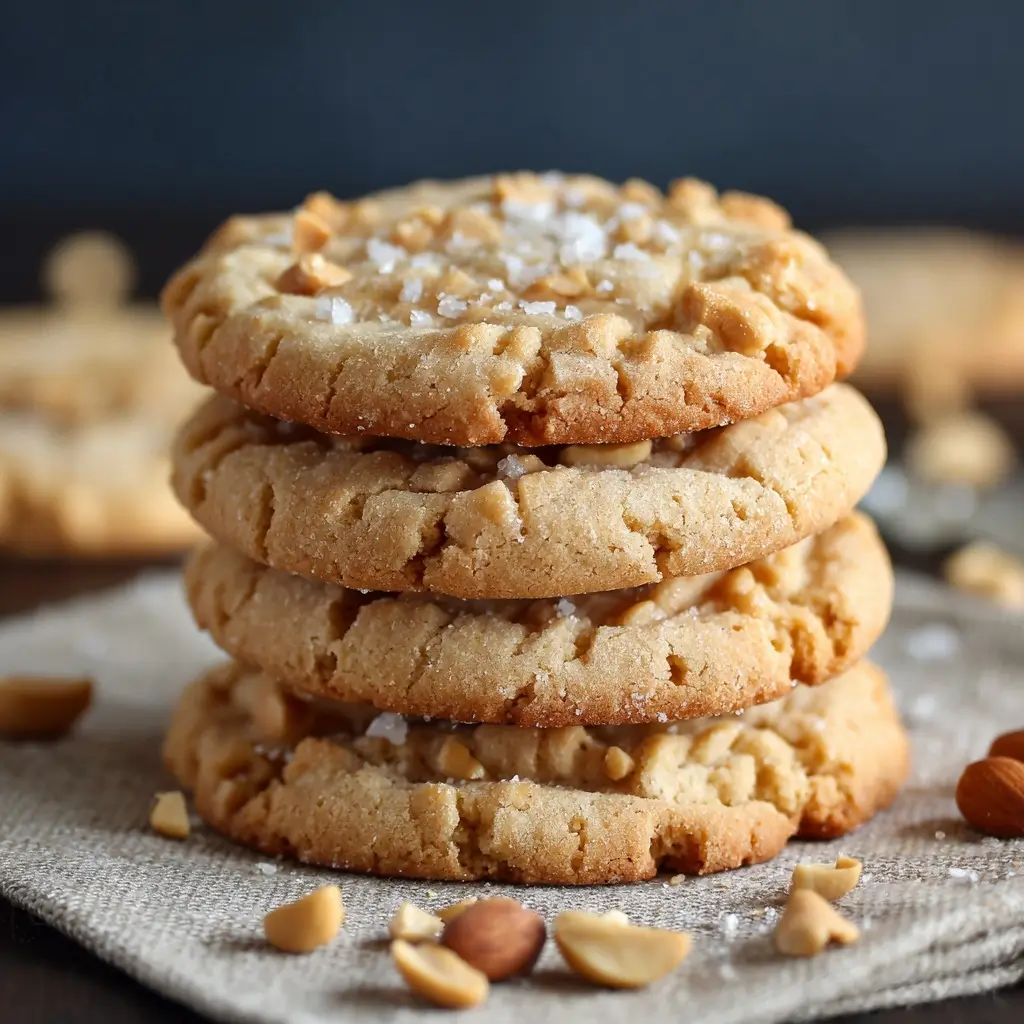
- Create Criss-Cross Pattern: Using a fork dipped in sugar (to prevent sticking), press down firmly on each ball to flatten it, creating a classic criss-cross design. You can rotate the fork 90 degrees after the first press for a traditional grid look.
- Bake: Bake in the preheated oven for 10–12 minutes, or until the edges are lightly golden but the centers still appear soft. Avoid overbaking for that signature melt-in-your-mouth texture.
- Cool: Let the cookies cool on the baking sheet for 5 minutes before transferring them to a wire rack to cool completely. They will firm up slightly as they cool.
Tips
- Use Room Temperature Ingredients: Cold butter or eggs can result in uneven mixing and dense cookies. Allow all refrigerated ingredients to sit out for at least 30 minutes before starting.
- Don’t Overbake: Remove the cookies from the oven when they’re still slightly underdone in the center. Residual heat will finish cooking them without drying them out.
- Press Firmly with Fork: To achieve the iconic criss-cross pattern, press the fork with confidence. If the dough sticks, dip the fork tines in granulated sugar between cookies.
- Uniform Sizing: Use a cookie scoop to ensure consistent size and even baking across all cookies.
- Rotate Baking Sheets: Halfway through baking, rotate the pan front to back for even browning, especially if your oven has hot spots.
- Store Properly: Keep cooled cookies in an airtight container at room temperature for up to 5 days. For longer storage, freeze the dough balls or baked cookies.
Variations and Customizations
While the classic version is divine on its own, feel free to get creative with these delicious twists:
- Chocolate Chip Peanut Butter Cookies: Fold in ¾ cup semi-sweet or milk chocolate chips for a decadent treat.
- Double Chocolate Peanut Butter Cookies: Replace 2 tablespoons of flour with unsweetened cocoa powder and add chocolate chips for a rich, fudgy variation.
- Reese’s Style: Press a mini peanut butter cup into the center of each dough ball before flattening with a fork.
- Honey-Sweetened: Substitute honey or maple syrup for part of the sugar, reducing liquid elsewhere accordingly.
- Gluten-Free: Swap all-purpose flour for a high-quality gluten-free flour blend. Add ¼ teaspoon xanthan gum if not included in the mix.
- Protein Boost: Add 1–2 tablespoons of powdered peanut butter (like PB2) for enhanced flavor and extra protein.
- Sea Salt Sprinkle: Finish warm cookies with a flake of sea salt to elevate the sweet-salty contrast.
- Spiced Version: Add ½ teaspoon cinnamon or a pinch of cayenne for warmth and complexity.
- Stuffed Cookies: Hide a small piece of chocolate bar, marshmallow, or jam inside the dough ball before shaping.
Health Considerations and Nutritional Value
While these cookies are undeniably indulgent, understanding their nutritional content can help you enjoy them mindfully:
Nutrition Facts (per cookie, based on 24 cookies per batch):
- Calories: ~120 kcal
- Total Fat: 7g (mostly healthy fats from peanut butter and butter)
- Saturated Fat: 3g
- Cholesterol: 18mg
- Sodium: 85mg
- Total Carbohydrates: 13g
- Dietary Fiber: 0.8g
- Sugars: 8g
- Protein: 2.5g
Health Notes:
- Peanut butter contributes heart-healthy monounsaturated fats and plant-based protein.
- Using natural peanut butter without added hydrogenated oils reduces trans fat intake.
- Opting for whole wheat flour increases fiber content.
- Reducing sugar by ¼ cup or using coconut sugar offers a lower glycemic option.
- These cookies contain gluten and dairy; suitable modifications exist for dietary needs.
- Enjoy in moderation as part of a balanced diet—perfect for satisfying sweet cravings without excess portion sizes.
Ingredients
- ½ cup (1 stick / 113g) unsalted butter, softened
- ½ cup granulated sugar
- ½ cup packed brown sugar
- ½ cup creamy peanut butter (unsweetened, unsalted preferred)
- 1 large egg
- 1 teaspoon pure vanilla extract
- 1¼ cups all-purpose flour (spooned and leveled)
- ½ teaspoon baking soda
- ¼ teaspoon salt
- Granulated sugar, for rolling (optional)
Directions
- Preheat oven to 350°F (175°C). Line baking sheets with parchment paper or silicone mats.
- In a large bowl, cream together softened butter, granulated sugar, and brown sugar until light and fluffy (about 2–3 minutes).
- Beat in peanut butter until smooth and fully combined.
- Add egg and vanilla extract; mix until incorporated.
- In a separate bowl, whisk together flour, baking soda, and salt.
- Gradually add dry ingredients to wet mixture, mixing on low speed just until dough forms. Do not overmix.
- (Optional) Chill dough for 30–60 minutes for thicker cookies.
- Roll dough into tablespoon-sized balls and place on baking sheet, spacing 2 inches apart.
- Dip a fork in sugar and press down on each ball to flatten, creating a criss-cross pattern.
- Bake for 10–12 minutes, until edges are lightly golden but centers remain soft.
- Let cool on baking sheet for 5 minutes, then transfer to wire rack to cool completely.
- Store in an airtight container at room temperature for up to 5 days.
FAQ
Q: Can I use crunchy peanut butter instead of creamy?
A: Absolutely! Crunchy peanut butter adds a delightful texture contrast. Just be aware that the final texture will be less uniformly soft.
Q: Why did my cookies spread too much?
A: Over-spreading can occur if the butter was too soft, the dough wasn’t chilled, or the oven temperature was too low. Try chilling the dough and ensuring accurate oven calibration.
Q: Can I make these cookies without eggs?
A: Yes, substitute the egg with ¼ cup unsweetened applesauce, mashed banana, or a flax egg (1 tbsp ground flaxseed + 3 tbsp water, let sit 5 mins).
Q: Can I freeze the cookie dough?
A: Yes! Portion the dough into balls and freeze on a tray. Once solid, transfer to a freezer bag. Bake from frozen, adding 1–2 minutes to baking time.
Q: Are these cookies gluten-free?
A: Not by default, but you can easily make them gluten-free using a 1:1 gluten-free flour blend.
Q: My cookies turned out hard—what went wrong?
A: Overbaking or overmixing the dough are common culprits. Always remove cookies when they still look slightly underdone in the center.
Q: Can I double the recipe?
A: Yes, this recipe scales well. Just make sure your mixer can handle the increased volume, and bake in batches to avoid overcrowding.
Summary
These melt-in-your-mouth peanut butter cookies are the ultimate blend of simplicity and indulgence—soft, rich, and perfectly balanced with a hint of sweetness and deep peanut flavor.
Baked to golden perfection with a signature criss-cross top, they’re destined to become your go-to recipe for cozy moments, gift-giving, and lifelong memories.