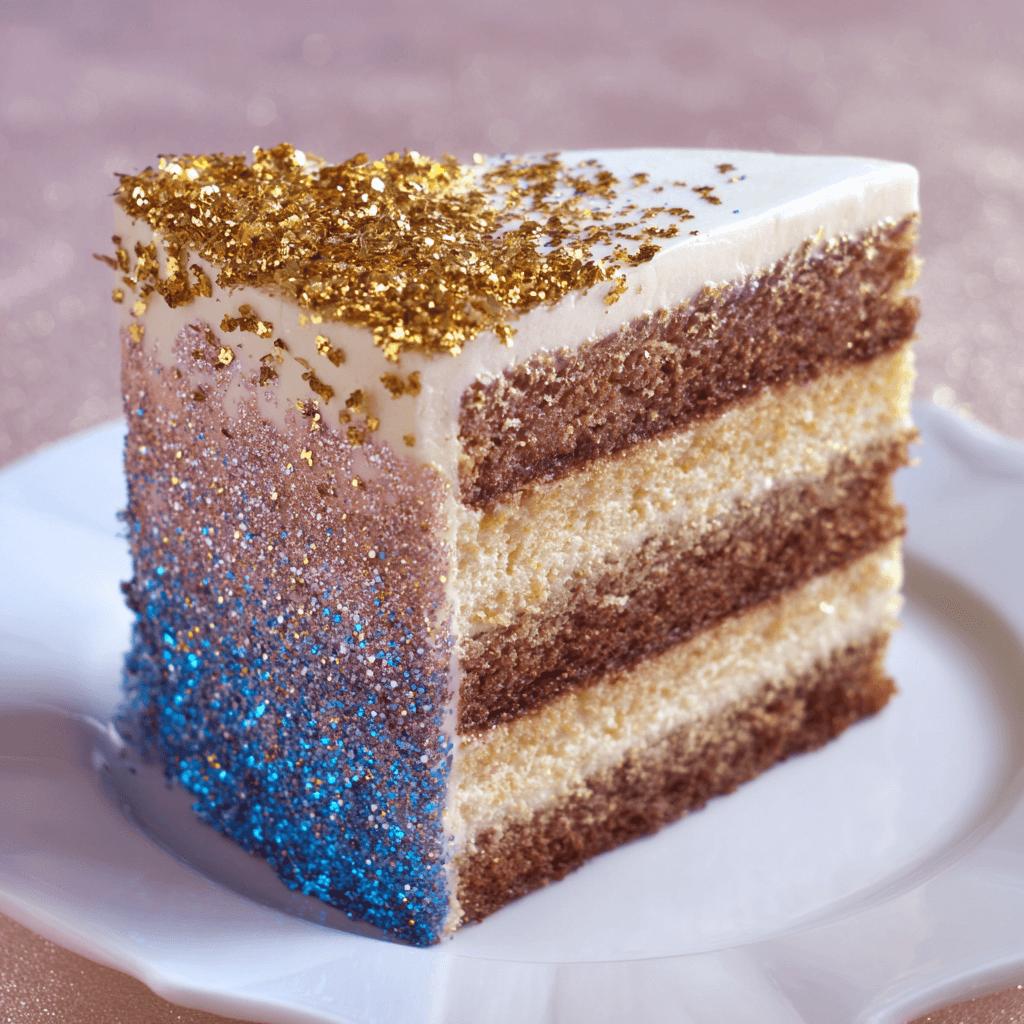
Glitter Ombre Celebration Cake
Introduction
The Glitter Ombre Celebration Cake is a dazzling centerpiece for any festive occasion. With its smooth gradient of colors and shimmering finish, it’s more than just a dessert—it’s a statement piece. Whether you’re celebrating a birthday, anniversary, graduation, or any milestone worth commemorating, this cake combines elegance with fun. The ombre effect creates a visual flow that draws the eye, while the edible glitter adds a magical sparkle. Perfect for those who love to impress guests with both flavor and flair, this cake will steal the show at your next event.
The History
Celebration cakes have been around for centuries, but the modern trend of colorful and glittery designs took off in the early 2010s, fueled by social media platforms like Pinterest and Instagram. The ombre technique, borrowed from fashion and hair design, was soon adopted by bakers looking to add dimension and drama to their creations. Edible glitter and metallic finishes became popular as edible art evolved into a form of high expression in baking. Today, the Glitter Ombre Celebration Cake represents the intersection of modern aesthetics and traditional baking, blending creativity and craftsmanship into one unforgettable dessert.
Ingredients Breakdown
- All-Purpose Flour: Provides structure to the cake layers.
- Baking Powder: Acts as a leavening agent for rise and lightness.
- Unsalted Butter: Adds richness and moisture.
- Granulated Sugar: Sweetens the batter and aids in texture.
- Eggs: Bind the ingredients together and contribute to a fluffy texture.
- Milk: Keeps the batter moist and tender.
- Vanilla Extract: Enhances flavor depth.
- Salt: Balances sweetness and enhances other flavors.
- Food Coloring (Gel): Creates vibrant ombre shades without altering consistency.
- Edible Glitter: Adds sparkle and shine to the final presentation.
- Buttercream Frosting: Base for coloring and texturing the ombre layers.
Step-by-Step Recipe
- Preheat oven to 350°F (175°C). Grease and flour three 8-inch round cake pans.
- In a medium bowl, sift together flour, baking powder, and salt. Set aside.
- In a large mixing bowl, beat butter and sugar until light and fluffy.
- Add eggs one at a time, mixing well after each addition. Stir in vanilla extract.
- Alternate adding dry ingredients and milk to the butter mixture, beginning and ending with dry ingredients.
- Distribute batter evenly into three bowls. Add food coloring to each bowl, creating a gradient—light, medium, and dark.
- Pour each color into prepared pans and bake for 25–30 minutes, or until a toothpick inserted comes out clean.
- Let cakes cool completely before frosting.
- Prepare buttercream frosting and divide into portions for coloring. Tint each to match the cake layers.
- Frost each layer, stacking them to create an ombre effect from bottom to top.
- Crumb coat the entire cake and chill for 15 minutes.
- Apply a final layer of frosting, smoothing the surface.
- Sprinkle edible glitter over the frosted cake, focusing on the top and sides for maximum impact.
- Refrigerate for at least 30 minutes before serving.
Tips
- Use gel-based food coloring for richer hues without affecting texture.
- For smoother gradients, blend frosting between shades slightly when applying.
- Chill cake layers before frosting to avoid crumbling or melting.
- Use a bench scraper or offset spatula for smooth frosting application.
- If using metallic glitters, test a small area first to ensure desired effect.
- Store leftovers covered in the refrigerator for up to 3 days.
- Allow cake to come to room temperature before serving for best flavor.
Variations and Customizations
- Flavor Variations: Try chocolate, lemon, red velvet, or strawberry bases instead of vanilla.
- Vegetarian/Vegan: Substitute eggs with flax or chia eggs, and use plant-based butter and milk.
- Gluten-Free: Replace all-purpose flour with a gluten-free flour blend and check all additives for gluten content.
- Layered Fillings: Add fruit preserves, ganache, or curd between layers for extra flavor.
- Theme-Based Decor: Match glitter colors to party themes—pastels for baby showers, bold hues for birthdays, or metallics for New Year’s.
- Mini Versions: Bake cupcakes or mini cakes with the same ombre and glitter effect for individual servings.
- Textured Finish: Use piping techniques to create glittery ruffles, swirls, or stars.
Health Considerations and Nutritional Value
This cake is rich in sugars and fats due to butter, sugar, and frosting, so it’s best enjoyed in moderation. A typical slice contains approximately 400–600 calories depending on portion size and frosting amount. For a healthier twist, consider substituting some sugar with natural sweeteners like honey or maple syrup, using low-fat dairy, and incorporating whole grain flour. Be mindful of artificial dyes and glitter; opt for all-natural or organic versions where possible, especially for children’s parties. Always check for allergens if serving guests with dietary restrictions.
Ingredients
- 2 and ½ cups all-purpose flour
- 2 and ½ tsp baking powder
- ½ tsp salt
- 1 cup unsalted butter, softened
- 2 cups granulated sugar
- 4 large eggs
- 1 cup milk
- 2 tsp vanilla extract
- Gel food coloring (in your chosen ombre palette)
- Edible glitter (silver, gold, or rainbow)
- Buttercream frosting (homemade or store-bought)
Directions
- Preheat oven to 350°F (175°C). Prepare three 8-inch round cake pans by greasing and flouring.
- In a bowl, sift together flour, baking powder, and salt.
- In another bowl, beat butter and sugar until creamy and light.
- Add eggs one by one, then mix in vanilla extract.
- Gradually alternate adding the dry ingredients and milk to the butter mixture, starting and ending with dry ingredients.
- Divide batter into three separate bowls. Add gel food coloring to each to create a gradient (e.g., pink to purple).
- Pour each colored batter into prepared pans and bake for 25–30 minutes or until a toothpick comes out clean.
- Let cakes cool completely on wire racks.
- Make or prepare buttercream frosting. Divide into three portions and tint to match cake layers.
- Stack and frost each layer, creating a seamless color transition.
- Apply a crumb coat and refrigerate for 15 minutes.
- Finish with a second, smoother layer of frosting.
- Sprinkle edible glitter generously over the top and sides of the cake.
- Chill for at least 30 minutes before slicing and serving.
FAQ
Q: Can I use liquid food coloring?
A: It’s not recommended, as it can thin the batter and affect the texture. Gel-based coloring works best.
Q: How do I store the cake overnight?
A: Cover the cake loosely with plastic wrap or place it in a cake dome and refrigerate. Let it sit at room temperature for 30 minutes before serving.
Q: What kind of glitter should I use?
A: Make sure to use edible glitter labeled as food-safe. Non-edible glitter may be harmful if consumed.
Q: Can I make this cake ahead of time?
A: Yes! You