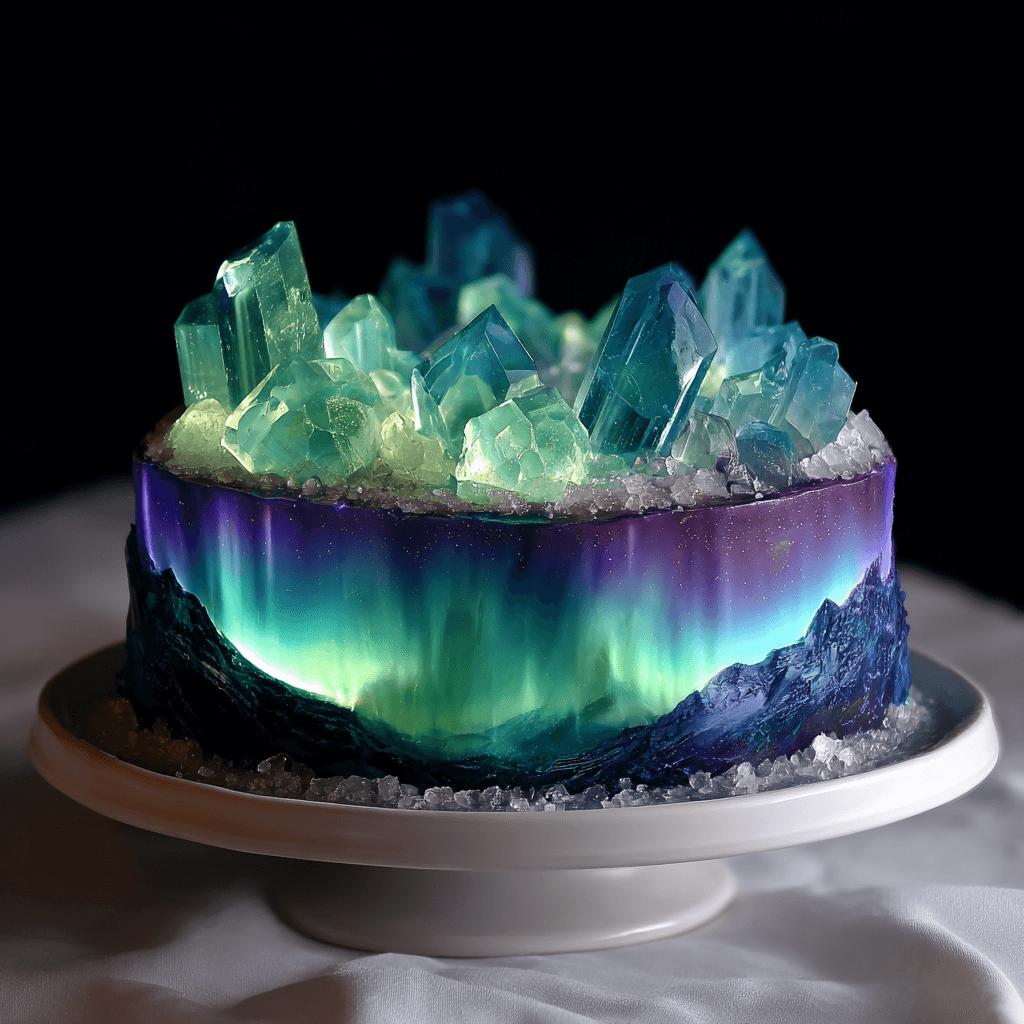
Frozen Aurora Borealis Cake: A Magical Dessert
The Frozen Aurora Borealis Cake is more than just a dessert — it’s a visual and sensory experience that brings the magic of the Northern Lights to your table. This stunning frozen cake captures the swirling colors of the aurora borealis in layers of vibrant, creamy textures, perfect for special occasions, parties, or even as a centerpiece for a winter-themed celebration. Whether you’re a seasoned baker or a curious beginner, this recipe promises to impress both with its appearance and flavor.
A Brief History of the Concept
While the Frozen Aurora Borealis Cake may seem like a modern creation, it builds on the tradition of frozen desserts that date back centuries. From Italian gelato to American icebox cakes, freezing ingredients to create layered, chilled delights has always been a popular technique. The inspiration for the “Aurora Borealis” theme comes from the natural phenomenon known as the Northern Lights — ethereal ribbons of light dancing across polar skies. Bringing that beauty into dessert form is a way to celebrate nature through culinary artistry.
Ingredients Breakdown
- Graham cracker crust: Provides a sturdy base and classic texture.
- Cream cheese: Adds richness and a slight tanginess to balance the sweetness.
- Whipped topping (like Cool Whip): Keeps the dessert light and airy while allowing it to freeze well.
- Sweetened condensed milk: Acts as a binder and sweetener without adding unnecessary moisture.
- Food coloring (blue, green, purple, pink): Creates the vivid aurora effect.
- Optional add-ins: Chopped white chocolate, crushed peppermint, or edible glitter for extra sparkle.
Step-by-Step Recipe
- Prepare the crust: Crush graham crackers and mix with melted butter. Press firmly into the bottom of a lined loaf pan or springform pan.
- Mix the cream cheese layer: Beat softened cream cheese until smooth. Fold in a few tablespoons of whipped topping to lighten the mixture before folding in the rest.
- Add sweetened condensed milk: Gradually incorporate the sweetened condensed milk to bind everything together.
- Create colored layers: Divide the mixture into separate bowls and tint each one with different food coloring shades representing the aurora lights.
- Pour layers carefully: Pour each color slowly and strategically into the pan, using a spoon to gently swirl them together for an organic look.
- Freeze thoroughly: Cover and freeze for at least 6 hours, preferably overnight.
- Serve with flair: Remove from the pan, slice, and serve immediately to enjoy the full visual effect.
Professional Tips
- Use gel-based food coloring instead of liquid for more vibrant hues without thinning the mixture.
- Let the cake sit out for about 10 minutes before slicing for cleaner cuts.
- To prevent freezer burn, wrap tightly in plastic wrap or store in an airtight container.
- For a smoother texture, ensure all ingredients are at room temperature before mixing.
Variations and Customizations
- Chocolate version: Add cocoa powder to one layer for dark sky contrast.
- Fruit twist: Layer in pureed berries for natural color and flavor.
- Alcohol-infused: Add a splash of vanilla, almond extract, or even liqueurs like blue curaçao.
- Theme variations: Make it galaxy-themed with black backgrounds and metallic stars, or ocean-inspired with blues and greens.
Health Considerations and Nutritional Value
This cake is rich and indulgent, so moderation is key. Each serving contains a combination of fats, sugars, and proteins, primarily from dairy and sweeteners. For healthier alternatives:
- Use low-fat cream cheese and reduced-sugar sweetened condensed milk.
- Opt for fat-free whipped topping.
- Try alternative crusts made from oats or almond flour for gluten-free versions.
- Consider natural sweeteners like stevia if reducing sugar content.
Ingredients List
- 1 ½ cups graham cracker crumbs
- 6 tbsp unsalted butter, melted
- 8 oz cream cheese, softened
- 1 cup sweetened condensed milk
- 2 cups whipped topping, thawed
- Gel food coloring (green, blue, purple, pink)
- Optional: Edible glitter, chopped white chocolate, sprinkles
Directions
- Combine graham cracker crumbs and melted butter; press into a loaf pan or 7-inch springform pan.
- Beat cream cheese until smooth. Gently fold in half of the whipped topping until fully incorporated.
- Add sweetened condensed milk slowly, mixing until blended.
- Fold in remaining whipped topping until light and fluffy.
- Divide mixture into 4 bowls; add different colors to each and stir lightly to create marbled effects.
- Pour each color into the pan, alternating and swirling gently with a toothpick or knife.
- Cover and freeze for at least 6 hours or overnight.
- Remove from pan, slice, and serve frozen.
Frequently Asked Questions
Can I make this ahead of time?
Absolutely! This cake can be made up to 3 days in advance and stored in the freezer until ready to serve.
What if I don’t have a springform pan?
You can use a regular loaf pan or even a rectangular dish lined with parchment paper for easy removal.
How do I avoid icy crystals forming?
Ensure the cake is tightly wrapped or covered with plastic wrap directly touching the surface before freezing.
Is there a vegan option?
Yes! Substitute cream cheese with vegan cream cheese, use coconut whipped topping, and a vegan graham cracker crust.
Can I use fresh whipped cream instead of whipped topping?
You can, but note that fresh whipped cream may lose volume when folded in. Stabilize it with a bit of powdered sugar or cornstarch for better results.
Summary
The Frozen Aurora Borealis Cake is a visually stunning, creamy, and dreamy dessert that captures the enchanting beauty of the Northern Lights in every bite. Perfect for celebrations, holidays, or anytime you want to bring a touch of magic to your kitchen.