Introduction
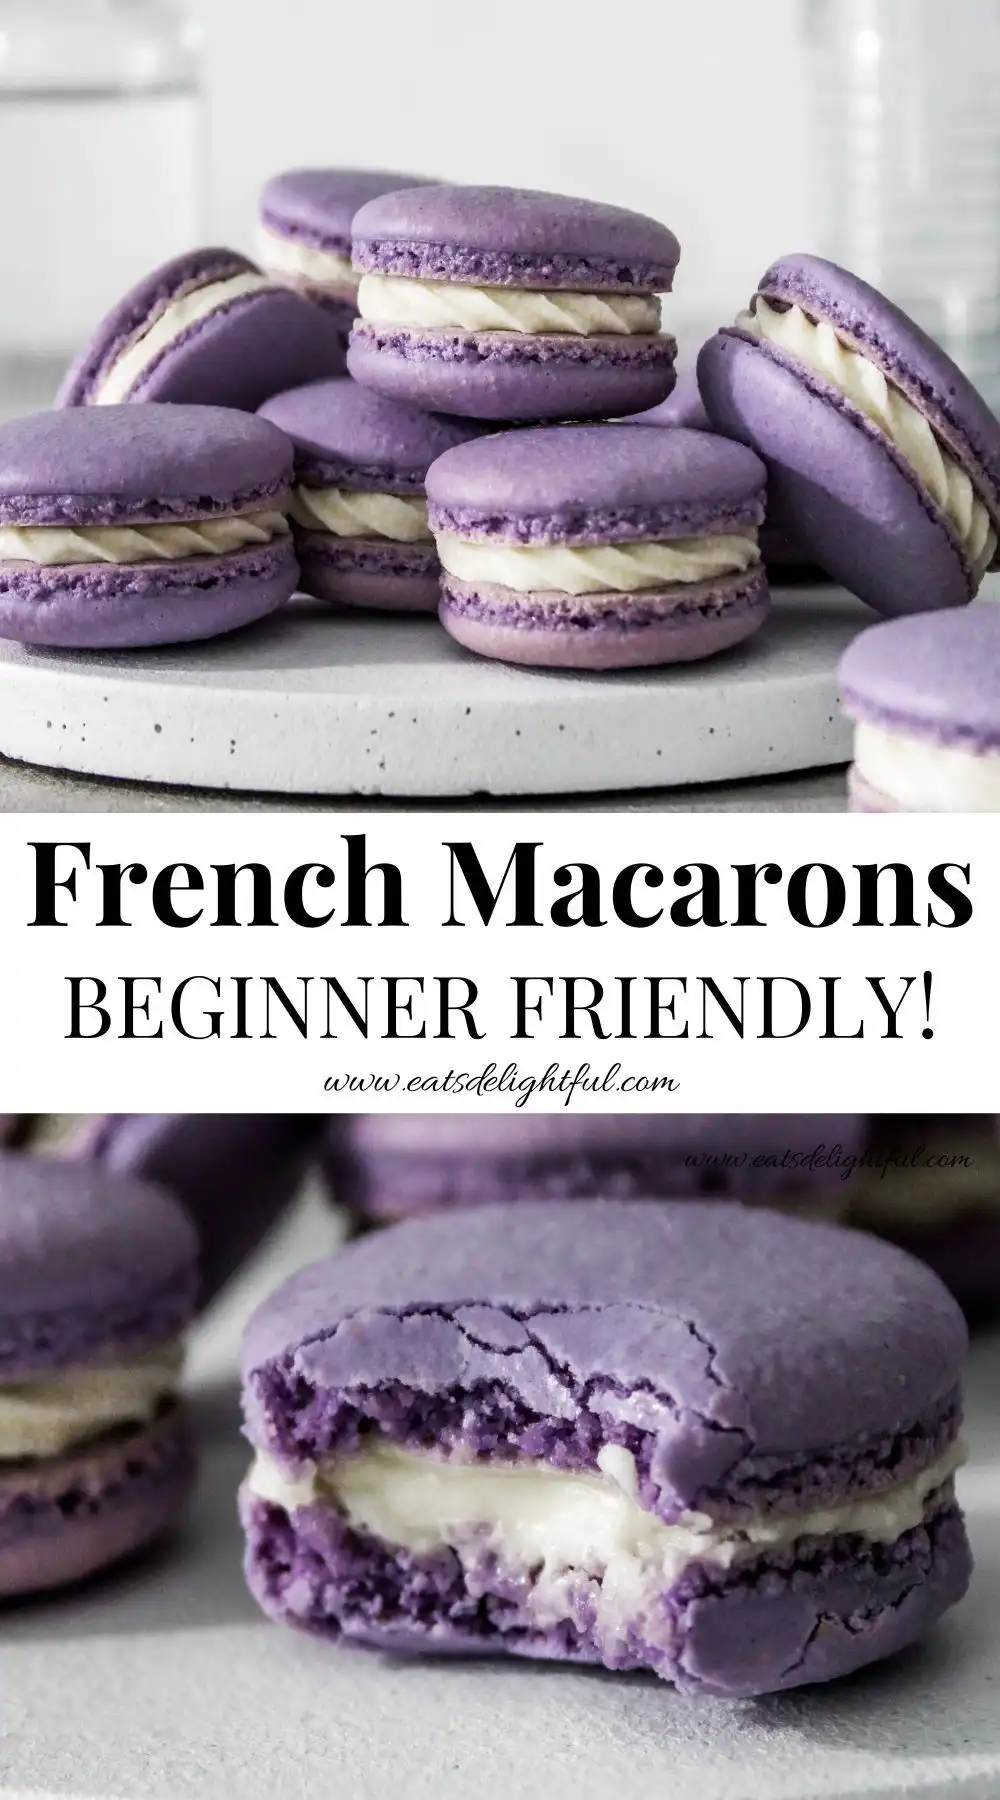
Welcome to the enchanting world of French macarons — delicate, colorful, and utterly irresistible! Often mistaken for simple cookies, these elegant meringue-based confections are a true testament to precision, patience, and passion in baking. While they carry an air of sophistication (and sometimes intimidation!), French macarons are absolutely achievable for beginners — especially with the right guidance, clear explanations, and a gentle, supportive approach. This beginner-friendly guide walks you through every nuance — from demystifying why your batter might be too runny or why feet won’t form, to celebrating that first perfect shell with crisp edges, smooth tops, and signature ruffled “feet.” Whether you’re baking for a special occasion, practicing new skills, or simply indulging your inner pastry enthusiast, this recipe is designed to empower, educate, and inspire confidence — one perfectly piped circle at a time.
The History
French macarons have a rich, layered history that stretches back centuries — and surprisingly, not entirely to France! Their earliest ancestors trace to 8th-century Persia, where almond-based sweets made with ground nuts, sugar, and rose water were enjoyed across the Middle East and Mediterranean. These treats traveled to Europe via the Silk Road and were embraced by Italian chefs during the Renaissance. When Catherine de’ Medici married the future King Henry II of France in 1533, she brought her Italian pastry chefs — and their almond confections — to the French court. At that time, “macaron” referred to a simple, rustic almond cookie: two crisp, round meringue discs sandwiched with jam or spices — no filling, no color, no frills.
It wasn’t until the 1830s in Paris that the modern macaron truly emerged. Sisters at the Carmelite convent in Nancy, France — known as the “Macaron Sisters” — refined the recipe into what became known as the “Macaron de Nancy”: tender, chewy, and delicately flavored. Then, in the early 20th century, Pierre Desfontaines of the legendary Parisian pâtisserie Ladurée had a brilliant idea: sandwich two delicate shells with a luscious ganache or buttercream. He also introduced vibrant pastel colors and delicate flavors — birch, rose, pistachio — transforming the humble cookie into an iconic Parisian jewel. Today, the “Parisian macaron” (as it’s often called) is protected under French culinary tradition, requiring strict adherence to ingredients (almond flour, egg whites, sugar) and method (French or Italian meringue) to earn its name.
Ingredients Breakdown
Understanding *why* each ingredient matters — and how it behaves — is half the battle in mastering macarons. Unlike many baked goods, there’s little room for substitution here. Every gram counts!
- Almond Flour (Blanched, Superfine): The backbone of texture and structure. Must be *blanched* (skins removed) and *superfine* (not coarse or homemade-ground). Coarse almond flour creates gritty, cracked shells; unblanched flour adds bitterness and uneven color. Always sift *twice* — once before mixing, once again with powdered sugar — to ensure zero lumps and optimal air incorporation.
- Powdered Sugar (Confectioners’ Sugar / Icing Sugar): Adds sweetness, stability to the meringue, and helps dry out the surface for smooth skin formation. Must be 100% pure — avoid cornstarch-free versions unless explicitly tested, as most commercial brands contain ~3% cornstarch, which actually helps absorb excess moisture and prevents stickiness. Sifting with almond flour ensures even distribution and eliminates clumps that cause spotting or cracking.
- Egg Whites (Aged, Room Temperature): The magic leavening agent. We use *aged* egg whites (left uncovered in a bowl at room temperature for 24–48 hours) because aging reduces moisture content and strengthens protein bonds — leading to more stable, glossy, and voluminous meringue. *Never use pasteurized liquid egg whites* — they lack the proper protein structure. Fresh cold whites won’t whip properly; room-temp aged whites are non-negotiable for success.
- Granulated Sugar: Used exclusively for the meringue. It stabilizes the foam, increases viscosity, and contributes to the signature crisp exterior and chewy interior. Added gradually while whipping ensures full dissolution — undissolved sugar causes graininess and weak structure.
- Food Coloring (Gel or Powder-Based): Liquid food coloring introduces unwanted moisture and can deflate meringue or thin batter. Gel or powdered colors are highly concentrated and moisture-free — ideal for achieving vibrant, professional-looking shells without compromising texture. Add *after* meringue reaches soft peaks but *before* stiff peaks — folding gently to avoid overmixing.
- Optional Pinch of Cream of Tartar or Lemon Juice: A tiny acidity (⅛ tsp cream of tartar or ¼ tsp lemon juice per 3 egg whites) helps stabilize the meringue and encourages faster, sturdier whipping — especially helpful for beginners or in humid climates.
Step-by-Step Recipe
This method uses the **French meringue technique**, widely considered the most accessible for beginners — no candy thermometers or boiling sugar required! But don’t let its simplicity fool you: timing, texture cues, and gentle handling make all the difference.
- Prep & Weigh (Day Before or Morning Of):
• Measure all ingredients *by weight* using a precise 0.1g digital scale — volume measurements (cups) introduce too much error.
• Separate eggs 1–2 days ahead. Place whites in an uncovered glass or stainless steel bowl; refrigerate uncovered (to allow evaporation). Bring to room temperature (68–72°F / 20–22°C) 1 hour before starting.
• Sift almond flour and powdered sugar together *twice* into a large bowl. Discard any large particles left in the sifter — they’ll cause bumps or cracks. - Whip the Meringue (The Heartbeat of Your Macarons):
• In a *spotlessly clean*, grease-free stand mixer bowl (or large metal bowl for hand mixer), add aged egg whites. Begin whipping on medium-low (Speed 3–4) until foamy (~1 min).
• Add cream of tartar (if using) and continue whipping until soft peaks form (tips curl gently when whisk is lifted).
• Gradually add granulated sugar, 1 tablespoon at a time, waiting 10–15 seconds between additions. Continue whipping on medium-high until you achieve *stiff, glossy peaks*: the meringue should stand straight up, shine like satin, and hold its shape firmly — no drooping, no dullness. Total whip time: ~5–7 minutes. *Do not overwhip* — grainy, dry, or curdled meringue cannot be salvaged. - Macaronage — Folding Like a Pro (The Make-or-Break Step):
• Add food coloring to meringue and fold gently 2–3 times with a flexible silicone spatula to distribute.
• Add half the sifted almond/powdered sugar mixture. Using a *figure-eight motion*, cut down the center, scrape along the bottom, and fold over — lifting and rotating the bowl as you go. Do this 10–15 times until mostly combined (no dry streaks).
• Add remaining dry mix and continue folding. Watch closely: you’re aiming for a lava-like consistency — thick, shiny, and slowly flowing off the spatula in a continuous, ribbon-like ribbon that disappears into the batter below within ~10 seconds (“the ribbon test”).
• Stop *immediately* when achieved. Overmixing = flat, footless, or cracked shells. Undermixing = peaked, wrinkled, or hollow shells. This takes practice — take photos of your batter at each stage to build intuition! - Piping with Precision:
• Fit a large piping bag with a plain round tip (½-inch / 12mm works best). Fill no more than ⅔ full to maintain control.
• Pipe onto parchment-lined or silicone-mat-lined baking sheets. Hold bag vertically, ½ inch above the sheet. Apply steady pressure, pipe straight down until the circle is ~1.5 inches (3.8 cm) wide, then lift and stop pressure — no swirl or tail!
• Space shells 1 inch apart. Tap each tray *firmly* on the counter 3–4 times to release air bubbles. Use a toothpick to gently pop any visible bubbles on the surface — this prevents craters and cracks. - Drying — The Secret to Smooth Skins:
• Let piped shells rest at room temperature, uncovered, until a skin forms — they should feel completely dry and non-tacky to the lightest touch (like a hard-boiled egg). Time varies: 30–60 minutes in dry climates; up to 90+ minutes in humidity. A fan on low (not blowing directly) can help in damp conditions. *Do not skip or rush drying* — wet surfaces steam instead of forming feet. - Baking — Low, Slow, and Steady:
• Preheat oven to 300°F (150°C) — *convection OFF*. Use an oven thermometer! Most home ovens run hot or fluctuate wildly.
• Bake one tray at a time on the *center rack*. Set timer for 12 minutes — then rotate tray 180°. Bake 3–5 more minutes (15–17 total) until feet are fully risen, tops are set, and shells lift cleanly from parchment. They should wobble slightly when nudged — if they jiggle violently, bake 1–2 minutes longer.
• Cool shells *completely* on the tray (15–20 min) before attempting to lift. Warm shells will tear.
Tips
- Climate Matters: Humidity is the #1 enemy. Aim to bake on days with ≤50% relative humidity. If it’s rainy or sticky, run a dehumidifier or AC, and extend drying time. Consider adding 1–2 tsp extra powdered sugar to your dry mix on high-humidity days to absorb ambient moisture.
- Equipment Essentials: Digital scale (0.1g accuracy), silicone baking mat (not parchment alone — mats yield more consistent feet), stainless steel or glass mixing bowls (no plastic — it retains oil), and a fine-mesh sieve (for double-sifting).
- Know Your Oven: Most failures stem from inaccurate temperatures. An oven thermometer is non-negotiable. If your oven has hot spots, rotate trays halfway — or invest in an oven stone for even heat distribution.
- Patience is Texture: Don’t rush drying — if the surface isn’t matte and completely dry, you’ll get cracked or peaked shells. Gently press a fingertip: if it leaves an imprint or feels sticky, wait longer.
- Consistent Piping = Consistent Baking: Use a template underneath your parchment (print a 1.5″ circle grid) to ensure uniform size. Uniform size = even baking and professional appearance.
- Rest Filled Macarons: Once sandwiched with filling, refrigerate assembled macarons for *at least 24 hours* before serving. This “maturing” period allows flavors to meld and the shells to soften just enough — transforming them from crisp-chewy to luxuriously tender.
- Keep a Macaron Journal: Note date, humidity %, oven temp (verified), drying time, batter texture, bake time, and results. Patterns emerge quickly — helping you troubleshoot and replicate wins.
Variations and Customizations
Once you’ve mastered the classic vanilla or chocolate shell, the flavor possibilities are boundless — all while keeping the same foundational technique. Remember: flavorings go into the meringue (liquid/gel) or dry mix (powders); fillings provide contrast and richness.
- Shell Variations:
• Chocolate: Replace 15–20g of almond flour with unsweetened cocoa powder (sifted with dry ingredients).
• Pistachio: Add 10g finely ground roasted pistachios + 2–3 drops green gel color.
• Lavender-Honey: Infuse 1 tbsp honey with ½ tsp culinary lavender (steep 10 min, strain), then add infused honey to meringue at soft peak stage.
• Matcha: Sift 5–8g high-quality ceremonial matcha with dry ingredients.
• Raspberry Swirl: After macaronage, drop 1 tsp raspberry purée onto batter and fold *once* with a knife for subtle marbling. - Filling Ideas (All Beginner-Friendly):
• Classic Vanilla Buttercream: ½ cup softened unsalted butter, 1¼ cups powdered sugar, 1 tsp vanilla extract, 1–2 tbsp heavy cream — beat until fluffy.
• Dark Chocolate Ganache: Heat ½ cup heavy cream to simmer, pour over 4 oz finely chopped dark chocolate (64–70%), wait 2 min, stir until smooth. Chill 1 hour until spreadable.
• Raspberry Jam (No-Cook): Seedless raspberry jam, thinned slightly with ½ tsp lemon juice — no cooking needed!
• Lemon Curd: Store-bought or homemade — ensure it’s thick and chilled before piping.
• Salted Caramel: Thick, cool caramel sauce swirled with flaky sea salt. - Decorative Touches (Post-Bake):
• Dust with edible gold luster dust + vodka (paint brush).
• Pipe delicate white chocolate drizzle using a melted-white-chocolate-filled piping bag with a #1 tip.
• Press toasted coconut, crushed freeze-dried fruit, or edible flowers onto filled sides before chilling.
Health Considerations and Nutritional Value
French macarons are a celebratory treat — not a health food — but understanding their composition helps make mindful choices.
- Nutrition Snapshot (Per 2-shell serving, ~30g, unfilled):
• Calories: ~85–100 kcal
• Carbohydrates: 9–11g (mostly from sugar)
• Fat: 4–5g (primarily heart-healthy monounsaturated fat from almonds)
• Protein: 1.5–2g
• Fiber: ~0.5g
• Gluten-Free: Yes — naturally gluten-free when made with certified GF almond flour and powdered sugar. Always verify labels if celiac or highly sensitive. - Sugar Awareness: Traditional macarons contain significant added sugar (both in shells and fillings). For lower-sugar options:
• Reduce granulated sugar in meringue by 5–10g (test carefully — affects structure).
• Use monk fruit or erythritol blends *specifically formulated for meringues* (standard sugar alcohols destabilize foam).
• Opt for fruit-based fillings (unsweetened jam, lemon curd) over buttercream. - Allergen Notes: Macarons contain tree nuts (almonds) and egg whites — major allergens. There is currently no reliable, texture-preserving substitute for almond flour that yields authentic macarons. Sunflower seed flour or pumpkin seed flour may work experimentally but produce denser, darker, less stable results.
- Storage & Food Safety: Unfilled shells keep airtight at room temp up to 1 week, or frozen 3 months. Filled macarons must be refrigerated (up to 5 days) due to dairy/egg-based fillings. Never leave filled macarons at room temperature >2 hours. Always use clean tools and chilled fillings to prevent bacterial growth.
Ingredients
Makes approx. 20–22 macaron sandwiches (40–44 shells)
- 100 g blanched superfine almond flour (sifted twice)
- 200 g powdered sugar (confectioners’ sugar, sifted with almond flour)
- 100 g aged egg whites (about 3 large eggs — separated 24–48 hrs prior)
- 100 g granulated sugar
- ⅛ tsp cream of tartar (optional but recommended)
- Gel or powder food coloring (your choice of hue — start with a pea-sized amount)
Directions
- Prepare Dry Mix: In a medium bowl, thoroughly sift together almond flour and powdered sugar. Sift a second time into a fresh bowl. Set aside. Discard any large granules.
- Make Meringue: In a clean, dry stand mixer bowl, combine egg whites and cream of tartar. Whip on medium-low until foamy (~1 min). Increase speed to medium-high and whip until soft peaks form (~2 min). Gradually add granulated sugar, 1 tbsp at a time, waiting 10–15 sec between additions. Continue whipping until stiff, glossy peaks form (~3–4 more min). Do not overwhip.
- Add Color & Fold: Add food coloring and fold gently 2–3 times. Add half the dry mix and fold using figure-eight motion until mostly combined (~10 folds). Add remaining dry mix and continue folding until batter reaches “ribbon stage”: when lifted, it falls in a thick, continuous ribbon that merges smoothly into the bowl within 10 seconds (~20–40 total folds). Stop immediately when achieved.
- Pipe & Rest: Transfer batter to piping bag fitted with ½-inch round tip. Pipe 1.5-inch rounds onto parchment- or silicone-mat-lined trays, spaced 1″ apart. Tap trays firmly 3–4 times. Pop any visible air bubbles. Let rest uncovered at room temperature until completely dry to the touch and non-tacky (30–90 min, depending on humidity).
- Bake: Preheat oven to 300°F (150°C) with oven thermometer verified. Bake one tray at a time on center rack for 12 minutes. Rotate tray 180° and bake 3–5 more minutes until feet are tall and firm, and shells lift cleanly. Do not open oven during first 12 minutes.
- Cool & Fill: Let shells cool completely on tray (15–20 min) before gently lifting. Pair by size. Pipe or spread 1 tsp filling onto flat side of half the shells. Top with matching shell, pressing gently. Refrigerate filled macarons for minimum 24 hours before serving for optimal texture and flavor development.
FAQ
- Why did my macarons crack?
- Most common causes: 1) Shells weren’t dried long enough (surface still tacky), 2) Oven too hot (verify with thermometer), 3) Overmixed batter (too runny → spreads and cracks), or 4) Air bubbles not popped before baking.
- Why no feet? Or feet collapsed?
- No feet usually means: under-whipped meringue, under-dried shells, oven too cool, or batter overmixed (no structure to rise). Collapsed feet often indicate opening oven too soon, sudden temperature drop, or underbaking — feet need time to set.
- Why are my shells hollow?
- Hollowness points to overmixed batter (too fluid → rises fast then collapses), under-whipped meringue (weak structure), or oven too hot (rapid expansion then collapse). Also check for trapped air pockets — always tap trays!
- Can I make macarons without a scale?
- We strongly advise against it. A 5g error in almond flour or sugar can mean the difference between success and failure. Investing in a $15 digital scale pays for itself in saved ingredients and frustration.
- Can I use liquid food coloring?
- No. Liquid adds water, destabilizing meringue and thinning batter — leading to spreading, cracking, and poor feet. Stick to gel or powder only.
- My batter is too thick/stiff — what do I do?
- Stop folding. Gently fold in *½ tsp* of aged egg white — only if absolutely necessary — and re-test ribbon stage. Better to have slightly thicker batter than over-thin. Err on the side of caution.
- How do I store macarons?
- Unfilled shells: airtight container at room temp (5 days) or freezer (3 months). Filled macarons: refrigerated in airtight container up to 5 days. Freeze filled macarons on a tray first, then transfer to freezer bag — thaw overnight in fridge before serving.
- Can I make vegan macarons?
- Authentic French macarons require egg whites and almond flour — both non-negotiable for structure and texture. Vegan “macaron-style” cookies exist but are fundamentally different (often coconut or aquafaba-based) and lack the classic chew, foot, and delicacy. They’re delicious — just not macarons.
Summary
French macarons are a harmonious dance of almond flour, egg whites, and sugar — transformed through precise technique into ethereal, footed confections that reward patience, attention to detail, and joyful curiosity. With this beginner-friendly guide — grounded in science, seasoned with troubleshooting wisdom, and brimming with encouragement — your first batch isn’t just possible… it’s inevitable.
Remember: every “failed” tray teaches you more than ten perfect ones — because macarons aren’t about perfection; they’re about presence, practice, and the quiet magic that happens when science meets soul in the kitchen.