Emoji Explosion Birthday Cake
Introduction
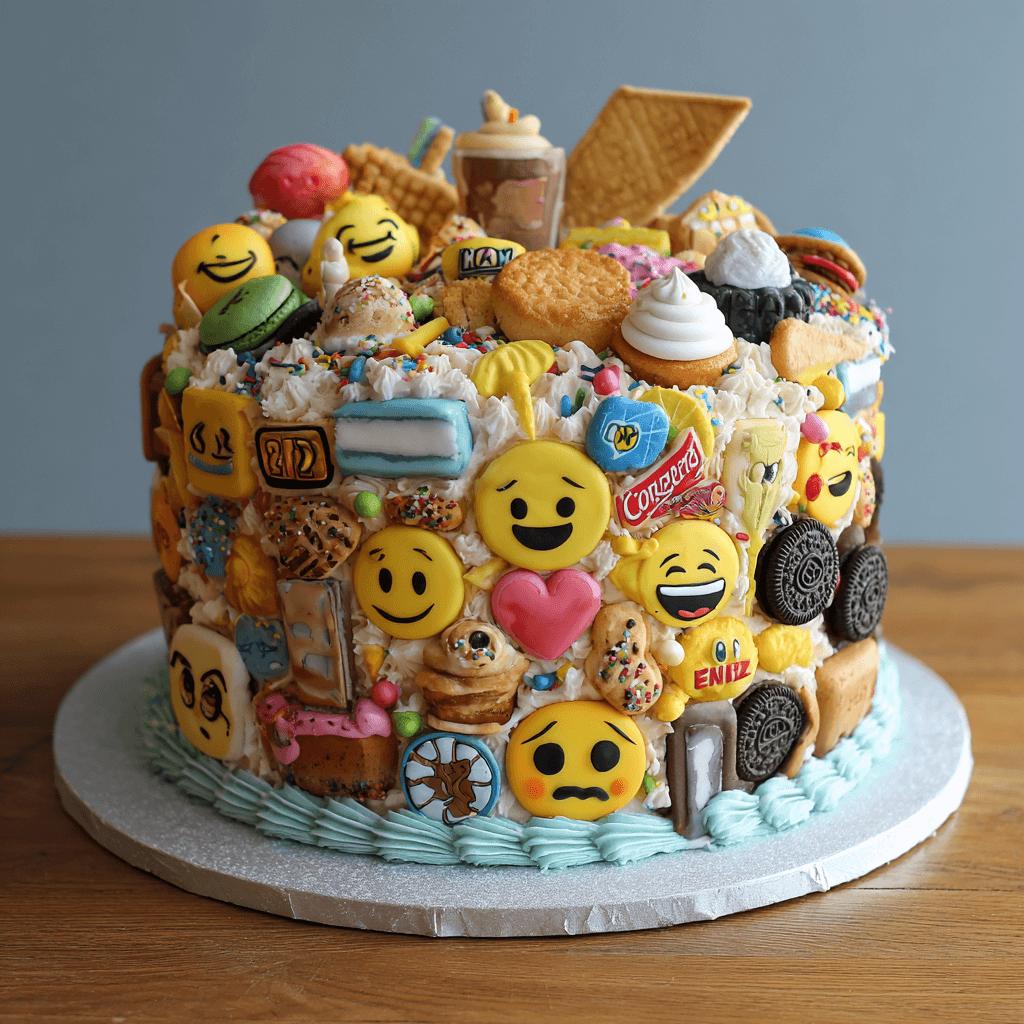
Get ready to celebrate in the most colorful and joyful way with our Emoji Explosion Birthday Cake! This whimsical, vibrant cake is more than just a dessert—it’s a statement of fun, happiness, and personality. Perfect for kids, teens, or anyone who loves emojis, this cake bursts with flavor and visual charm. Whether it’s a milestone birthday or a casual celebration, this emoji-themed cake will steal the show and leave everyone smiling.
The History
While the concept of themed cakes has been around for decades, the rise of digital culture and social media brought about the popularity of emoji-inspired desserts. Emojis first emerged in Japan in the late 1990s and have since become a global phenomenon. As people began expressing emotions through these tiny icons, bakeries and home bakers alike started incorporating them into cakes and cupcakes. The Emoji Explosion Cake combines modern pop culture with classic baking, turning a simple birthday cake into a trendy, shareable centerpiece.
Ingredients Breakdown
This cake features multiple layers, bold colors, and playful decorations that reflect the joy of emojis. Here’s what you’ll need:
- Cake Base: All-purpose flour, baking powder, salt, unsalted butter, granulated sugar, large eggs, milk, vanilla extract
- Frosting: Unsalted butter, powdered sugar, heavy cream or milk, vanilla extract, food coloring (assorted colors for rainbow effect)
- Emoji Toppings: Fondant or store-bought emoji candies, edible markers, mini marshmallows, or piped frosting designs
- Optional Add-ins: Sprinkles, edible glitter, lollipops shaped like emojis, or cake toppers
Step-by-Step Recipe
- Bake the Cake: Preheat oven to 350°F (175°C). Grease and flour two 9-inch round cake pans. In a bowl, mix flour, baking powder, and salt. In another bowl, beat butter and sugar until fluffy. Add eggs one at a time, then mix in vanilla and alternating additions of milk and dry ingredients. Pour batter evenly into pans and bake for 25–30 minutes. Let cool completely.
- Make the Frosting: Beat softened butter until creamy. Gradually add powdered sugar, then incorporate heavy cream/milk and vanilla. Divide frosting into bowls and color each with different food coloring for a rainbow effect.
- Assemble the Cake: Level the cakes if necessary. Place one layer on a cake board or plate and spread a layer of frosting. Top with second layer and frost the top and sides. Use piping bags with star tips to create swirls or wave patterns for an “explosion” look.
- Add Emoji Decorations: Arrange fondant emojis, candy emojis, or piped emoji faces around the top and sides of the cake. Add extra flair with sprinkles, edible glitter, or lollipop emoji picks.
Tips
- Use room temperature ingredients for smoother batter and frosting.
- If making fondant emojis, let them dry overnight to firm up before placing on the cake.
- For a neater finish, use a bench scraper or cake smoother when frosting.
- Create a gradient effect by arranging colored frosting from light to dark.
Variations and Customizations
- Theme Variations: Match the emoji theme with emoji balloons, banners, and party hats.
- Flavor Swaps: Try chocolate, red velvet, or lemon cake instead of vanilla.
- Dietary Options: Make gluten-free using GF flour or vegan by substituting egg and dairy products.
- Mini Versions: Bake cupcakes and decorate each with a different emoji!
Health Considerations and Nutritional Value
A slice of this Emoji Explosion Birthday Cake can be high in sugar and calories due to the buttercream frosting and decorative candies. To make it healthier:
- Use natural sweeteners like honey or maple syrup in the cake.
- Opt for Greek yogurt or mashed banana as a partial substitute for butter/oil.
- Choose low-fat milk and reduced-sugar frosting alternatives.
- Limit portion sizes and pair with fresh fruit or healthy snacks at the party.
Estimated per serving (based on 12 slices): ~400–500 calories, 15–20g fat, 60–70g carbs, 3–5g protein.
Ingredients
- 2 cups all-purpose flour
- 1 tsp baking powder
- ½ tsp salt
- ½ cup unsalted butter, softened
- 1½ cups granulated sugar
- 2 large eggs
- 1 cup milk
- 1 tsp vanilla extract
- ½ cup unsalted butter (for frosting)
- 3–4 cups powdered sugar
- 2–3 tbsp heavy cream or milk
- 1 tsp vanilla extract
- Food coloring (assorted colors)
- Emoji decorations (fondant or candy)
Directions
- Preheat oven to 350°F (175°C).
- Grease and flour two 9-inch round cake pans.
- Mix flour, baking powder, and salt in a bowl.
- In another bowl, beat butter and sugar until fluffy.
- Add eggs one at a time, then mix in vanilla.
- Alternately add dry ingredients and milk to the wet mixture.
- Pour batter into prepared pans and bake for 25–30 minutes.
- Let cakes cool completely.
- Beat butter for frosting until creamy; gradually add powdered sugar, cream/milk, and vanilla.
- Divide frosting into bowls and color with food coloring.
- Assemble cake layers and frost with colorful swirls.
- Decorate with emoji shapes, sprinkles, and optional cake picks.
FAQ
Can I make this cake ahead?
Yes! Bake and frost the cake a day in advance. Store in a cool place or refrigerate if your kitchen is warm.
How do I store leftover cake?
Cover loosely with plastic wrap or store in an airtight container. Refrigerate for up to 4 days or freeze unfrosted layers for up to 2 months.
Can I use store-bought frosting?
Absolutely! Tint with food coloring and layer creatively for the same explosion effect.
Are there any alternatives to fondant emojis?
Try piping emoji faces directly onto the cake using buttercream or edible markers on white chocolate discs.
What if I don’t have rainbow-colored food coloring?
You can use any bright colors you have available—just aim for variety and vibrancy!
Summary
The Emoji Explosion Birthday Cake is a vibrant, flavorful celebration of modern fun and creativity. It brings smiles, laughter, and unforgettable memories to every occasion.