Introduction
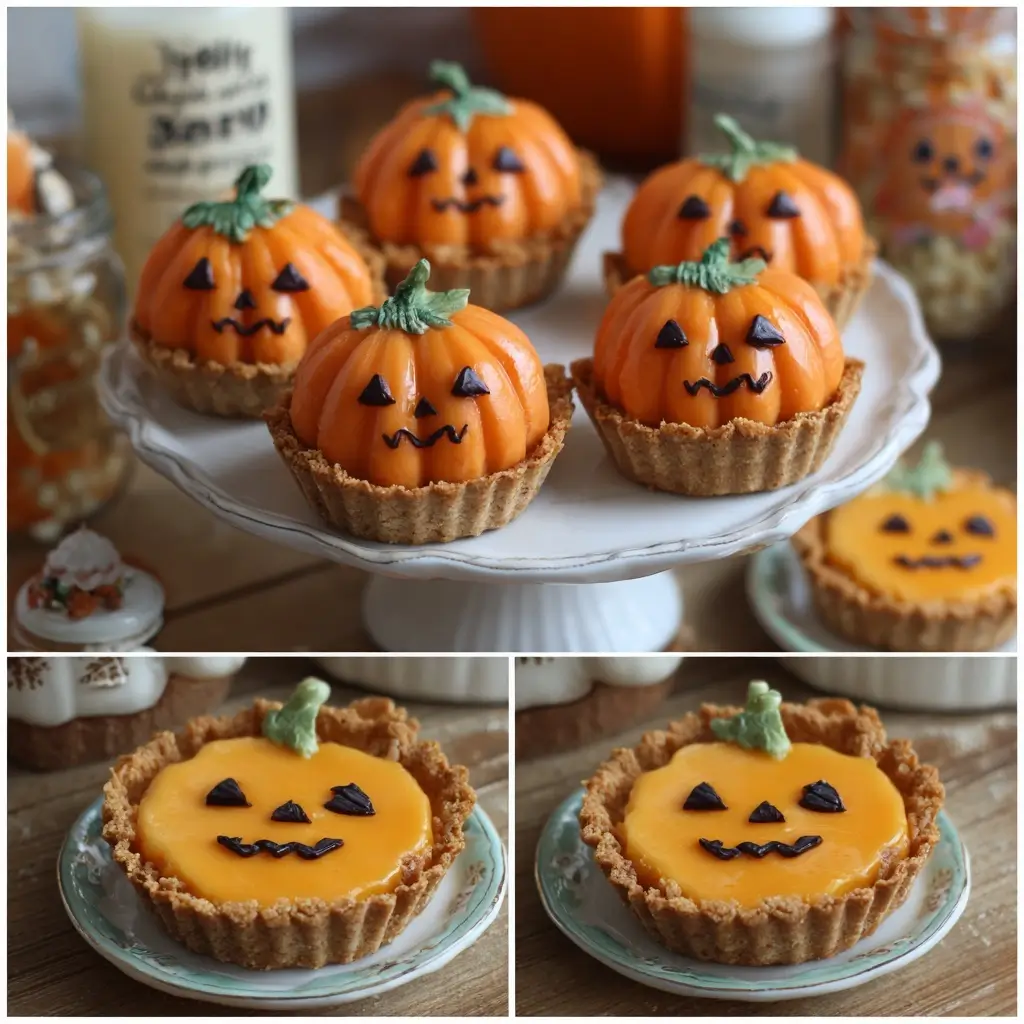
Welcome to a delightful twist on traditional autumn desserts — the Cheese & Cracker “Pumpkin” Pies! These whimsical, no-bake mini pies are perfect for Halloween parties, Thanksgiving gatherings, or any cozy fall event where you want to impress guests with creativity and flavor. Though they don’t contain real pumpkin pie filling, these adorable treats cleverly mimic the look of tiny pumpkins using cream cheese, graham crackers, and a few simple ingredients. With their creamy centers, crunchy crusts, and playful presentation, these “pumpkin” pies bring seasonal charm to your dessert table without requiring hours in the kitchen. Whether you’re hosting kids, adults, or both, this fun and festive recipe is sure to become a fall favorite.
The History
The concept of mock desserts — dishes that resemble other foods in appearance but differ in ingredients or preparation — has deep roots in American culinary tradition. From deviled eggs made to look like fruit in vintage gelatin salads to modern cake pops shaped like animals, food illusion has always sparked joy and conversation at gatherings. The idea behind the Cheese & Cracker “Pumpkin” Pies likely emerged from mid-20th century Jell-O culture and children’s party snacks, where visual appeal was just as important as taste.
These particular treats gained popularity through school lunch ideas, Pinterest boards, and holiday entertaining blogs during the 2010s. Inspired by the iconic pumpkin pie served during Thanksgiving, creative home cooks began crafting edible versions using accessible pantry staples. By combining sweet cream cheese mixtures with cracker bases and artistic garnishes, they created a safe, allergy-friendly (with modifications), and visually striking alternative that mimics the warm orange hues and rustic elegance of real pumpkin pie — all without turning on the oven. Today, these “pies” are celebrated not only for their nostalgic flair but also for their adaptability across dietary needs and cultural celebrations centered around autumn.
Ingredients Breakdown
Let’s take a closer look at each ingredient in this charming recipe and understand its role in creating the perfect balance of texture, flavor, and visual appeal:
- Cream Cheese (softened): Acts as the base for the creamy filling. Its rich, slightly tangy flavor complements the sweetness of the other ingredients and helps bind everything together into a smooth, spreadable consistency.
- Powdered Sugar: Adds sweetness while dissolving easily into the cream cheese without adding moisture. It also gives the filling a light, fluffy texture when beaten properly.
- Vanilla Extract: Enhances the overall sweetness with a warm, aromatic note that pairs beautifully with fall flavors.
- Orange Food Coloring (gel preferred): Gives the filling its vibrant pumpkin-like hue. Gel coloring is recommended over liquid because it provides intense color without altering the texture of the mixture.
- Graham Crackers: Serve as the edible “crust,” offering a buttery, slightly sweet crunch reminiscent of traditional pie shells. They’re sturdy enough to hold the filling and easy to find in most grocery stores.
- Green Candy Melts or White Chocolate + Green Food Coloring: Used to create the pumpkin stem and leaf details. Candy melts are ideal because they harden quickly and are easy to drizzle or pipe.
- Sour Apple Spray (optional) or Green Sprinkles: Adds a pop of green color and texture for leaves, enhancing the realistic pumpkin appearance.
- Cinnamon (optional): Can be lightly dusted on top for extra fall aroma and flavor depth.
Each component works harmoniously to deliver a treat that’s as photogenic as it is delicious, making it ideal for themed parties, classroom treats, or even edible crafts with kids.
Step-by-Step Recipe
- Prepare Your Workspace: Cover your countertop or tray with parchment paper or wax paper to prevent sticking. Gather small bowls, a mixing spoon, an electric hand mixer or stand mixer, zip-top bags, and a knife or small offset spatula.
- Make the Cream Cheese Filling: In a medium bowl, add 8 ounces of softened cream cheese. Using a mixer on medium speed, beat until smooth and creamy (about 1–2 minutes). Gradually add ½ cup of powdered sugar and 1 teaspoon of vanilla extract. Continue beating until fully incorporated and fluffy.
- Add Color: Add orange gel food coloring one drop at a time, mixing thoroughly after each addition, until you achieve a bright pumpkin-orange shade. Be cautious — a little goes a long way!
- Portion the Graham Crackers: Break full-sheet graham crackers into squares or rectangles (approximately 2×2 inches). You’ll need one piece per “pie.” Arrange them neatly on your prepared surface.
- Spread the Filling: Spoon about 1 tablespoon of the colored cream cheese mixture onto the center of each cracker. Use the back of a spoon or small spatula to gently spread it into a neat circular mound, slightly raised in the center to mimic a pie dome.
- Create Pumpkin Texture (Optional): For a more authentic pumpkin look, use a toothpick to draw shallow vertical lines from the top to the bottom of the cream cheese mound, creating segmented grooves like those on a real pumpkin.
- Melt the Candy for Stems: Melt green candy melts according to package instructions (usually 30-second intervals in the microwave, stirring between). If using white chocolate, tint it green with a few drops of food coloring once melted.
- Form the Stems and Leaves: Transfer the melted green confectionery coating to a small zip-top bag. Snip off a tiny corner to create a fine piping tip. Pipe a small vertical line (about ½ inch tall) in the center of each cream cheese circle to represent the pumpkin stem. Then, add two or three small curved lines branching off to one side to mimic leaves.
- Set and Harden: Allow the pies to sit at room temperature for 10–15 minutes, or place them in the refrigerator for 5–7 minutes to help the candy coating harden.
- Final Touches: Lightly sprinkle cinnamon over the tops if desired, or add green sprinkles around the base for grassy effect. For extra sparkle, consider edible glitter or gold dust accents.
- Serve or Store: Once set, serve immediately or store in an airtight container in the fridge until ready to enjoy.
Tips
- Softening Cream Cheese: To soften cream cheese quickly, leave it out at room temperature for 30–60 minutes. Alternatively, cut it into small cubes and let it sit for 15 minutes — never microwave unless specified, as it can melt unevenly.
- Avoid Watery Filling: Ensure your cream cheese is fully softened before mixing. Cold cream cheese leads to lumpy filling, which affects both texture and appearance.
- Use Gel Food Coloring: Liquid food coloring contains water, which can make the filling runny. Gel or paste colors give bold results without compromising consistency.
- Piping Alternatives: Don’t have a piping bag? Use a resealable plastic bag with the corner snipped off, or even a clean condiment bottle with a narrow nozzle.
- Kid-Friendly Assembly: Let children help with spreading the filling or decorating stems — it’s a great way to involve them in cooking while encouraging creativity.
- Chill Before Serving: Refrigerating the finished pies for 15–20 minutes firms up the filling and makes them easier to eat without smudging.
- Prevent Browning: Assemble these pies no more than 4–6 hours ahead of time to maintain freshness and appearance, especially if exposed to air.
- Portability: Place each pie in a mini cupcake liner for easy transport and serving at parties.
Variations and Customizations
The beauty of Cheese & Cracker “Pumpkin” Pies lies in their versatility. Here are some creative ways to personalize them for different tastes, diets, or occasions:
- Dairy-Free Version: Substitute regular cream cheese with vegan cream cheese (such as brands made from almonds or soy), and use dairy-free chocolate or candy melts for the stems.
- Gluten-Free Option: Replace graham crackers with gluten-free digestive biscuits or certified GF crackers like Schär or Glutino varieties.
- Nut-Free for Schools: Ensure all ingredients, especially candy melts and crackers, are processed in nut-free facilities if needed for school events.
- Flavored Fillings: Infuse the cream cheese with pumpkin spice (½ tsp cinnamon, ¼ tsp ginger, pinch of nutmeg and cloves) for a true pumpkin pie flavor profile — even without real pumpkin.
- Fruit Swirl Variation: Gently swirl in a small amount of warmed and strained pumpkin puree or apple butter for added nutrition and flavor complexity.
- Chocolate Lover’s Twist: Use chocolate graham crackers as the base and add a hint of cocoa powder to the filling for a darker, richer version.
- Halloween Theme: Turn them into “Jack-o-Lanterns” by drawing faces with black decorator icing after the green stems are set.
- Thanksgiving Edition: Top with tiny turkey-shaped candies or use brown candy melts to create mini pie crust edges around the rim.
- Adult Cocktail Pairing: Serve alongside spiced cider, pumpkin beer, or a glass of dessert wine like Moscato for a sophisticated touch.
- Allergy-Safe Kits: Prepare ingredient kits with labels so guests can assemble their own safely, accommodating various dietary restrictions.
Health Considerations and Nutritional Value
While Cheese & Cracker “Pumpkin” Pies are meant to be enjoyed as an occasional treat, here’s what you should know about their nutritional content and health implications:
- Calories: Each serving (one cracker with filling and decoration) contains approximately 90–120 calories, depending on portion size and exact ingredients used.
- Fat Content: Primarily comes from cream cheese and graham crackers. A single pie has about 5–7 grams of fat, including 3 grams of saturated fat. Opt for low-fat cream cheese to reduce this.
- Sugar Levels: Contains added sugars from powdered sugar and graham crackers. One serving may have 6–8 grams of sugar. Consider using powdered erythritol or monk fruit sweetener for lower-sugar alternatives.
- Calcium and Protein: Cream cheese contributes a small amount of calcium and protein (about 1–2 grams per serving), though not enough to count as a significant source.
- Sodium: Graham crackers and cream cheese both contribute sodium — roughly 100–150 mg per pie. Choose reduced-sodium versions if monitoring intake.
- Allergens: Common allergens include dairy (cream cheese, candy melts), wheat (graham crackers), and possible traces of nuts (depending on brand). Always check labels when serving sensitive individuals.
- Dietary Modifications: Easily adaptable for vegetarian, gluten-free, dairy-free, and kosher diets with proper substitutions.
- Serving Size Control: Because they’re bite-sized, these pies naturally encourage portion control — perfect for grazing tables or dessert platters.
- Kid Nutrition: While tasty, they lack fiber, vitamins, or substantial nutrients. Best paired with fruit trays or yogurt cups for balanced snacking.
Enjoy in moderation as part of a well-rounded diet, especially during seasonal festivities.
Ingredients
- 8 oz (1 package) cream cheese, softened
- ½ cup powdered sugar
- 1 teaspoon pure vanilla extract
- Orange gel food coloring (or natural alternatives like carrot juice concentrate, though less vibrant)
- 16–20 graham cracker squares (full sheet broken into pieces)
- ½ cup green candy melts or white chocolate chips
- Green food coloring (if using white chocolate)
- Optional: Cinnamon, green sprinkles, sour apple spray, edible glitter
Directions
- In a mixing bowl, beat softened cream cheese with an electric mixer until smooth and creamy (1–2 minutes).
- Add powdered sugar and vanilla extract. Beat on medium speed until fully combined and fluffy.
- Add orange gel food coloring drop by drop, mixing well after each addition, until the desired pumpkin-orange color is achieved.
- Lay out graham cracker squares on a clean, flat surface lined with parchment paper.
- Spoon approximately 1 tablespoon of the orange cream cheese mixture onto the center of each cracker.
- Use the back of a spoon or small spatula to shape the filling into a rounded, dome-like circle resembling a miniature pumpkin pie.
- (Optional) Use a toothpick to gently score vertical lines into the filling to mimic pumpkin ridges.
- Melt green candy melts or white chocolate in 30-second bursts in the microwave, stirring frequently until smooth.
- If using white chocolate, stir in a few drops of green food coloring until vibrant.
- Transfer the melted green coating to a small zip-top bag, seal, and snip a tiny hole in one corner.
- Pipe a short straight line (stem) in the center of each cream cheese mound. Add two or three small curved lines extending outward to resemble leaves.
- Allow the pies to rest for 10–15 minutes at room temperature or chill in the refrigerator for 5–7 minutes to set the candy coating.
- Lightly dust with cinnamon or add green sprinkles for decoration if desired.
- Serve immediately or store covered in the refrigerator for up to 24 hours.
FAQ
Q: Can I make these ahead of time?
A: Yes! Assemble up to 24 hours in advance and store in an airtight container in the refrigerator. Bring to room temperature 10 minutes before serving for best texture.
Q: Can I freeze Cheese & Cracker “Pumpkin” Pies?
A: Freezing is not recommended. The graham crackers may become soggy upon thawing, and the cream cheese filling could separate or weep moisture.
Q: Are these pies suitable for kids?
A: Absolutely! They’re a hit at school parties, Halloween events, and family gatherings. Just ensure ingredients meet any allergy requirements.
Q: What can I use instead of candy melts?
A: Melted white chocolate, almond bark, or even green-tinted marshmallow fondant can work as substitutes for the stems.
Q: Can I make them taste like real pumpkin pie?
A: Yes! Add ½ teaspoon of pumpkin pie spice to the cream cheese mixture for that classic fall flavor.
Q: How many does this recipe serve?
A: This recipe yields approximately 16–20 mini pies, depending on cracker size and filling amount.
Q: Can I use real pumpkin puree?
A: While possible, puree adds moisture that may make the filling too soft. If using, strain it overnight in a cheesecloth to remove excess liquid first.
Q: Are there vegan versions?
A: Definitely! Use plant-based cream cheese, vegan chocolate, and dairy-free graham crackers to make a fully vegan version.
Q: Why did my cream cheese filling turn runny?
A: This usually happens if liquid food coloring was used or if the cream cheese wasn’t fully softened. Stick to gel coloring and ensure ingredients are at room temperature.
Q: Can I use other crackers?
A: Yes! Try vanilla wafers, shortbread cookies, or chocolate sandwich cookies for different flavor profiles.
Summary
Cheese & Cracker “Pumpkin” Pies are festive, no-bake delights that capture the spirit of fall with creamy orange filling atop crunchy graham crackers, artistically topped with green candy stems.
Easy to customize, fun to make with kids, and perfect for holidays, these adorable mini treats offer seasonal charm in every bite — no oven required!