Introduction
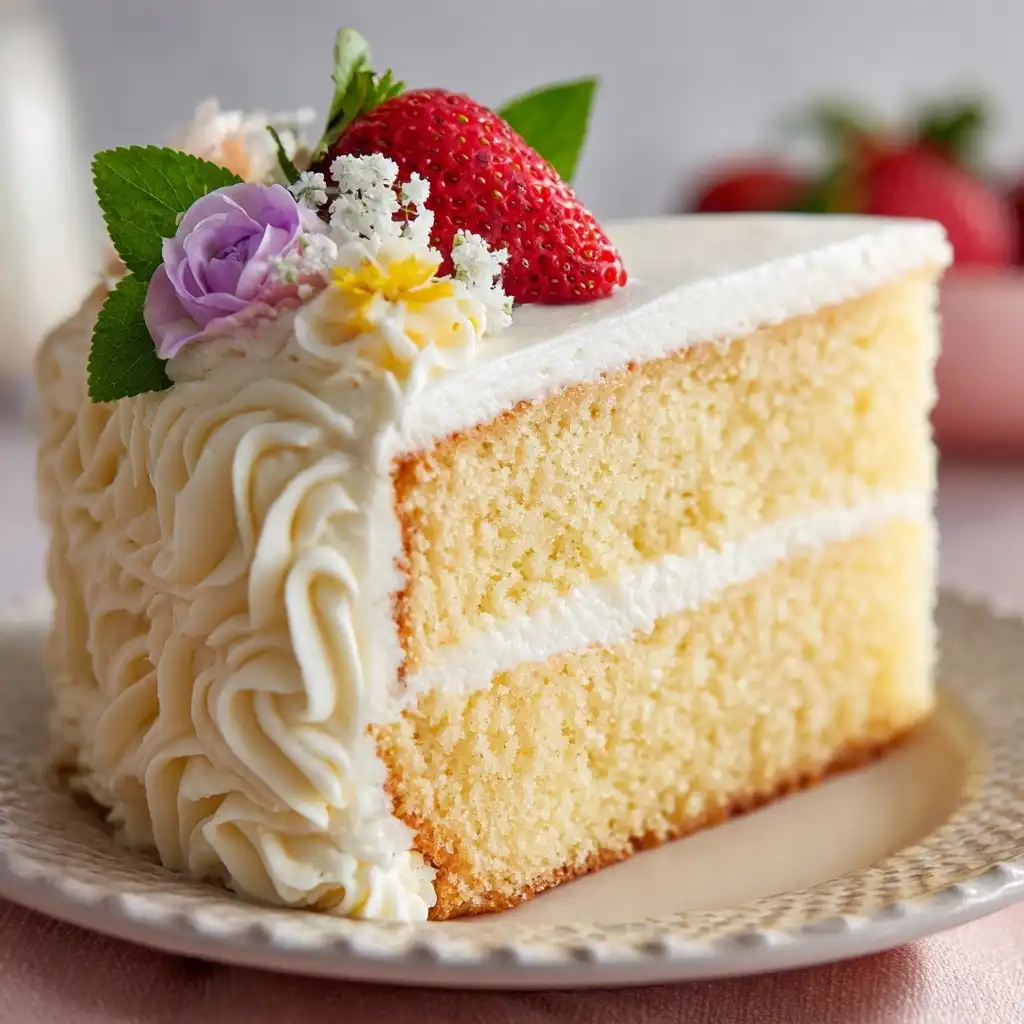
There’s a certain magic in that first bite of a truly exceptional white cake — delicate, cloud-like crumb, luminous ivory hue, and an elegant, buttery-sweet aroma that whispers “professional bakery” with every whiff. Unlike its more robust vanilla cousin, a bakery-style white cake is a masterclass in restraint and refinement: no brown specks of vanilla bean, no golden tinge from egg yolks, no hint of caramelized sugar — just pure, pristine sweetness balanced by subtle richness and airy tenderness. Achieving this at home has long been the holy grail for home bakers, often thwarted by dense texture, grayish tint, or bland flavor. But what if we told you the secret isn’t in exotic ingredients or industrial equipment — it’s in *precision*, *understanding function*, and a handful of non-negotiable techniques honed over decades in commercial kitchens? This guide unveils the complete, deeply researched blueprint behind the elusive bakery-style white cake — not a simplified shortcut, but the authentic, time-tested methodology used by award-winning pastry chefs and century-old bakeries alike.
The History
The origins of the white cake trace back to the late 19th century, emerging alongside technological advances that transformed American baking. Before the widespread availability of reliable chemical leaveners and refined white sugar, cakes were typically “yellow” or “brown,” relying on whole eggs and molasses or honey for moisture and color. The advent of granulated cane sugar, bleached all-purpose flour, and especially double-acting baking powder in the 1890s paved the way for lighter, whiter confections. By the early 1900s, “white cake” became synonymous with celebration, purity, and modernity — frequently chosen for weddings (predating the white wedding dress trend) and debutante balls. Iconic regional iterations soon followed: the ultra-fine crumb of Chicago’s “Buttercream White Cake,” the moist, slightly denser Southern “Snow Cake” enriched with sour cream, and the ultra-luxurious “French White Cake” popularized by New York’s elite patisseries, which substituted part of the butter with clarified butter for unparalleled silkiness. Crucially, the rise of commercial bakeries in the 1920s–1950s codified the standards we associate with “bakery style”: consistent texture across large batches, extended shelf life without refrigeration, brilliant whiteness (achieved through strict ingredient selection and sometimes titanium dioxide — now largely phased out), and structural integrity to support multi-tiered designs. Understanding this lineage reveals why technique trumps substitution — every step was engineered for reliability, not convenience.
Ingredients Breakdown
Every ingredient in a true bakery-style white cake serves a precise structural, textural, or aesthetic function — none are merely “for flavor.” Here’s the forensic-level analysis:
- Ultra-Refined Bleached All-Purpose Flour (e.g., Softasilk, Swan’s Down, or King Arthur Bleached AP): Not just “any white flour.” Bleaching alters the starch structure, increasing water absorption and gluten extensibility — critical for maximum volume and fine crumb. Unbleached flour yields denser, chewier results. Protein content (typically 8.5–9.5%) is deliberately low enough to prevent toughness but high enough to support delicate structure.
- Granulated Cane Sugar (NOT beet sugar): Cane sugar dissolves more readily and contributes to superior aeration during creaming. Beet sugar can impart a faint, undesirable earthy note and may crystallize differently under heat. Fine-grain “baker’s sugar” or superfine sugar is ideal for ultra-smooth batter integration.
- Pure Butter (Unsalted, 82% Butterfat, European-Style Preferred): High-fat butter (like Plugrá or Kerrygold) provides richer mouthfeel and superior emulsification. Salted butter introduces inconsistent sodium levels, interfering with leavener activity and flavor balance. Butter must be at *precise* 65°F (18°C) — cool enough to hold air bubbles, warm enough to blend smoothly. Too cold = grainy; too warm = greasy, collapsed batter.
- Fresh Egg Whites (Pasteurized, Room Temperature): The cornerstone of whiteness and lift. Yolks are excluded entirely — they add fat, color, and emulsifiers that inhibit maximum aeration and cause browning. Pasteurized whites eliminate salmonella risk without cooking the protein, preserving full whipping capacity. Room temperature whites (about 70°F/21°C) incorporate air 30–40% faster and more stably than cold ones.
- Whole Milk (NOT skim or ultra-pasteurized): Full-fat milk (3.25%) provides lactose for gentle browning (Maillard reaction) and casein proteins that strengthen the crumb without toughness. Ultra-pasteurized milk denatures proteins, leading to rubbery texture and poor emulsion. Scalding milk (heated to 180°F/82°C, then cooled) further denatures whey proteins, yielding even finer, more stable crumb — a pro bakery trick rarely shared.
- Pure Almond Extract (NOT imitation) + Clear Vanilla Extract: Real vanilla bean paste or alcohol-based clear vanilla (like Nielsen-Massey’s “Clear Vanilla”) avoids any amber tint. Almond extract (0.25–0.5 tsp) is non-negotiable — it doesn’t taste “almond-y” but *enhances* the perception of sweetness and floral notes while masking any raw egg or flour aftertaste. It’s the invisible flavor amplifier.
- Double-Acting Baking Powder (Aluminum-Free, e.g., Rumford): Aluminum-based powders can leave a bitter, metallic aftertaste and contribute to grayish discoloration. Double-acting ensures initial rise in the bowl and secondary lift in the oven’s heat. Freshness is paramount — test by mixing 1 tsp with 1/3 cup hot water; vigorous, immediate bubbling = active.
- Distilled White Vinegar (or Cream of Tartar): A tiny amount (1/8 tsp) added to egg whites *before* whipping stabilizes the foam by lowering pH, preventing over-beating and collapse. It also reacts with baking soda (if used in variations) for extra lift.
- High-Quality Salt (Fine Sea Salt or Kosher, NOT iodized table salt): Iodized salt imparts a medicinal tang and can accelerate fat oxidation (rancidity). Fine sea salt dissolves instantly and provides clean, bright seasoning that balances sweetness without bitterness.
Step-by-Step Recipe
- Prep & Precision Weighing (45 mins before mixing): Calibrate your digital scale (0.1g accuracy). Line two 9-inch round cake pans with parchment, grease *only the sides* (not bottom) with shortening, then dust lightly with flour — this prevents dome cracking and ensures clean release. Preheat oven to 325°F (163°C) *convection off* — conventional bake is essential for even, gentle rise. Place oven rack in center position. Measure all ingredients by weight — volume measurements introduce up to 20% error.
- Scald & Cool the Milk (15 mins): Heat whole milk in a saucepan over medium-low heat until tiny bubbles form around edges and temperature reaches 180°F (82°C). Remove immediately, pour into a heatproof bowl, and cool to exactly 90°F (32°C) — use an instant-read thermometer. This step is critical for crumb refinement.
- Cream Butter & Sugar (8–10 mins): In a stand mixer fitted with paddle attachment, beat unsalted butter (65°F) and granulated sugar on medium-low (Speed 3 on KitchenAid) for 2 minutes to combine. Increase to medium-high (Speed 6) and beat for 6–8 minutes until *pale, fluffy, and nearly tripled in volume*. Scrape bowl thoroughly every 2 minutes. The mixture should hold a distinct ribbon when lifted — not runny, not stiff. This incorporates 1,000+ micro-bubbles — the foundation of lift.
- Incorporate Dry Ingredients (3 mins): Sift together flour, baking powder, and salt *twice* into a separate bowl. With mixer on low (Speed 2), add 1/3 of dry mix to butter-sugar. Mix just until incorporated (5–10 seconds). Add 1/2 of scalded/cooled milk. Mix 10 seconds. Repeat: dry mix → milk → dry mix. Do *not* overmix — stop as soon as no streaks remain. Batter will be thick and glossy.
- Whip Egg Whites to Stiff, Shiny Peaks (5–7 mins): In a *spotlessly clean*, grease-free bowl, combine egg whites, vinegar, and almond extract. Whip on medium (Speed 5) for 2 minutes until foamy. Increase to medium-high (Speed 7) and whip until soft peaks form (3–4 mins). Gradually add remaining sugar (1 tbsp at a time) while whipping. Continue 1–2 minutes until whites are stiff, glossy, and hold a vertical peak that bends slightly at the tip — *not dry or crumbly*. Over-whipped whites deflate the cake.
- Fold with Surgical Precision (3–4 mins): Transfer 1/3 of whipped whites to batter bowl. Using a flexible silicone spatula, cut down center, sweep along bottom, and fold up and over — rotating bowl 1/4 turn each stroke. Repeat until *just* combined (no streaks, but still visible white swirls). Gently add remaining whites in two additions, folding *exactly* 12 strokes per addition. Stop when batter is uniform but retains visible airiness — over-folding collapses structure.
- Pan & Bake with Thermal Discipline (35–40 mins): Divide batter evenly between pans (use scale for accuracy: ~580g per pan). Smooth tops with offset spatula. Tap pans firmly *twice* on counter to release large air pockets. Immediately place in preheated 325°F oven. Bake 35–40 minutes. Rotate pans front-to-back at 20 minutes. Cake is done when: (a) edges pull cleanly from pan, (b) top springs back when lightly pressed, (c) internal temperature reads 208–210°F (98–99°C) on instant-read thermometer, and (d) toothpick inserted 1 inch from edge comes out with *moist crumbs*, not wet batter.
- Cool with Patience (2 hours minimum): Cool cakes in pans on wire racks for 20 minutes. Run thin knife around edges. Invert onto racks, peel off parchment, then re-invert *right-side-up* to cool completely (1.5–2 hours). Cooling upside-down prevents doming and encourages even moisture distribution. Never frost warm cake — condensation causes frosting to slide and cake to become gummy.
Tips
- Thermometer Non-Negotiable: An instant-read thermometer is the single most important tool — judging doneness by time alone fails due to oven variance, pan material, and altitude.
- Altitude Adjustments: Above 3,000 ft: Reduce baking powder by 1/8 tsp, increase oven temp to 335°F, reduce sugar by 1 tbsp, and add 1 tbsp extra milk. Above 5,000 ft: Further reduce sugar by 2 tbsp and add 2 tbsp milk.
- Humidity Control: On humid days, reduce milk by 1 tbsp and add 1 tsp cornstarch to dry ingredients to absorb excess moisture.
- Flour Sifting Ritual: Sift flour *after* measuring by weight — sifting before weighing creates air pockets, leading to under-measurement and dense cake.
- Butter Temp Hack: Cut butter into 1/2-inch cubes and let sit at room temp for 35 minutes. Verify with thermometer — if >68°F, chill 2 minutes. If <62°F, microwave at 10% power for 3 seconds.
- Egg White Safety: Use pasteurized liquid egg whites (like Davidson’s) — they whip to 95% of fresh volume and eliminate risk. Avoid powdered whites; they lack stability.
- Prevent Browning: Cover cake tops loosely with foil at 25 minutes if edges darken too quickly — never cover entire pan.
- Storage Wisdom: Unfrosted layers keep 3 days wrapped tightly in plastic at room temp. Frosted cake lasts 5 days refrigerated (wrap exposed edges in plastic) — bring to room temp 2 hours before serving for optimal texture.
Variations and Customizations
- Lemon-White Tea Cake: Replace 2 tbsp milk with fresh lemon juice + zest of 1 large lemon. Add 1 tsp dried white tea leaves (crushed) to dry ingredients. Frost with lemon-cream cheese buttercream.
- Coconut-Cloud Variation: Substitute 1/2 cup flour with toasted coconut flour. Fold in 3/4 cup finely shredded unsweetened coconut with final whites. Pair with coconut milk Swiss meringue buttercream.
- Champagne Celebration Cake: Replace 1/4 cup milk with chilled, flat premium champagne. Add 1/4 tsp champagne yeast extract (optional, for depth). Decorate with edible gold leaf and candied violets.
- Matcha-Silk Layer: Sift 2 tbsp culinary-grade matcha (not ceremonial) into dry ingredients. Reduce almond extract to 1/8 tsp. Frost with white chocolate-matcha ganache.
- Cardamom-Infused Luxury: Toast 1 tbsp green cardamom pods, grind finely, and sift 1.5 tsp into dry ingredients. Add 1/4 tsp rose water with extracts. Serve with rose petal jam filling.
- Gluten-Free Bakery Style: Use certified GF all-purpose blend with xanthan gum (e.g., Bob’s Red Mill 1-to-1). Add 1/4 tsp psyllium husk powder to dry ingredients. Whip whites to *medium-stiff* peaks only. Bake at 320°F for 42–45 mins.
- Vegan Professional White: Replace butter with refined coconut oil (65°F), egg whites with aquafaba (1/2 cup per 4 whites, whipped with 1/4 tsp cream of tartar), milk with oat milk (scalded), and sugar with organic cane. Add 1 tsp apple cider vinegar to batter. Requires 10% longer bake time.
Health Considerations and Nutritional Value
A single 3-inch slice (1/12th of recipe) contains approximately 385 calories, 52g carbohydrates (38g sugars), 5g protein, 17g total fat (10g saturated), 125mg sodium, and negligible fiber. While undeniably indulgent, strategic modifications enhance nutritional profile without sacrificing bakery integrity:
- Sugar Reduction Science: Up to 25% sugar can be reduced using enzymatically treated “low-glycemic” cane sugar (e.g., Swerve Brown), which maintains browning and moisture. Beyond 25%, structure suffers — consider adding 1 tbsp inulin fiber to retain tenderness.
- Protein Enrichment: Replace 2 tbsp flour with unflavored whey isolate (not concentrate) — adds 4g protein/slice with zero texture change. Ensure it’s cold-processed to avoid denaturation.
- Healthy Fat Swap: Substitute 1/4 cup butter with avocado oil — same volume, 30% less saturated fat, identical melting point. Flavor remains neutral when paired with almond/vanilla.
- Functional Flour Blends: Replace 30% flour with teff flour (naturally gluten-free, high in iron/calcium) or oat flour (beta-glucan for cholesterol support). Add 1/8 tsp xanthan gum per 1/2 cup substitute.
- Allergen Notes: This recipe is naturally nut-free (almond extract is flavor compound, not tree nut allergen — verify brand’s allergen statement). For dairy-free, use cultured plant butter (e.g., Miyoko’s) and oat milk; for egg-free, aquafaba is the only proven replacement maintaining volume.
- Glycemic Index Context: With refined flour and sugar, GI is ~72 (high). Adding 1 tbsp ground flaxseed to dry ingredients lowers GI to ~65 while boosting omega-3s — undetectable in flavor or texture.
Ingredients
- 340g (2 ¾ cups) ultra-refined bleached all-purpose flour (e.g., Softasilk)
- 360g (1 ¾ cups) granulated cane sugar
- 227g (1 cup / 2 sticks) unsalted butter, European-style, at precisely 65°F
- 360g (1 ½ cups) whole milk, scalded to 180°F and cooled to 90°F
- 280g (1 cup) pasteurized liquid egg whites (approx. 8 large egg whites)
- 12g (1 tbsp) pure almond extract
- 12g (1 tbsp) clear vanilla extract
- 12g (1 tbsp) distilled white vinegar
- 14g (1 ½ tsp) aluminum-free double-acting baking powder
- 4g (3/4 tsp) fine sea salt
Directions
- Preheat oven to 325°F (163°C) with rack centered. Line two 9-inch round cake pans with parchment paper circles; grease only the *sides* with shortening, then dust lightly with flour. Set aside.
- Scald milk: Heat milk in a small saucepan over medium-low heat until tiny bubbles form around edges and temperature reaches 180°F (82°C). Immediately remove from heat, pour into a heatproof bowl, and cool to exactly 90°F (32°C) — use an instant-read thermometer.
- Cream butter & sugar: In stand mixer with paddle attachment, beat butter and sugar on medium-low (Speed 3) for 2 minutes to combine. Increase to medium-high (Speed 6) and beat 6–8 minutes until pale, fluffy, and tripled in volume. Scrape bowl thoroughly.
- Mix dry ingredients: Sift flour, baking powder, and salt together *twice* into a medium bowl.
- Combine batter base: With mixer on low (Speed 2), add 1/3 of dry ingredients to butter-sugar. Mix 5 seconds. Add 1/2 of cooled milk. Mix 10 seconds. Add next 1/3 dry ingredients. Mix 5 seconds. Add remaining milk. Mix 10 seconds. Add final 1/3 dry ingredients. Mix *just* until no dry streaks remain (5–10 seconds). Batter will be thick and glossy.
- Whip egg whites: In a clean, grease-free bowl, combine egg whites, vinegar, almond extract, and vanilla extract. Whip on medium (Speed 5) 2 minutes until foamy. Increase to medium-high (Speed 7) and whip until soft peaks form (3–4 mins). Gradually add remaining sugar (1 tbsp at a time) while whipping. Continue 1–2 minutes until stiff, glossy peaks form — tip bends slightly. Do not over-whip.
- Fold whites: Transfer 1/3 of whites to batter. Using silicone spatula, fold gently but thoroughly until *just* combined (no streaks, but visible swirls). Add half remaining whites; fold *exactly* 12 strokes. Add final whites; fold *exactly* 12 strokes. Stop when uniform and airy — no visible lumps, no deflation.
- Bake: Divide batter evenly between pans (weigh for accuracy: ~580g each). Smooth tops. Tap pans firmly twice on counter. Place in preheated oven. Bake 35–40 minutes, rotating front-to-back at 20 minutes. Cake is done at 208–210°F internal temp, edges pulling away, top springing back, and toothpick with moist crumbs.
- Cool: Cool in pans on wire racks 20 minutes. Run thin knife around edges. Invert onto racks, peel off parchment, then re-invert right-side-up. Cool completely (1.5–2 hours) before frosting.
FAQ
- Why does my white cake turn yellow or gray?
- Gray tint comes from over-mixed batter (gluten development), old baking powder (aluminum reaction), or iodized salt. Yellow hue means egg yolks were accidentally included, butter was too warm (releasing carotene), or vanilla wasn’t clear. Always use pasteurized whites, clear extracts, and fine sea salt.
- Can I make this as cupcakes?
- Absolutely. Fill lined muffin tins 2/3 full. Bake at 325°F for 18–22 minutes. Yield: 24 standard cupcakes. No need to adjust ingredients — the batter’s structure holds perfectly.
- Why do bakery cakes stay moist for days while mine dries out?
- Professional bakeries use invert sugar syrup (2:1 sugar:water boiled 5 mins) brushed on cooled layers — adds humectant properties. At home, brush each layer with 2 tbsp simple syrup (1:1 sugar:water, cooled) before frosting.
- My cake dome cracks dramatically. How do I fix it?
- Dome cracking signals uneven oven heat or premature surface setting. Ensure oven is fully preheated, use light-colored aluminum pans (not dark non-stick), and avoid opening oven door before 25 minutes. Cooling upside-down also minimizes doming.
- Can I freeze the baked layers?
- Yes — wrap *completely cooled* layers tightly in plastic wrap, then in aluminum foil. Freeze up to 3 months. Thaw overnight in fridge, then bring to room temp 2 hours before frosting. Texture remains identical.
- What’s the best frosting to pair with bakery-style white cake?
- Swiss meringue buttercream (SMB) is the gold standard — its silky, less-sweet profile and stable structure mirror professional results. American buttercream is too sweet and dense; cream cheese frosting masks the delicate crumb. For elegance, try white chocolate ganache or stabilized whipped cream with vanilla bean.
- Why did my cake sink in the center?
- Sinking indicates under-baking (internal temp below 208°F), opening oven too early, or over-folding egg whites. Also check baking powder freshness — expired powder causes collapse mid-bake.
- Can I use cake flour instead of bleached AP?
- No. Cake flour’s lower protein (6–8%) lacks the gluten strength needed for tall, stable layers. Bleached AP provides the ideal 8.5–9.5% protein for lift *and* structure — a unique balance cake flour cannot replicate.
Summary
The secret to bakery-style white cake lies not in mystery ingredients, but in the rigorous application of food science principles: precise ingredient temperatures, controlled aeration through extended creaming and stabilized egg whites, thermal treatment of milk for crumb refinement, and unwavering attention to detail at every stage — from flour sifting to oven thermometry.
This isn’t just a recipe — it’s a replicable system developed over a century of professional practice, where every gram, degree, and second is calibrated to transform humble pantry staples into a luminous, ethereal confection worthy of the finest patisserie counter.