Introduction
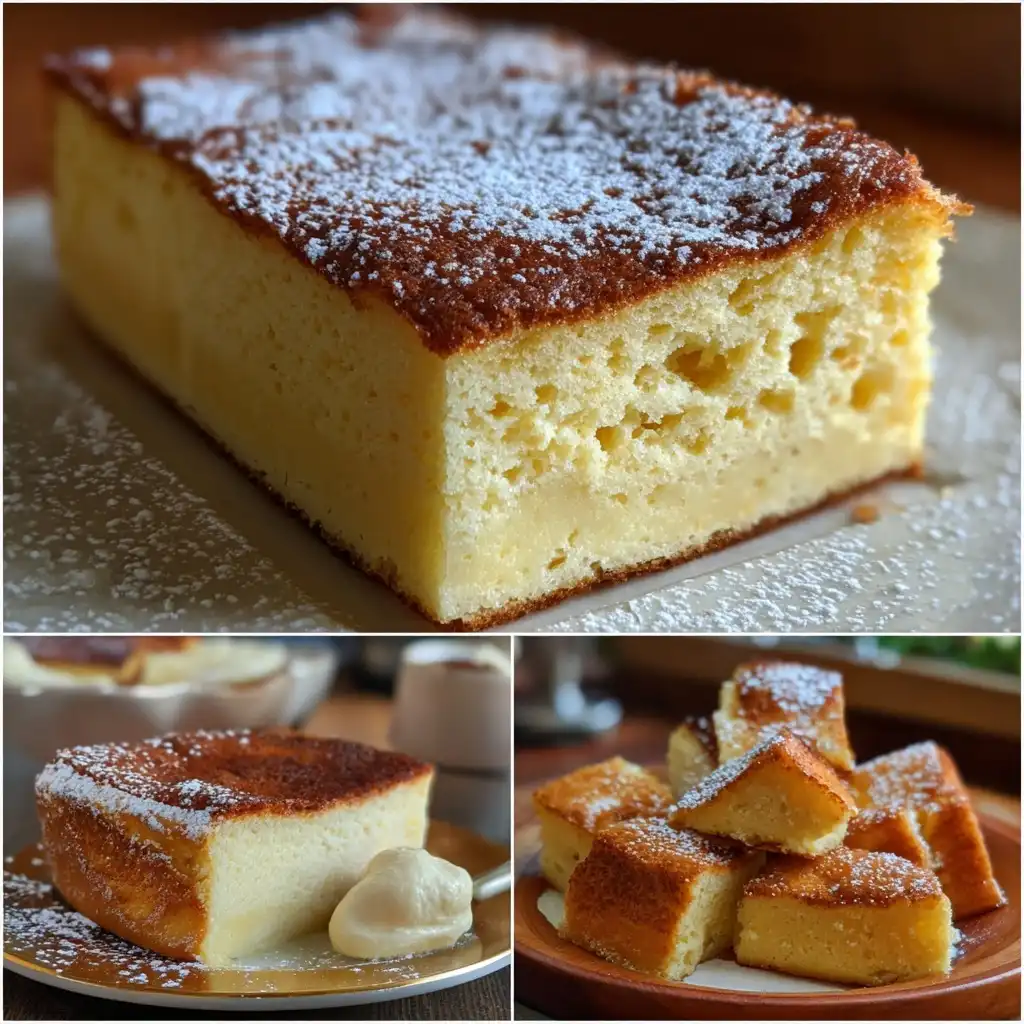
Magic Cake—also known as “Three-Layer Magic Cake,” “Miracle Cake,” or “Japanese Magic Cake”—is a mesmerizing dessert that defies conventional baking logic. From a single, simple batter poured into one pan, it spontaneously separates during baking into three distinct, perfectly textured layers: a dense, custard-like bottom; a light, airy, sponge-like middle; and a delicate, golden-brown cakey top. This alchemical transformation occurs without any layering, folding, or manipulation—just precise ingredient ratios, gentle mixing, and controlled oven conditions. Revered for its visual drama, textural contrast, and minimalist elegance, the Magic Cake has captivated home bakers worldwide, becoming a viral sensation on social media, food blogs, and culinary forums. It’s more than a dessert—it’s edible science, quiet theater, and nostalgic comfort all in one square.
The History
Though often attributed to Japanese home cooking traditions—where layered, subtle-textured sweets like castella and purin have long been cherished—the exact origins of the Magic Cake remain delightfully ambiguous. The earliest documented references appear in mid-2000s Japanese home economics magazines and regional cooking newsletters, where it was called “mājikku kēki” (マジックケーキ) and marketed as an accessible “kitchen miracle” for busy mothers and novice bakers. Its rise coincided with Japan’s broader “shōshin” (beginner-friendly) baking movement, emphasizing intuitive techniques over precision equipment. By 2013, variations began appearing across Southeast Asia—particularly in Korea (maegik keuki) and the Philippines (magic layer cake)—often adapted with local dairy alternatives and pandan infusions. The cake gained global traction around 2016–2017 through YouTube tutorials and Instagram reels, where time-lapse videos of its dramatic layer separation went viral. Notably, it was never patented nor trademarked, allowing organic, cross-cultural evolution—making it a rare example of truly democratic, community-driven culinary innovation. Today, it stands as a beloved symbol of joyful imperfection: a dessert that celebrates serendipity, patience, and the quiet magic hidden in everyday ingredients.
Ingredients Breakdown
What makes this cake “magic” isn’t leavening tricks or secret additives—it’s the elegant interplay of five foundational components, each playing a precise structural and thermal role:
- Eggs: The backbone of texture and separation. Egg yolks provide fat and emulsification for the rich, creamy bottom layer, while egg whites—when gently folded in—create the buoyant, cloud-like middle stratum. Using room-temperature eggs ensures optimal incorporation and thermal responsiveness.
- Granulated Sugar: Beyond sweetness, sugar controls moisture retention and delays starch gelatinization. Its concentration helps create the syrupy, custard-like base by binding water and slowing protein coagulation in the lower third of the batter.
- All-Purpose Flour: Acts as the structural scaffold—but used sparingly. Too much yields a uniform, dense cake; too little causes collapse. Its gluten network forms just enough to support the top layer while remaining weak enough to allow stratification.
- Whole Milk: The primary liquid medium—and the key thermal conductor. Its water content evaporates slowly at the top, concentrating proteins and sugars to form the cakey crust, while its fat and casein proteins coagulate gradually in the cooler, denser bottom zone to produce custard.
- Unsalted Butter: Melted and cooled, it enriches mouthfeel and contributes to the luxurious silkiness of the bottom layer. Clarified butter can be substituted for enhanced stability, though traditional versions favor the nuanced flavor of whole butter.
Optional but highly recommended additions include a splash of pure vanilla extract (for aromatic depth), a pinch of fine sea salt (to balance sweetness and heighten flavor perception), and a drop of lemon juice or white vinegar (to stabilize egg whites and subtly brighten richness).
Step-by-Step Recipe
- Preheat & Prepare: Position oven rack in the center. Preheat oven to 325°F (163°C)—not higher, as excessive heat causes premature surface setting and inhibits layer formation. Grease an 8-inch (20 cm) round, straight-sided cake pan with softened butter, then line the bottom with parchment paper. Lightly dust sides with flour or granulated sugar (sugar prevents sticking while adding subtle caramel notes).
- Warm the Dairy: In a small saucepan over low heat, warm whole milk and butter together until butter is fully melted and mixture reaches 110–115°F (43–46°C)—warm to the touch but not hot. Remove from heat and stir in vanilla and salt. Let cool slightly while you prepare the egg mixture.
- Whisk Yolks & Sugar: In a large bowl, whisk egg yolks and granulated sugar vigorously for 2–3 minutes until pale, thickened, and ribbon-like. This incorporates air and begins emulsifying the fat, crucial for layer differentiation.
- Temper & Combine: Slowly drizzle the warm milk-butter mixture into the yolk-sugar mixture while whisking constantly to prevent scrambling. Once fully combined, sift in flour in two additions, folding gently with a silicone spatula until *just* no streaks remain—overmixing develops gluten and hinders separation.
- Beat & Fold Whites: In a impeccably clean, dry bowl, beat egg whites with cream of tartar (or vinegar) on medium-high speed until soft peaks form—about 4–5 minutes. They should be glossy, billowy, and hold a gentle curl. Using a spatula, fold ⅓ of the meringue into the yolk batter to lighten it, then gently fold in the remaining meringue in two additions, using broad, under-and-over strokes. Stop as soon as no white streaks remain—do not deflate.
- Pour & Bake: Immediately pour batter into prepared pan. Tap firmly on the counter 2–3 times to release large air bubbles. Place pan on a baking sheet (for even heat distribution and spill protection). Bake for 65–75 minutes—do not open the oven door before 55 minutes. The cake is done when the top is deeply golden, springs back lightly when touched, and a toothpick inserted 1 inch from the edge comes out with moist crumbs (not wet batter); the center may still look slightly soft—it will set as it cools.
- Cool Completely: Remove from oven and place pan on a wire rack. Let cool *in the pan* for a full 2 hours—this slow, ambient cooling is non-negotiable. It allows residual heat to continue gentle coagulation, solidifying the custard layer and stabilizing the sponge. After 2 hours, run a thin knife around the edges, invert onto a plate, remove parchment, then reinvert onto a serving platter—bottom layer becomes the visible base.
Tips
- Oven Thermometer Essential: Most home ovens run hot or cold. An oven thermometer is not optional—it’s the single most critical tool for success. Even a 15°F variance disrupts the delicate thermal gradient needed for layering.
- Pan Choice Matters: Use a metal (aluminum or stainless steel) round cake pan—not glass, ceramic, or nonstick-only pans. Metal conducts heat evenly and rapidly, enabling the precise top-to-bottom temperature differential. A springform pan is acceptable if tightly wrapped in foil to prevent leaks, but standard 8-inch rounds yield the most reliable results.
- No Substitutions Without Adjustment: Almond milk, oat milk, or coconut milk alter density, fat content, and protein behavior—leading to inconsistent or failed separation. Same applies to gluten-free flours (they lack the necessary starch-protein matrix) or sugar alternatives (erythritol and stevia don’t caramelize or bind water like sucrose).
- Room-Temperature Eggs Are Non-Negotiable: Cold eggs reduce meringue volume and cause uneven emulsification. To warm quickly: place eggs in warm (not hot) tap water for 5–7 minutes before separating.
- Gentle Folding Is an Art: Treat the batter like fragile spun glass. Over-folding collapses air cells needed for the middle layer; under-folding leaves unmixed meringue pockets that bake into dense gummy spots.
- Cooling Time Is Baking Time: Resist cutting or removing the cake early. The custard layer sets entirely during cooling—cutting too soon releases steam and causes weeping or layer slippage.
- Humidity Awareness: On rainy or high-humidity days, increase flour by 1 tsp and extend bake time by 5–8 minutes. Moisture in the air slows surface evaporation, delaying crust formation.
Variations and Customizations
While the classic Magic Cake is a study in purity, its structure welcomes thoughtful, flavor-forward enhancements—provided core ratios and technique remain intact:
- Pandan Magic Cake: Replace 2 tbsp of milk with fresh pandan juice (or 1 tsp pandan extract + green food gel). Add ¼ tsp roasted sesame oil to butter-milk mixture for nutty depth. Top with toasted coconut flakes and palm sugar syrup.
- Matcha-Infused Magic Cake: Sift 1½ tsp ceremonial-grade matcha with the flour. Reduce sugar by 1 tbsp to offset bitterness. Serve with sweetened kinako (roasted soybean powder) and black sesame crumble.
- Earl Grey Lavender Edition: Steep 2 Earl Grey tea bags and 1 tsp dried culinary lavender in warm milk for 10 minutes; strain thoroughly before mixing. Infuse butter with lavender for 5 minutes off-heat. Garnish with crystallized violets.
- Chocolate Magic Cake: Replace 2 tbsp flour with unsweetened cocoa powder (Dutch-process preferred). Add 1 oz finely chopped dark chocolate (70%) to warm milk-butter mixture and stir until melted. Dust top with cocoa and flaky sea salt.
- Lemon-Ricotta Magic Cake: Substitute ¼ cup whole milk with full-fat ricotta (well-drained and smoothed). Add zest of 2 lemons and 1 tbsp lemon juice to yolk mixture. Finish with lemon glaze (powdered sugar + lemon juice) and candied lemon peel.
- Spiced Chai Magic Cake: Simmer milk with 1 cinnamon stick, 4 cardamom pods, 3 peppercorns, and 1 star anise for 10 minutes; cool and strain. Add ½ tsp ground ginger and ¼ tsp ground cloves to flour. Serve with spiced whipped cream.
- Mini Mason Jar Magic Cakes: Divide batter among six ½-pint mason jars (lightly greased). Bake at 325°F for 40–45 minutes. Perfect for portion control and gifting—layers form beautifully in narrow vessels.
Note: Always test new variations in small batches first. Flavorings should never exceed 1–2 tsp total per recipe, and liquid additions must be accounted for in the milk quantity to preserve hydration balance.
Health Considerations and Nutritional Value
A standard slice (1/12th of an 8-inch cake) contains approximately 210–230 calories, with 11–13g of total fat (7g saturated), 32–35g carbohydrates (24–26g sugars), and 4–5g protein. While not a “health food” per se, the Magic Cake offers notable nutritional context when viewed holistically:
- Natural Ingredients, No Additives: Free from preservatives, artificial flavors, hydrogenated oils, or emulsifiers—unlike many commercial layered desserts. Its simplicity supports mindful eating and ingredient transparency.
- High-Quality Protein Source: Eggs provide all nine essential amino acids in optimal ratios, supporting muscle maintenance and satiety. The custard layer’s slow-cooked egg proteins are highly bioavailable.
- Bioavailable Calcium & Vitamin D: Whole milk contributes ~90mg calcium and naturally occurring vitamin D (especially if fortified), supporting bone health and immune function.
- Minimal Processing: Unlike boxed cake mixes requiring chemical leaveners and stabilizers, this cake relies solely on physical aeration (whipped egg whites) and thermal chemistry—aligning with whole-food, clean-label preferences.
- Modifiable for Dietary Needs: With careful adaptation, it can accommodate lactose sensitivity (lactose-free milk + butter), nut allergies (no nut flours or toppings), and refined-sugar reduction (up to 25% less sugar, balanced with extra vanilla and citrus zest for perceived sweetness).
- Portion-Conscious Enjoyment: Its rich, layered texture promotes slower eating and greater satisfaction per bite—supporting intuitive eating practices better than airy, high-sugar sponge cakes.
That said, individuals managing diabetes should monitor carbohydrate load and consider pairing with a source of fiber (e.g., mixed berry compote) or healthy fat (e.g., almond slivers) to moderate glycemic response. Those with egg allergies should avoid entirely—no effective egg substitute replicates the dual yolk/white functionality required for layer separation.
Ingredients
- 4 large eggs, separated, room temperature
- ¾ cup (150g) granulated sugar, divided
- 1 cup (240ml) whole milk
- ¼ cup (60g) unsalted butter
- 1½ tsp pure vanilla extract
- ¼ tsp fine sea salt
- ⅔ cup (85g) all-purpose flour, sifted
- ⅛ tsp cream of tartar (or ¼ tsp distilled white vinegar)
Directions
- Preheat oven to 325°F (163°C). Grease an 8-inch round cake pan with butter and line bottom with parchment paper. Lightly dust sides with flour or granulated sugar.
- In a small saucepan, combine milk and butter. Heat over low until butter melts and mixture registers 110–115°F (43–46°C) on an instant-read thermometer. Remove from heat; stir in vanilla and salt. Set aside to cool slightly.
- In a large bowl, whisk egg yolks and ½ cup (100g) sugar for 2–3 minutes until pale, thick, and ribbon-stage.
- Gradually drizzle warm milk mixture into yolk mixture while whisking constantly. Once combined, sift in flour and gently fold until just incorporated—no streaks, no overmixing.
- In a separate clean, dry bowl, beat egg whites and cream of tartar on medium-high until soft peaks form (4–5 minutes). Gently fold ⅓ of meringue into yolk batter to lighten, then fold in remaining meringue in two additions until uniform and airy—no deflation.
- Immediately pour batter into prepared pan. Tap pan firmly on counter 3 times. Place on a baking sheet and bake 65–75 minutes—do not open oven before 55 minutes—until top is deep golden and springs back lightly. Toothpick at edge should show moist crumbs.
- Let cool completely in pan on wire rack for 2 full hours. Run knife around edges, invert onto plate, peel off parchment, then reinvert onto serving platter. Chill for 1 hour before slicing for cleanest layers. Serve at cool room temperature.
FAQ
- Why didn’t my cake form three layers?
- The most common culprits are: oven temperature too high (causes rapid surface setting), overmixed batter (develops gluten, preventing separation), cold eggs or milk (disrupts emulsion and thermal gradient), or opening the oven too early. Double-check your oven thermometer and strictly follow cooling instructions.
- Can I make this ahead of time?
- Absolutely—and it improves! Magic Cake tastes best after chilling overnight. Store covered at room temperature for up to 12 hours, or refrigerate for up to 3 days. Bring to cool room temperature 30 minutes before serving for ideal texture contrast.
- Can I freeze Magic Cake?
- Yes—wrap tightly in plastic wrap, then aluminum foil. Freeze for up to 2 months. Thaw overnight in refrigerator, then sit at room temperature for 45 minutes before serving. Texture remains remarkably intact.
- My cake sank in the middle—is it ruined?
- A slight dome depression is normal and does not indicate failure. As long as the three-texture separation is evident upon slicing (custard bottom, sponge middle, cake top), it’s perfect. Sinking often occurs from cooling too quickly or overbaking.
- Can I use a different pan size?
- Not recommended. An 8-inch round pan provides the ideal depth-to-surface ratio for thermal layering. A 9-inch pan yields thinner layers and inconsistent separation; a 7-inch risks overflow and uneven baking. Stick to the specified size for guaranteed magic.
- Is Magic Cake gluten-free friendly?
- Traditional Magic Cake relies on wheat gluten’s specific viscoelastic behavior for layer stabilization. Gluten-free all-purpose blends lack the necessary starch-protein synergy and typically result in collapsed or homogenous texture. A dedicated GF Magic Cake requires extensive reformulation—including xanthan gum, psyllium husk, and modified starches—and is beyond scope for reliable home replication.
- Can I add fruit or nuts?
- Not directly into the batter—add-ins disrupt density gradients and inhibit stratification. However, you may garnish generously: fresh berries, poached pears, toasted nuts, edible flowers, or citrus segments pair beautifully *on top* or alongside.
Summary
Magic Cake is a singular marvel of baking science—a single batter transforming mysteriously in the oven into three harmonious layers of custard, sponge, and cake, guided by precise ratios, thermal discipline, and patient reverence for process.
It invites curiosity, rewards attention to detail, and delivers profound sensory joy—not through complexity, but through the elegant, elemental magic of eggs, milk, sugar, flour, and butter, working in quiet, wondrous concert.