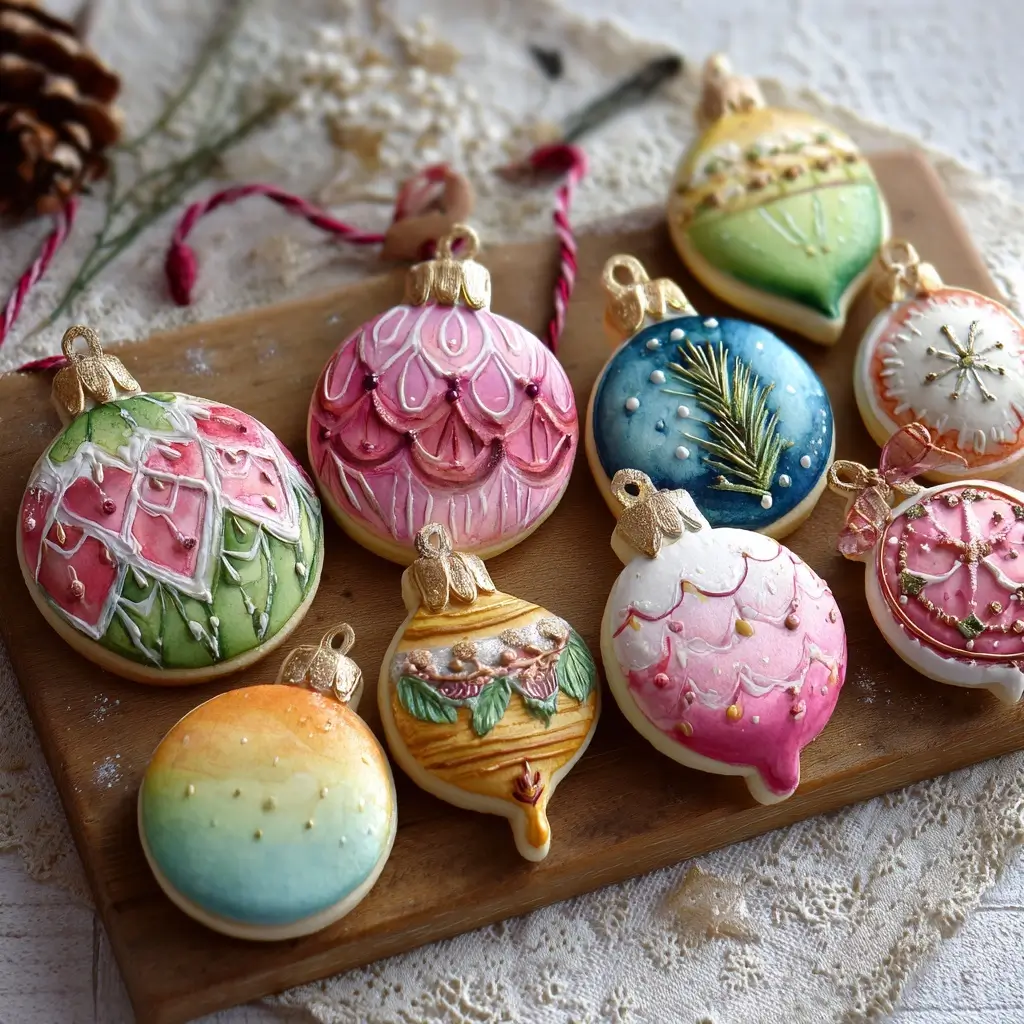
Watercolor Christmas Ornament Cookies
If you’re looking for a festive, artistic, and delicious way to celebrate the holiday season, Watercolor Christmas Ornament Cookies are the perfect treat. These beautifully decorated sugar cookies resemble hand-painted ornaments hanging from delicate ribbons, blending the elegance of watercolor art with the joy of holiday baking. Ideal for cookie exchanges, tree decorations (edible ones!), or as part of a holiday dessert table, these cookies are as much a feast for the eyes as they are for the taste buds.
The History Behind Ornament-Inspired Treats
The tradition of decorating cookies dates back centuries, with roots in German and Scandinavian cultures where gingerbread and speculoos were shaped into stars, animals, and Yule symbols. The modern concept of cookie decorating flourished in the 18th and 19th centuries, especially with the advent of royal icing and refined sugar. By the 20th century, cookie cutters made holiday shapes—trees, snowmen, bells, and ornaments—ubiquitous during Christmas.
Watercolor-style cookies emerged more recently, inspired by the soft, blended hues seen in actual watercolor paintings. Bakers began experimenting with food-safe liquid or gel colors, applying them in gradients to mimic painted glass or stained windows. Combining this technique with ornament-shaped cookies was a natural evolution, especially popularized on social media platforms like Pinterest and Instagram around the 2010s. Today, Watercolor Christmas Ornament Cookies represent the intersection of culinary craft and fine artistry, turning simple sugar cookies into edible masterpieces.
Ingredients Breakdown: What Makes These Cookies Shine
The magic of these cookies lies not just in their appearance but in the quality and function of each ingredient. Here’s a detailed breakdown:
- All-Purpose Flour – Provides the structural base for the dough. Sifted to ensure a tender texture.
- Baking Powder – A small amount helps the cookies rise slightly while maintaining their shape during baking.
- Salt – Enhances flavor and balances sweetness.
- Unsalted Butter (Cold) – Key for flakiness and richness. Must be cold to create steam during baking, contributing to a crisp edge.
- Granulated Sugar – Sweetens the dough and helps with browning.
- Egg Yolk – Adds richness and helps bind the dough without making it tough (using only the yolk avoids excess moisture from the white).
- Vanilla Extract – Deepens flavor and adds warmth.
- Lemon Juice – A small splash brightens the dough and tenderizes it slightly by weakening gluten formation.
- Milk or Heavy Cream – Used sparingly to bring the dough together if needed.
For the Royal Icing:
- Powdered Sugar – The foundation of royal icing; when mixed with meringue powder, it dries hard and smooth.
- Meringue Powder – A safe alternative to raw egg whites, helping the icing set and dry glossy.
- Warm Water – Activates the meringue powder and dissolves the sugar.
- Food Coloring Gels (Watercolor Palette) – Highly concentrated gel colors (like sky blue, cranberry red, emerald green, gold, silver) are used to create soft washes. Liquid colors can work but may alter icing consistency.
- Edible Luster Dust or Pearl Powder – Optional, for shimmer effects mimicking metallic ornaments.
- Fine-Tipped Paintbrushes – Food-safe brushes for blending and layering color.
Step-by-Step Recipe: Crafting Your Watercolor Ornament Cookies
Part 1: Making the Sugar Cookie Dough
- Chill Ingredients: Ensure butter is cold and eggs are refrigerated. This prevents the dough from becoming greasy.
- Mix Dry Ingredients: In a bowl, whisk together 3 cups all-purpose flour, 1/2 teaspoon baking powder, and 1/4 teaspoon salt. Set aside.
- Cream Butter and Sugar: In a stand mixer with paddle attachment, beat 1 cup (2 sticks) cold cubed unsalted butter with 3/4 cup granulated sugar on medium speed until crumbly and pale (about 3–4 minutes). Do not over-cream.
- Add Wet Ingredients: Mix in 1 large egg yolk, 1 teaspoon vanilla extract, and 1/2 teaspoon lemon juice until just combined.
- Incorporate Dry Mix: Gradually add the flour mixture on low speed until clumps form. Pinch the dough—it should hold together without being sticky.
- Form Dough Discs: Turn onto a floured surface, gently knead once or twice, then divide into two flat discs. Wrap in plastic and chill for at least 2 hours (or up to 48 hours).
Part 2: Cutting and Baking the Cookies
- Preheat Oven: 350°F (175°C). Line baking sheets with parchment paper.
- Roll Out Dough: On a floured surface, roll one disc to 1/4-inch thickness. Use ornament-shaped cookie cutters (typically elongated teardrop or bulb shapes with a top loop).
- Cut Shapes: Cut out cookies and transfer to baking sheets using a spatula. Re-roll scraps once for best texture.
- Bake: 8–10 minutes until edges are just golden. Cool completely on wire racks before decorating.
Part 3: Preparing Royal Icing
- Mix Icing: In a stand mixer, combine 4 cups powdered sugar, 3 tablespoons meringue powder, and 6–7 tablespoons warm water. Beat on low, then medium-high for 7–10 minutes until stiff peaks form.
- Consistency Check: For flooding (filling), thin with water (1/2 tsp at a time) until it reaches “15-second” consistency—when lifted, icing should flow back into itself within 15 seconds.
- Divide and Color: Portion icing into bowls. Add small amounts of gel food coloring to create your palette (e.g., red, green, blue, purple, gold). Keep covered with damp cloths.
Part 4: Watercolor Painting Technique
- Flood Base: Using a piping bag or squeeze bottle, outline each cookie with thicker icing, then fill (“flood”) with base color (white or light pastel). Let dry 4–6 hours or overnight.
- Layer Colors: Dip a clean, damp paintbrush into a gel color mixed with a drop of vodka or lemon extract (helps blend and dry faster). Lightly brush color onto the dried base, creating soft gradients.
- Blend & Blur: Use a second clean brush with just a touch of liquid to feather edges and create watercolor-like diffusion.
- Add Details: Once colored, use darker icing to pipe subtle lines (like ornament ridges), dots, or glitter accents. Use luster dust mixed with clear alcohol for metallic sheen.
- Dry Completely: Allow 12–24 hours for full drying before handling or packaging.
Part 5: Adding the “Hanger”
- Create Loop: Before baking, use a straw or small piping tip to poke a hole at the top of each cookie (where the ornament hook would be).
- Thread Ribbon: After decorating, thread baker’s twine, satin ribbon, or metallic cord through the hole for display.
Tips for Perfect Watercolor Ornament Cookies
- Keep Dough Cold: Warm dough spreads. Chill between rolling and baking.
- Use Gel Colors: They’re more concentrated and won’t thin your icing like liquids.
- Work in a Dry Environment: Humidity makes royal icing take forever to dry.
- Label Brushes: Assign one brush per color to avoid muddy mixes.
- Rotate Your Palette: Start light, build to dark. Let layers dry slightly between applications.
- Use Vodka or Extract: Instead of water to thin paint—evaporates faster, reduces smudging.
- Invest in Quality Tools: Piping bags, tips (#2 and #1), offset spatulas, and turntable make decorating smoother.
- Practice First: Try techniques on spare cookies or parchment before committing.
Variations and Customizations
Make these cookies uniquely yours with creative twists:
- Theme Ornaments: Create cookies shaped like snowflakes, stars, or candy canes using different cutters.
- Personalized Initials: Pipe names or initials inside the ornament design.
- Glitter Bombs: Spritz with edible glitter spray or sprinkle micro-beads before icing sets.
- Matte vs. Gloss: For vintage look, skip luster dust. For modern glam, add gold leaf flakes.
- Allergy-Friendly: Use vegan butter, flax egg yolk substitute, and aquafaba-based royal icing.
- Gluten-Free: Substitute with a 1:1 GF flour blend (add 1/4 tsp xanthan gum if not included).
- Mini Versions: Make bite-sized ornaments for cookie jars or favors.
- Non-Edible Decor: Bake extras, let dry completely, and hang on tree (wrap in cellophane for freshness).
Health Considerations and Nutritional Value
While undeniably a treat, here’s what to know about these cookies:
- Calories: ~120–150 per medium cookie (without heavy embellishments).
- Sugar Content: High due to both dough and royal icing (~15–20g per cookie). Consider reducing sugar in dough by 1–2 tbsp if desired.
- Butter & Fat: Contains saturated fat. Can substitute half with vegetable shortening for firmer hold, though flavor suffers.
- Food Dyes: Some gel colors contain synthetic dyes. Opt for natural plant-based colors (beet, spirulina, turmeric) if preferred, though vibrancy may vary.
- Allergens: Contains dairy, wheat, egg, and potential cross-contamination with nuts if tools are shared.
- Storage: Store in airtight containers up to 2 weeks, or freeze undecorated cookies for 3 months.
For a lighter version, consider almond flour shortbread bases or honey-sweetened icing alternatives—but note these will behave differently during decoration.
Full Ingredient List
Sugar Cookies:
- 3 cups (360g) all-purpose flour, sifted
- 1/2 teaspoon baking powder
- 1/4 teaspoon salt
- 1 cup (226g / 2 sticks) cold unsalted butter, cubed
- 3/4 cup (150g) granulated sugar
- 1 large egg yolk
- 1 teaspoon pure vanilla extract
- 1/2 teaspoon lemon juice
- 1–2 tablespoons milk or cream (if needed)
Royal Icing:
- 4 cups (480g) powdered sugar, sifted
- 3 tablespoons meringue powder
- 6–7 tablespoons warm water, divided
- Gel food coloring (red, green, blue, gold, etc.)
- Edible luster dust (optional)
- Food-grade paintbrushes (small, medium, fine)
- Vodka or lemon extract (for thinning paint)
Decorative Extras:
- Satin ribbon, baker’s twine, or metallic cord
- Edible glitter, sprinkles, or pearls
- Piping bags and tips (#2 round tip recommended)
Directions Summary
- Make dough by creaming cold butter and sugar, adding egg yolk and vanilla, then mixing in dry ingredients. Chill 2+ hours.
- Roll to 1/4-inch thick, cut into ornament shapes, and bake at 350°F for 8–10 minutes. Cool completely.
- Prepare royal icing to 15-second consistency. Flood cookies with base color and dry overnight.
- Using damp brushes and gel colors thinned with alcohol, paint soft watercolor washes across the surface.
- Add details like outlines, glitter, or metallic accents. Let dry 12–24 hours.
- Poke holes before baking; thread with ribbon after decorating.
FAQ: Frequently Asked Questions
Can I make these cookies ahead of time?
Yes! Bake and freeze undecorated cookies for up to 3 months. Fully decorated cookies keep in airtight containers for 2 weeks at room temperature.
Why did my royal icing crack?
Cracking usually happens if layers dry too fast or if humidity is high. Work in a climate-controlled space and avoid direct sunlight or fans.
Can I use egg whites instead of meringue powder?
Yes, but raw egg whites pose a salmonella risk. Pasteurized liquid egg whites or meringue powder are safer and more consistent.
How do I fix bleeding colors?
Ensure the base layer is fully dry before painting. Use minimal liquid when blending, and blot brushes often.
Are these cookies safe to eat after being hung on the tree?
Only if kept in a cool, dry place and consumed within a few days. For longer display, make non-edible versions with polymer clay or air-dry dough.
Can kids help decorate?
Absolutely! Let them paint with safe colors and add sprinkles. Supervise use of small tools and ensure all materials are food-grade.
What if I don’t have ornament cutters?
Use a knife to freehand shapes, trace from a template, or even use a bell or teardrop cutter as a substitute.
Summary
Watercolor Christmas Ornament Cookies combine gourmet baking with artistic flair, transforming simple sugar cookies into vibrant, hand-painted holiday treasures. Perfect for gifting, decorating, or spreading seasonal cheer, these edible artworks capture the spirit of Christmas with every colorful brushstroke.