Introduction
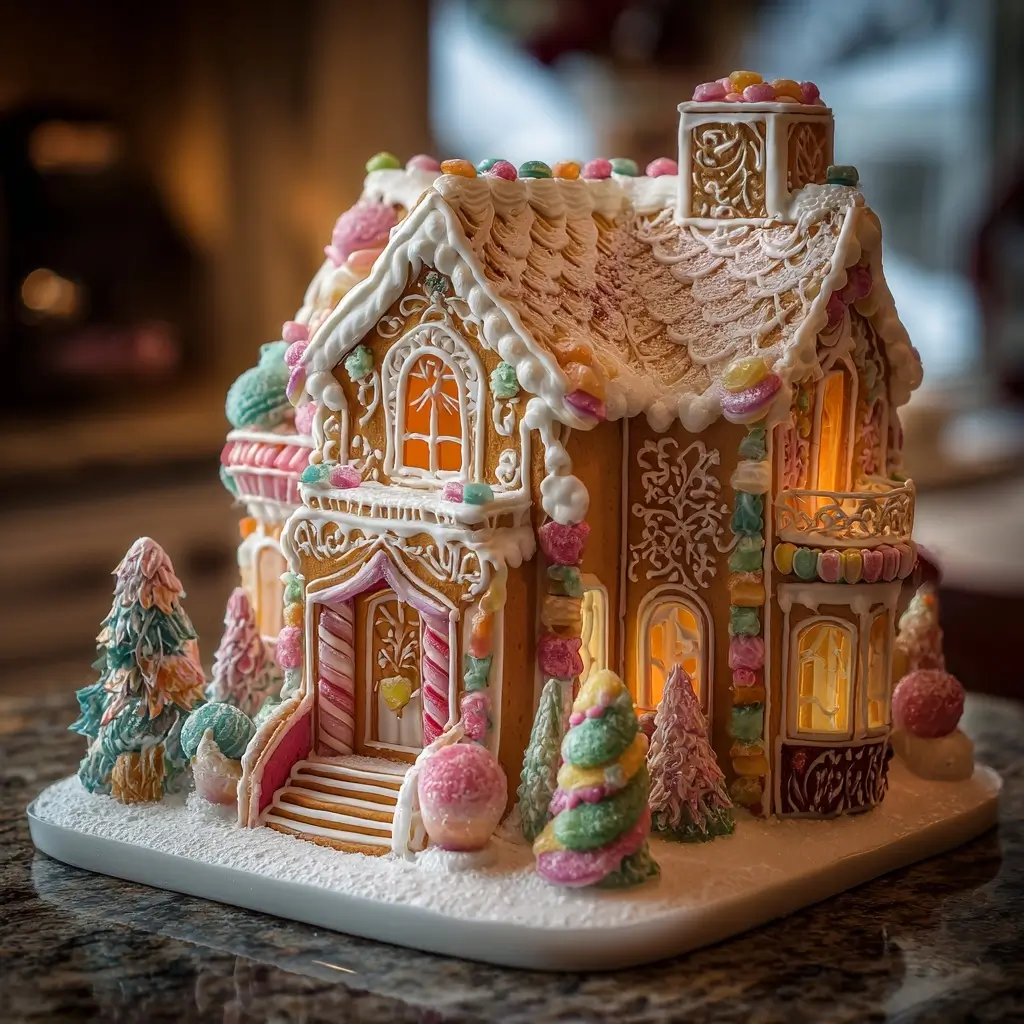
The gingerbread house is more than just a confection—it’s a beloved holiday tradition that brings magic to the season. With its sweet, spiced aroma and whimsical appearance, a gingerbread house can transform any kitchen into a winter wonderland. Whether you’re crafting one with family during Christmas break or showcasing it as a centerpiece at your festive gathering, building an edible gingerbread house is a delightful experience that combines baking, creativity, and storytelling. This guide will walk you through every step of making a fully edible gingerbread house—from understanding its historical roots to mastering the perfect royal icing, and even offering variations for different dietary needs. So roll up your sleeves, gather your tools, and let’s build something deliciously enchanting.
The History
The origins of the gingerbread house trace back to 16th-century Germany, where gingerbread itself had been a popular treat since the Middle Ages. The use of ginger, cinnamon, cloves, and other warming spices was not only prized for flavor but also believed to have digestive and medicinal properties. Over time, bakers began shaping gingerbread into elaborate forms, including figures, hearts, and houses. The concept gained legendary status through the Brothers Grimm fairy tale “Hansel and Gretel,” in which two lost children stumble upon a witch’s cottage made entirely of sweets. This story, published in 1812, captured imaginations across Europe and helped cement the gingerbread house as a symbol of both temptation and homecoming. German bakers in regions like Nuremberg—renowned for their spice trade and pastry craftsmanship—became especially famous for their ornate gingerbread creations. By the 19th century, the tradition spread throughout Europe and North America, evolving into the colorful, icing-laden structures we know today. Modern gingerbread houses are often built during the holidays using pre-cut kits or homemade templates, but the spirit remains the same: a celebration of warmth, nostalgia, and the joy of handmade treats.
Ingredients Breakdown
Creating an edible gingerbread house requires two essential components: the gingerbread dough for the structure and royal icing for assembly and decoration. Each ingredient plays a vital role in ensuring the house holds together while remaining safe and delicious to eat.
- Gingerbread Dough:
- Flour: All-purpose flour provides the structure and chewiness needed for sturdy walls and roof panels. For a gluten-free version, a high-quality 1:1 gluten-free flour blend can be substituted.
- Brown Sugar: Adds moisture, richness, and a caramel-like depth. It also helps the dough brown evenly during baking.
- Molasses: The star ingredient! Blackstrap molasses delivers the deep, robust flavor characteristic of traditional gingerbread. It also contributes to the dark color and tender crumb.
- Butter: Unsalted butter adds fat for tenderness and enhances flavor. It should be softened but not melted for proper creaming.
- Egg: Binds the ingredients and adds structure. A large egg is standard, though flax eggs can be used for vegan alternatives.
- Spices (Ginger, Cinnamon, Cloves, Nutmeg): These warm spices define the taste profile. Freshly ground spices offer the most vibrant flavor.
- Baking Soda: Acts as a leavening agent, helping the dough rise slightly for a soft interior while keeping edges crisp.
- Salt: Balances sweetness and enhances overall flavor complexity.
- Royal Icing:
- Powdered Sugar: Forms the base of the icing, providing sweetness and structure when dried.
- Egg Whites: Traditional royal icing uses raw egg whites, which dry hard and act like edible glue. For safety, pasteurized egg whites or meringue powder are recommended alternatives.
- Lemon Juice or Cream of Tartar: Stabilizes the icing, prevents crystallization, and adds a slight tang to balance sweetness.
- Decorations (Edible Only):
- Sprinkles, candy canes, gumdrops, jelly beans, licorice, colored sugars, mini chocolate chips, maraschino cherries (dried), coconut flakes, and fruit slices (dried or candied) are all excellent choices. Avoid non-edible items like plastic figurines unless clearly marked as food-safe.
Step-by-Step Recipe
- Prepare the Gingerbread Dough: In a large bowl, cream together ¾ cup (170g) softened unsalted butter and ¾ cup (150g) packed brown sugar until light and fluffy. Add 1 large egg and ½ cup (120ml) molasses, mixing until well combined.
- Mix Dry Ingredients: In a separate bowl, whisk together 3 cups (360g) all-purpose flour, 1 tsp baking soda, ½ tsp salt, 2 tsp ground ginger, 1½ tsp ground cinnamon, ¼ tsp ground cloves, and ¼ tsp nutmeg.
- Combine Wet and Dry Mixtures: Gradually add the dry ingredients to the wet mixture, mixing on low speed or by hand until a soft dough forms. If the dough is too sticky, chill it for 10 minutes before rolling.
- Chill the Dough: Divide the dough into two equal portions, flatten into discs, wrap in plastic, and refrigerate for at least 2 hours (or up to 3 days). Chilling prevents spreading during baking and makes the dough easier to handle.
- Preheat Oven and Prepare Pans: Preheat oven to 350°F (175°C). Line baking sheets with parchment paper or silicone mats.
- Roll and Cut Shapes: On a floured surface, roll out one disc of dough to ¼-inch thickness. Use a gingerbread house template (available online) to cut out walls, roof panels, door, windows, and chimney. Carefully transfer pieces to baking sheets using a spatula.
- Bake: Bake for 10–14 minutes, or until firm to the touch and lightly browned around the edges. Let cool on the pan for 5 minutes, then transfer to wire racks to cool completely. Repeat with second dough portion.
- Make Royal Icing: In a clean bowl, beat 3 large egg whites (or equivalent meringue powder + water) until frothy. Gradually add 4 cups (480g) powdered sugar and 1 tsp lemon juice. Beat on high for 5–7 minutes until thick, glossy, and stiff peaks form. Transfer to a piping bag fitted with a small round tip (e.g., #3 or #5).
- Assemble the House: Pipe a thick line of icing along the bottom edge of one wall piece and attach it upright to a cardboard base (covered in foil or edible paper). Support it with cans or mugs until stable. Attach the second wall, then join corners with extra icing. Allow seams to dry slightly before adding roof panels.
- Add Roof and Chimney: Pipe icing along the top edges of the walls and carefully place roof panels at an angle. Hold in place for 1–2 minutes until secure. Attach chimney piece with generous icing.
- Decorate: Once the structure is stable (after 30–60 minutes), begin decorating with piped icing designs (snowy edges, shingles, wreaths) and press on candies. Be creative—use licorice for window panes, gumdrops for doorknobs, and crushed cookies for pathways.
- Dry Overnight: Let the house sit uncovered for several hours or overnight to allow icing to harden fully.
Tips
- Use a Template: Print and laminate a full-size gingerbread house pattern. Tape it to wax paper, then lay dough on top for precise cutting.
- Don’t Rush Assembly: Work slowly and support each piece until the icing sets. Use books, cans, or jars as temporary braces.
- Keep Icing Covered: Royal icing dries quickly. Cover unused portions with a damp cloth or store in an airtight container.
- Thicker Edges = Stronger Structure: Slightly over-bake edges if needed to ensure rigidity. Walls should feel firm, not flexible.
- Avoid Humidity: High moisture can soften the gingerbread and prevent icing from setting. Assemble in a climate-controlled room.
- Work with Kids? Pre-bake the pieces and let children focus on decorating—less stress, more fun!
- Storage Tip: Keep assembled houses in a cool, dry place away from direct sunlight to preserve shape and color.
Variations and Customizations
- Gluten-Free Gingerbread: Substitute all-purpose flour with a reputable gluten-free blend containing xanthan gum. Add an extra ½ tsp xanthan gum if not included.
- Vegan Version: Replace butter with vegan margarine, egg with a flax egg (1 tbsp ground flaxseed + 3 tbsp water), and use aquafaba (chickpea brine) or meringue powder instead of egg whites in icing.
- Mini Houses: Make individual-sized gingerbread cottages using smaller templates—perfect for party favors or classroom activities.
- Theme Houses: Create a winter forest, Santa’s workshop, Hogwarts-inspired castle, or a beachside gingerbread hut using themed candies and colors.
- Sugar-Free Option: Use erythritol-based powdered sugar and sugar-free molasses substitute (though flavor may vary). Note: texture and browning may differ.
- Colored Dough: Add natural food coloring (beet powder, spirulina, turmeric) to create red, green, or yellow gingerbread walls.
- Scented Houses: Infuse dough with orange zest or vanilla extract for a citrusy twist, or add almond extract for a marzipan-like aroma.
Health Considerations and Nutritional Value
While gingerbread houses are festive and fun, they are best enjoyed in moderation due to their high sugar and calorie content. A typical serving (one wall panel with icing and candy) can contain 150–250 calories, depending on size and decorations. The main health considerations include:
- Sugar Content: Both the dough and royal icing are rich in added sugars. One cup of royal icing contains about 300 calories and 75g of sugar. Limit portions and consider sharing.
- Spice Benefits: Ginger has anti-inflammatory and digestive properties. Cinnamon may help regulate blood sugar, though in small amounts found in recipes, these benefits are minimal.
- Allergens: Contains common allergens: wheat (gluten), eggs, dairy (butter), and tree nuts (if used in decorations). Always label accordingly when serving guests.
- Food Safety: Traditional royal icing uses raw egg whites, posing a salmonella risk. Use pasteurized eggs, liquid egg whites, or meringue powder for safer consumption, especially for children, pregnant individuals, or immunocompromised persons.
- Dietary Modifications: Health-conscious bakers can reduce sugar by 25% in dough, use whole wheat flour (though texture will be denser), or opt for natural sweeteners like date paste (with adjustments to moisture levels).
Ingredients
Gingerbread Dough:
- ¾ cup (170g) unsalted butter, softened
- ¾ cup (150g) packed brown sugar
- ½ cup (120ml) molasses (preferably blackstrap)
- 1 large egg
- 3 cups (360g) all-purpose flour
- 1 teaspoon baking soda
- ½ teaspoon salt
- 2 teaspoons ground ginger
- 1½ teaspoons ground cinnamon
- ¼ teaspoon ground cloves
- ¼ teaspoon ground nutmeg
Royal Icing:
- 4 cups (480g) powdered sugar, sifted
- 3 large egg whites (pasteurized recommended) OR 3 tablespoons meringue powder + 6 tablespoons water
- 1 teaspoon lemon juice or cream of tartar
Decorations (Choose Edible Options):
- Candy canes (broken for fence posts)
- Gumdrops, jelly beans, or malted milk balls
- Licorice laces (black and red)
- Sprinkles and colored sugars
- Mini chocolate chips or M&M’s
- Shredded coconut (for snow)
- Dried fruit slices (apricots, cranberries)
- Maraschino cherries (drained and halved)
- Crushed sandwich cookies (for pathways)
Directions
- In a stand mixer fitted with paddle attachment, cream butter and brown sugar on medium speed for 2–3 minutes until fluffy.
- Add molasses and egg; mix until smooth and emulsified.
- In a separate bowl, combine flour, baking soda, salt, ginger, cinnamon, cloves, and nutmeg.
- Gradually add dry ingredients to wet mixture on low speed until a cohesive dough forms.
- Divide dough into two discs, wrap in plastic, and chill for at least 2 hours.
- Preheat oven to 350°F (175°C). Roll out one disc on a floured surface to ¼-inch thickness.
- Place template pieces over dough and cut with a sharp knife. Transfer shapes to parchment-lined baking sheets.
- Bake for 10–14 minutes until firm. Cool completely on wire racks.
- Repeat with second dough disc.
- To make royal icing, beat egg whites (or meringue mixture) until frothy. Gradually add sifted powdered sugar and lemon juice. Beat 5–7 minutes until stiff peaks form.
- Transfer icing to piping bags. Use immediately or cover surface with plastic wrap to prevent drying.
- Assemble house on a sturdy base (cardboard covered in foil or edible rice paper). Pipe icing along edges and join walls, supporting with cans until set.
- Attach roof panels and chimney using thick lines of icing. Hold in place for 1–2 minutes.
- Once structure is stable, decorate with piped details and pressed-on candies.
- Allow to dry overnight before moving or serving.
- Serve in small portions. Store in a cool, dry place for up to 2 weeks (longer if sealed in an airtight container).
FAQ
- Can I make a gingerbread house without royal icing?
- No—royal icing is essential because it dries hard and acts as structural glue. Buttercream or whipped cream will not hold the weight.
- How long does a gingerbread house last?
- Properly stored, an edible gingerbread house can last 2–3 weeks at room temperature. After that, it may become stale or attract pests. Discard if mold appears.
- Can I eat the entire gingerbread house?
- Yes! Every part—walls, roof, icing, and decorations—should be edible if made with food-safe ingredients. Avoid non-food items like plastic toys.
- Why did my gingerbread house collapse?
- Common causes include under-baked pieces, weak icing, rushing assembly, or humidity. Ensure pieces are fully cooled and use thick, stiff royal icing.
- Can I make this ahead of time?
- Absolutely! Bake and decorate components up to 2 weeks in advance. Assemble 1–2 days before display for best freshness.
- What can I use as a base?
- A sturdy cardboard sheet covered in aluminum foil, edible wafer paper, or a wooden board (if not consuming) works well. For full edibility, use a large cookie or cake base.
- Are there kid-friendly alternatives?
- Yes! Let children decorate pre-assembled houses or use marshmallows and graham crackers for no-bake versions.
Summary
Building an edible gingerbread house is a heartwarming holiday tradition that combines baking artistry with imaginative design, resulting in a delicious and visually stunning centerpiece. From selecting quality spices to mastering royal icing, every step offers joy and flavor worth savoring—one sweet bite at a time.