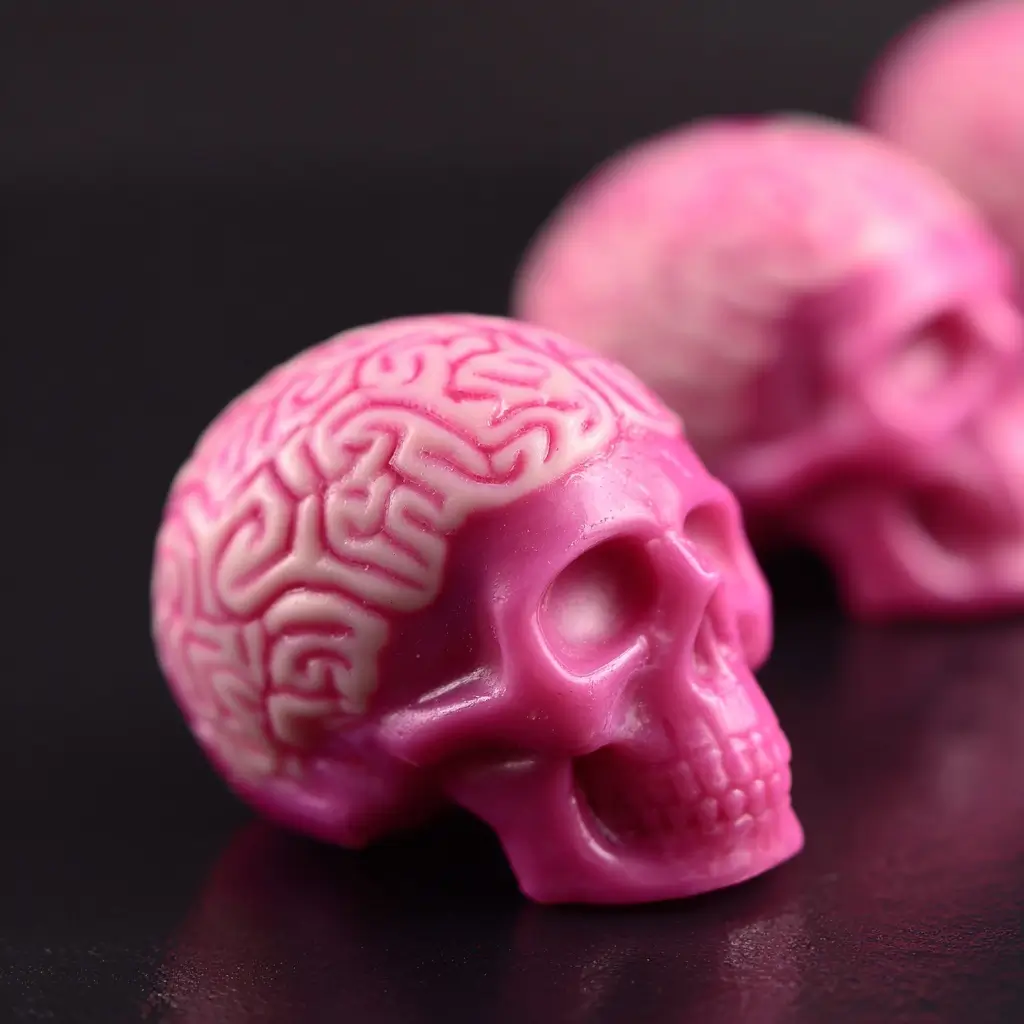
Pink Brain Mousse in White Chocolate Skulls
A hauntingly delightful dessert that combines eerie presentation with luxurious flavor, the Pink Brain Mousse in White Chocolate Skulls is a show-stopping treat perfect for Halloween parties, themed dinners, or any occasion where you want to impress guests with both taste and theatrical flair. Imagine silky pink mousse shaped like brains, nestled inside delicately molded white chocolate skulls—creepy yet elegant, sweet yet sophisticated. This dessert blends artistry with culinary craft, offering a sensory experience that’s as visually captivating as it is delicious.
The History Behind the Haunt
While there isn’t a centuries-old tradition behind brain-shaped desserts, the fascination with macabre cuisine dates back to medieval banquets and Victorian-era dinner parties, where illusion foods—dishes designed to resemble animals, body parts, or unexpected objects—were popular among the elite. In modern times, chefs and home bakers have embraced the grotesque-gourmet trend, especially around Halloween. The idea of “brain” desserts emerged from this movement, often made with jellied meats or gelatin molds during savory courses.
The evolution into sweet versions began with the rise of molecular gastronomy and creative plating techniques in the early 2000s. Pastry chefs started experimenting with textures and shapes, using silicone molds to create anatomically inspired confections. The Pink Brain Mousse in White Chocolate Skulls is a contemporary twist on this theme—merging whimsy, horror, and high-end dessert design. Pink symbolizes sweetness and playfulness, contrasting with the skull motif to create an intriguing juxtaposition between danger and delight.
Ingredients Breakdown: What Makes This Dessert So Irresistible?
This dessert is more than just its spooky appearance—it’s built on a foundation of rich, high-quality ingredients that deliver a luscious mouthfeel and balanced flavor profile. Let’s break down what goes into each component:
For the White Chocolate Skulls:
- White Chocolate (High-Quality): At least 60% cocoa butter content ensures smooth melting, glossy finish, and clean release from molds. Avoid brands with excessive palm oil or artificial flavors.
- Coconut Oil (Optional): A small amount can be added to enhance snap and stability, especially in warmer climates.
For the Pink Brain Mousse:
- Heavy Cream: Provides the airy, velvety texture when whipped. Must be cold for optimal volume.
- Sweetened Condensed Milk: Adds richness and sweetness without crystallizing, helping stabilize the mousse.
- Gelatin Sheets or Powder: Essential for structure and firmness, allowing the mousse to hold its brain-like ridges.
- Water (for blooming gelatin): Used to activate the gelatin before incorporation.
- Pink Food Coloring (Gel-Based Preferred): Offers vibrant hue without altering consistency. Natural alternatives include beetroot powder or hibiscus extract.
- Vanilla Extract: Enhances overall aroma and balances the sweetness.
- Fresh Berries (Puréed Optional): For natural color and tartness; raspberry or strawberry purée adds fruity depth.
Optional Garnishes & Enhancements:
- Edible glitter or gold dust for a supernatural shimmer
- Mint leaves or candied flowers for contrast
- Dried cranberries or pomegranate seeds to resemble “blood clots”
- Crushed pistachios or toasted coconut for textural contrast
Step-by-Step Recipe: Crafting Your Creepy Confection
Follow these detailed steps to create your own stunning Pink Brain Mousse in White Chocolate Skulls. Patience and precision are key—this is as much an art project as it is a recipe.
Step 1: Prepare the White Chocolate Skulls
- Begin by selecting food-grade silicone skull molds (available online or at specialty baking stores). Clean thoroughly and dry completely.
- Chop high-quality white chocolate into uniform pieces to ensure even melting.
- Melt the chocolate using a double boiler: Place a heatproof bowl over a pot of simmering water (ensure the bowl doesn’t touch the water). Stir constantly until smooth and reaches 104–113°F (40–45°C).
- Optional: Add ½ teaspoon of refined coconut oil per 8 oz of chocolate to improve shine and hardness.
- Using a small brush or spoon, coat the inside of each skull cavity with melted chocolate. Start with the details (eye sockets, nasal cavity) first, then fill in larger areas. Rotate the mold to spread evenly.
- Let the layer set in the refrigerator for 10 minutes. Repeat the process 2–3 times to build thickness and strength.
- After the final layer, chill for at least 30 minutes until fully hardened.
- Carefully demold by gently pressing the back of each cavity. Store in a cool place until ready to assemble.
Step 2: Make the Pink Brain Mousse
- In a small bowl, sprinkle 1 packet (or 2 sheets) of unflavored gelatin over ¼ cup cold water. Let bloom for 5–7 minutes.
- In a saucepan, warm the bloomed gelatin over low heat, stirring continuously until fully dissolved (do not boil).
- In a separate bowl, mix 1 can (14 oz) sweetened condensed milk, 1 teaspoon vanilla extract, and a few drops of pink gel food coloring. Stir in the melted gelatin mixture until fully combined.
- If using fruit purée, blend ½ cup fresh raspberries or strawberries until smooth, then strain to remove seeds. Fold into the milk mixture.
- In a chilled bowl, whip 2 cups of cold heavy cream to soft peaks. Gradually fold into the pink mixture in three additions, ensuring no streaks remain. Be gentle to maintain airiness.
- Transfer the mousse into a piping bag fitted with a wide round tip (or use a plastic bag with the corner snipped).
Step 3: Assemble the Brains Inside the Skulls
- Place the white chocolate skulls on a tray lined with parchment paper.
- Pipe the pink mousse into each skull mold, starting from the center and spiraling outward to mimic brain folds. Overfill slightly so the top is rounded.
- Smooth the surface gently with an offset spatula or the back of a spoon to enhance the cerebral texture.
- Chill assembled desserts for at least 2 hours, or overnight for best results.
Step 4: Final Presentation
- Just before serving, carefully unmold the mousse brains if desired (though they can remain in the chocolate shells).
- Garnish with edible glitter, drizzled red coulis (raspberry or grenadine), or mint sprigs for dramatic effect.
- Serve chilled on individual plates with themed labels like “Caution: Contains Imagination” or “Handle With Care – Fragile Mind Inside.”
Tips for Perfection: Mastering the Macabre
- Temperature Control: Keep all dairy components cold and work quickly when handling mousse to prevent deflation.
- Gelatin Consistency: Too little gelatin = runny mousse; too much = rubbery texture. Stick to tested ratios (1 sheet per ½ cup liquid).
- Color Depth: Gel-based food coloring gives intense pigment without thinning the mixture. Add gradually to achieve your desired shade of pink—from blush to neon magenta.
- Mold Mastery: Silicone molds must be completely dry before pouring chocolate. Any moisture causes streaking or poor adhesion.
- Demolding Delicacy: Warm the outside of the chocolate mold slightly with a hairdryer (from 6 inches away) to ease release without cracking.
- Serving Suggestion: Pair with sparkling rosé or berry-infused cocktails for a full sensory experience.
- Storage: These desserts are best consumed within 24 hours. Store covered in the fridge, but allow 5–10 minutes at room temperature before serving for optimal texture.
Variations and Customizations: Make It Your Own
The beauty of this dessert lies in its versatility. Whether you’re catering to dietary needs, flavor preferences, or seasonal themes, here are some creative spins:
Flavor Twists:
- Chocolate-Pink Swirl: Add a dark chocolate ribbon through the mousse for a “neural pathway” effect.
- Rosewater Elegance: Replace vanilla with rosewater for a floral, Middle Eastern-inspired version.
- Lavender Lemon: Infuse cream with culinary lavender and add lemon zest for a refreshing twist.
- Matcha Monster: Use pale green mousse instead of pink for a “toxic brain” look.
Dietary Adaptations:
- Dairy-Free: Substitute heavy cream with full-fat coconut milk and use dairy-free white chocolate.
- Vegan Version: Use agar-agar instead of gelatin, aquafaba for fluffiness, and plant-based condensed milk alternatives.
- Sugar-Free: Opt for sugar-free condensed milk and erythritol-sweetened white chocolate, using stevia or monk fruit for additional sweetness.
- Gluten-Free: Naturally gluten-free, but always check labels on chocolate and food coloring.
Themed Variations:
- Valentine’s Edition: Heart-shaped molds with deep crimson mousse labeled “Love Potion #9.”
- Easter Surprise: Hollow skulls with mini candy eggs hidden inside.
- Sci-Fi Glow Brains: Add UV-reactive edible powder and serve under black light for a laboratory effect.
- Kid-Friendly Monsters: Use gummy worms emerging from the brain for playful horror.
Health Considerations and Nutritional Value
While undeniably decadent, understanding the nutritional makeup helps balance indulgence with awareness.
Nutrition Facts (Per Serving, Approximate):
- Calories: ~320 kcal
- Total Fat: 24g (Saturated: 15g)
- Cholesterol: 60mg
- Sodium: 65mg
- Total Carbohydrates: 26g (Sugars: 24g)
- Protein: 4g
- Gelatin Benefits: Supports joint health and skin elasticity due to collagen content.
Health Notes:
- Sugar Content: High due to condensed milk and white chocolate. Consider reducing sugar or using alternatives for diabetic guests.
- Portion Control: Serve in smaller molds or shot glasses to keep calories in check while maintaining impact.
- Allergens: Contains dairy, possible soy (in chocolate), and potential traces of nuts depending on brand.
- Balancing Act: Offset with fresh fruit platters or herbal teas to aid digestion after rich desserts.
Full Ingredient List
White Chocolate Skulls:
- 12 oz (340g) high-quality white chocolate, finely chopped
- 1 tsp refined coconut oil (optional)
Pink Brain Mousse:
- 1 packet (¼ oz / 7g) unflavored gelatin powder (or 2 gelatin sheets)
- ¼ cup (60ml) cold water
- 14 oz (397g) can sweetened condensed milk
- 2 cups (480ml) cold heavy whipping cream
- 1 tsp pure vanilla extract
- Red or pink gel food coloring (½ tsp or to desired shade)
- Optional: ½ cup fresh raspberry or strawberry purée (strained)
Garnishes (Optional):
- Edible glitter or luster dust
- Fresh berries or mint leaves
- Raspberry coulis or melted red fruit jelly
- Toasted coconut flakes or crushed nuts
Detailed Directions
- Melt the Chocolate: Using a double boiler, melt white chocolate with coconut oil (if using) until smooth and glossy. Maintain temperature below 115°F (46°C).
- Coat the Molds: Brush melted chocolate into each skull cavity, ensuring even coverage. Refrigerate for 10 minutes between layers. Repeat 2–3 times for durability.
- Final Chill: After last layer, refrigerate for 30 minutes to fully harden. Gently demold and set aside.
- Bloom Gelatin: Sprinkle gelatin over cold water and let sit 5–7 minutes until spongy.
- Dissolve Gelatin: Heat bloomed gelatin over low heat until clear and liquid. Cool slightly.
- Mix Base: In a large bowl, combine sweetened condensed milk, vanilla, food coloring, and fruit purée (if using). Whisk in gelatin mixture until smooth.
- Whip Cream: In a chilled bowl, beat heavy cream to soft peaks. Do not over-whip.
- Fold Together: Gently fold whipped cream into the pink base in three batches. Keep mixture light and airy.
- Fill Skulls: Pipe or spoon mousse into white chocolate skulls, creating a domed, brain-like shape.
- Chill Thoroughly: Refrigerate for at least 2 hours or until firm.
- Decorate & Serve: Add garnishes just before presenting. Serve cold for best texture.
Frequently Asked Questions (FAQ)
Q: Can I make the chocolate skulls ahead of time?
A: Absolutely! Make them up to one week in advance and store in an airtight container in a cool, dry place.
Q: What if I don’t have skull molds?
A: You can use brain-shaped ice cube trays, silicone candy molds, or even hand-carve temporary molds from styrofoam (though not food-safe—only for shaping outer shells).
Q: Can I freeze this dessert?
A: Not recommended. Freezing may cause condensation upon thawing, leading to soggy chocolate and separated mousse.
Q: Is the gelatin necessary?
A: Yes, for structure. However, vegans can substitute with agar-agar (use 1 tsp agar powder boiled in ¼ cup liquid for 5 minutes, then cooled slightly before mixing in).
Q: How do I get the perfect brain texture?
A: Use a piping bag and swirl from the center outward. Chilling partially before final set helps preserve the shape.
Q: Are these safe for kids?
A: Yes, though the appearance might be scary for very young children. Offer a fun explanation like “magic fairy brains” to ease fears.
Q: Can I use different colors?
A: Definitely! Green for monsters, blue for aliens, yellow for “buttery thoughts”—the possibilities are endless.
Summary
The Pink Brain Mousse in White Chocolate Skulls is a masterful fusion of culinary technique and artistic expression—a dessert that shocks the eyes and delights the palate. From its ghostly white shell to the vibrant, creamy brain within, every bite is a celebration of creativity, flavor, and fearless fun.