Chocolate Cheesecake Brownie Cake: A Decadent Fusion Dessert
Indulgence meets creativity in the form of the Chocolate Cheesecake Brownie Cake — a heavenly dessert that combines the richness of brownies, the creaminess of cheesecake, and the deep flavor of chocolate into one irresistible treat. Whether you’re planning a dinner party or simply satisfying your sweet tooth, this layered dessert is guaranteed to impress. This recipe is designed to guide you step-by-step through the process of creating a dessert that’s as beautiful as it is delicious.
A Brief History of Cheesecake and Brownies
Cheesecake has roots that stretch back to ancient Greece, where it was served to athletes during the first Olympic games. The Romans later adopted the recipe and spread it throughout Europe. Modern cheesecake, especially the creamy New York style, became popular in the United States during the 19th century.
Brownies, on the other hand, are a more recent invention. They’re believed to have originated in the United States in the late 1800s, likely as a result of a happy baking accident. Over time, bakers began experimenting with the base chocolate brownie recipe, giving rise to variations like the Chocolate Cheesecake Brownie Cake we know and love today.
Ingredients Breakdown
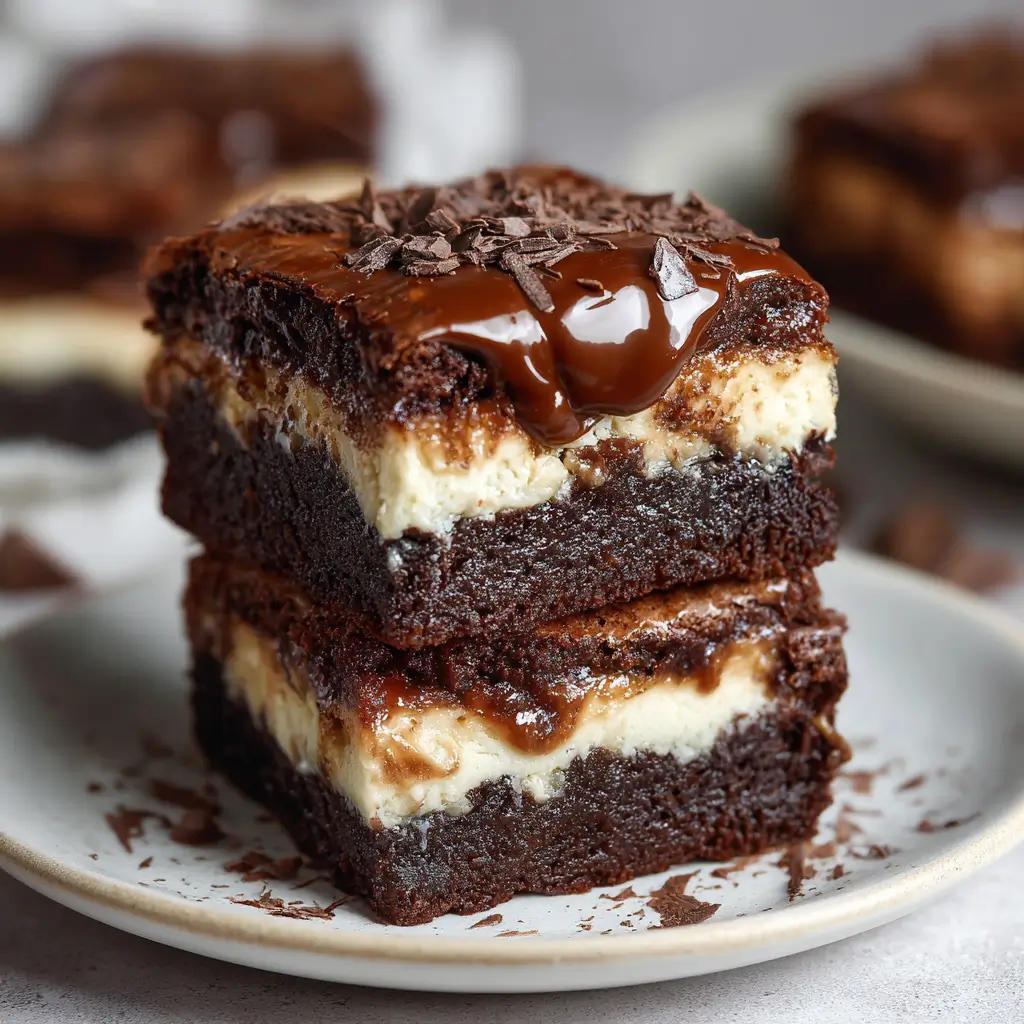
Each layer of this dessert serves a unique purpose and contributes to the overall experience:
- Dark Chocolate: Adds depth and richness to the brownie layer.
- Unsalted Butter: Provides moisture and a smooth texture.
- Granulated Sugar & Brown Sugar: Sweetens the brownie and adds a caramel-like flavor.
- Eggs: Bind the ingredients and create structure.
- All-Purpose Flour: Gives the brownie layer its dense, fudgy texture.
- Cocoa Powder: Enhances the chocolate flavor.
- Vanilla Extract: Adds aromatic depth to both layers.
- Cream Cheese: The base of the cheesecake layer, offering tangy creaminess.
- Heavy Cream: Makes the cheesecake layer extra smooth and luxurious.
- Chocolate Chips or Ganache: For drizzling or topping, adding an extra layer of chocolate decadence.
Step-by-Step Recipe
- Preheat oven to 350°F (175°C). Line an 8×8-inch (or 9×9-inch) baking pan with parchment paper.
- Prepare the brownie base: In a microwave-safe bowl, melt dark chocolate and butter together in 30-second increments until smooth. Stir in sugar, brown sugar, and eggs until well combined. Sift in flour and cocoa powder, then fold in gently until no dry spots remain. Stir in vanilla extract.
- Pour the brownie batter into the prepared pan and set aside.
- Make the cheesecake layer: In a separate bowl, beat cream cheese and sugar until smooth. Add one egg and mix well. Stir in heavy cream and vanilla extract.
- Layer the cheesecake mixture on top of the brownie batter.
- Swirl the layers with a knife or toothpick for a marbled effect (optional).
- Bake for 35-40 minutes, or until the center is just set. The edges should be firm but the center should have a slight wobble.
- Cool completely at room temperature, then refrigerate for at least 2 hours (or overnight) to set the cheesecake layer.
- Optional topping: Melt chocolate chips and drizzle over the top before slicing.
Pro Tips for Perfect Results
- Use room temperature cream cheese to ensure a smooth, lump-free cheesecake layer.
- Don’t overbake — the cheesecake will continue to set as it cools and chills.
- For a fudgier brownie layer, slightly underbake the base before adding the cheesecake topping.
- Chill the cake for at least two hours to get clean slices and a firm texture.
- If using a water bath for the cheesecake layer, wrap the pan tightly in foil to prevent leaks.
Variations and Customizations
Make this dessert your own by trying out these fun twists:
- Flavor Add-ins: Add espresso powder, orange zest, or peppermint extract to the brownie or cheesecake layer for a flavor boost.
- Swirl Options: Swirl in peanut butter, caramel, or raspberry puree into the cheesecake layer before baking.
- Texture Boost: Fold in chopped nuts, chocolate chunks, or crushed cookies into the brownie batter for added crunch.
- Dietary Adjustments: Use gluten-free flour, vegan butter and cream cheese, or dairy-free chocolate for a special diet-friendly version.
Health Considerations and Nutritional Value
This dessert is rich and indulgent, so it’s best enjoyed in moderation. A typical serving (1 of 12 slices) may contain approximately:
- Calories: ~300–350
- Fat: ~20–25g (mostly from butter and cream cheese)
- Carbohydrates: ~30g (from sugar and flour)
- Protein: ~4–6g (mainly from eggs and cream cheese)
To reduce calories or fat, consider using reduced-fat cream cheese, applesauce instead of some butter, or a sugar substitute like erythritol or monk fruit sweetener. However, be mindful that these substitutions may alter the texture and flavor slightly.
Ingredients
Brownie Layer:
- 1/2 cup unsalted butter
- 1 cup dark chocolate chips or chopped chocolate
- 1 cup granulated sugar
- 1/2 cup brown sugar
- 2 large eggs
- 1/3 cup all-purpose flour
- 1/4 cup cocoa powder
- 1 tsp vanilla extract
Cheesecake Layer:
- 8 oz cream cheese, softened
- 1/4 cup granulated sugar
- 1 large egg
- 2 tbsp heavy cream
- 1 tsp vanilla extract
Directions
- Preheat oven to 350°F (175°C) and line an 8×8-inch baking pan with parchment paper.
- In a microwave-safe bowl, combine butter and chocolate. Microwave in 30-second intervals, stirring each time, until melted and smooth. Let cool slightly.
- Add granulated and brown sugar to the chocolate mixture, then beat in eggs one at a time until smooth.
- Sift in flour and cocoa powder, then fold in gently with a spatula. Stir in vanilla extract.
- Pour the brownie batter into the prepared pan.
- In a separate bowl, beat cream cheese and sugar until smooth. Add egg, heavy cream, and vanilla extract; mix until fully combined.
- Pour the cheesecake mixture over the brownie layer.
- Swirl the layers with a knife or toothpick for a marbled effect (optional).
- Bake for 35–40 minutes, or until the center is just set. The edges should be firm but the center slightly jiggly.
- Let cool completely at room temperature, then refrigerate for at least 2 hours or overnight.
- Slice and serve chilled. Optional: drizzle with melted chocolate or top with whipped cream and berries.
Frequently Asked Questions (FAQ)
Can I use a different pan size?
Yes, a 9×9-inch pan can be used,