Introduction
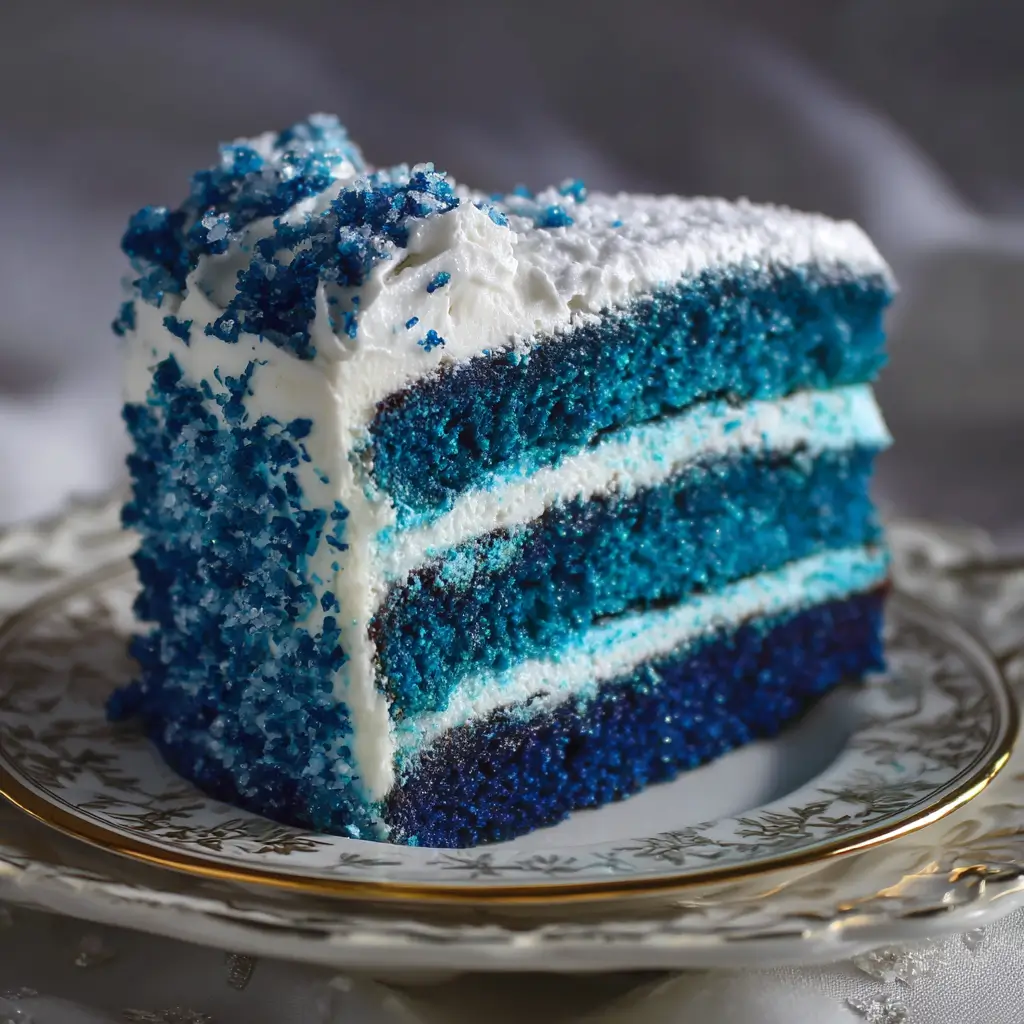
The Blue Velvet Cake is a stunning and elegant dessert that combines the rich, moist texture of traditional velvet cakes with a vibrant blue hue. While red velvet cake has long been a classic favorite, the blue velvet variation offers a unique twist that’s perfect for birthdays, weddings, parties, or simply when you want to make a bold statement on your dessert table. With its velvety crumb, subtle cocoa flavor, and creamy frosting, this cake is as delicious as it is beautiful.
The History
Velvet cakes trace their origins back to the 19th century, when bakers began experimenting with ingredients like buttermilk, cocoa powder, and vinegar to create softer, finer textures in their cakes. Red velvet became especially popular in the early 20th century, thanks in part to marketing efforts by food companies. The blue velvet cake is a modern reinterpretation, using vibrant blue food coloring instead of the traditional red. It’s often associated with contemporary baking trends and creative cake design, offering a fresh alternative for those who love velvet-style desserts but want something visually distinct.
Ingredients Breakdown
- All-purpose flour: Provides structure to the cake.
- Cocoa powder: Adds depth of chocolate flavor without making the cake too heavy.
- Baking soda: Helps the cake rise and remain light.
- Salt: Enhances flavor and balances sweetness.
- Butter: Adds richness and moisture to the crumb.
- Sugar: Sweetens the cake and contributes to its tender texture.
- Eggs: Bind the ingredients together and add volume.
- Buttermilk: Keeps the cake moist and adds a slight tanginess.
- Oil: Further enhances moisture and tenderness.
- Vanilla extract: Adds aromatic flavor.
- Blue food coloring: Gives the cake its signature color; gel or liquid can be used depending on desired intensity.
- Vinegar: Reacts with baking soda to help the cake rise and gives it a soft texture.
- Boiling water: Adds moisture and helps dissolve the cocoa for a richer flavor and smoother texture.
Step-by-Step Recipe
- Preheat oven to 350°F (175°C). Grease and flour two 9-inch round cake pans.
- In a medium bowl, sift together flour, cocoa powder, baking soda, and salt. Set aside.
- In a large mixing bowl, cream together butter and sugar until light and fluffy.
- Add eggs one at a time, beating well after each addition. Stir in oil and vanilla extract.
- Mix in the dry ingredients alternately with buttermilk, beginning and ending with the dry mixture.
- In a small bowl, combine blue food coloring with vinegar. Add to the batter and mix well.
- Stir in boiling water. The batter will be thin—this ensures a moist cake.
- Pour the batter evenly into prepared pans.
- Bake for 30–35 minutes or until a toothpick inserted in the center comes out clean.
- Cool the cakes in the pans for 10 minutes, then remove from pans and place on wire racks to cool completely.
- Frost with your favorite frosting (cream cheese or buttercream works well) and decorate as desired.
Tips
- Use room temperature ingredients for a smoother batter and better rise.
- To avoid staining your hands or bowls, wear gloves and use a spatula when working with blue food coloring.
- If using liquid food coloring, you may need more than if using gel—start with a few drops and adjust as needed.
- For extra moisture, brush each cake layer with a simple syrup before frosting.
- Chill the cake layers for 30 minutes before frosting to make assembly easier.
- Use a turntable and offset spatula for smooth frosting application.
Variations and Customizations
- Chocolate Blue Velvet: Increase the cocoa powder slightly for a deeper chocolate flavor.
- Lemon Blue Velvet: Replace some of the buttermilk with lemon juice and add lemon zest for a citrus twist.
- Gluten-free: Substitute all-purpose flour with a gluten-free flour blend designed for baking.
- Dairy-free: Use plant-based butter and substitute buttermilk with almond milk mixed with apple cider vinegar.
- Layered fillings: Add fruit preserves, ganache, or cream between layers for extra flavor.
- Themed decoration: Decorate with edible glitter, fondant accents, or themed toppers for holidays, birthdays, or special events.
Health Considerations and Nutritional Value
While Blue Velvet Cake is a decadent treat, it’s important to enjoy it in moderation. A typical slice contains around 400–600 calories, depending on the frosting and portion size. The cake contains saturated fats from butter and cream cheese frosting, so consider lighter alternatives such as Greek yogurt frosting for a healthier option. You can also reduce the sugar content slightly or use natural sweeteners like honey or maple syrup. For added nutrition, pair with fresh berries or serve alongside a cup of herbal tea.
Ingredients
- 2 cups all-purpose flour
- ¾ cup unsweetened cocoa powder
- 1 tsp baking soda
- ½ tsp salt
- ½ cup (1 stick) unsalted butter, softened
- 1¾ cups granulated sugar
- 2 large eggs
- ⅔ cup vegetable oil
- 1 tsp vanilla extract
- 1 cup buttermilk
- 1–2 tbsp blue gel or liquid food coloring
- 1 tbsp white vinegar
- ½ cup boiling water
Directions
- Preheat oven to 350°F (175°C). Prepare two 9-inch round cake pans by greasing and flouring them.
- In a medium bowl, sift together flour, cocoa powder, baking soda, and salt. Whisk to combine and set aside.
- In a large bowl, beat the butter and sugar together until light and fluffy, about 3–4 minutes.
- Add eggs one at a time, beating well after each. Mix in oil and vanilla extract.
- Gradually add the dry ingredients to the wet ingredients, alternating with buttermilk, starting and ending with the dry mixture. Mix until just combined.
- In a small bowl, combine blue food coloring with vinegar. Add this mixture to the batter and stir until evenly colored.
- Carefully stir in boiling water. The batter will be thin, but this helps keep the cake moist and tender.
- Divide the batter evenly between the prepared cake pans.
- Bake for 30–35 minutes or until a toothpick inserted in the center comes out clean.
- Let the cakes cool in the pans for 10 minutes, then remove and transfer to wire racks to cool completely before frosting.
- Frost with your favorite frosting and decorate as desired.
FAQ
Can I use regular food coloring instead of gel?
Yes, you can, but you may need more of it to achieve the same vibrant blue color. Gel coloring is more concentrated and won’t thin out the batter as much.
Can I make cupcakes instead of a layer cake?
Absolutely! Fill cupcake liners ⅔ full and bake at the same temperature for 18–22 minutes.
How do I store the cake?
Store frosted cake in the refrigerator for up to 3 days. Unfrosted cake layers can be wrapped and frozen for up to 2 months.
Can I make this cake ahead of time?
Yes, you can bake and wrap the layers a day in advance. Frosting should be done just before serving for best appearance.
Why did my cake sink in the middle?
This could be due to underbaking, overmixing, or not preheating the oven properly. Ensure your oven is fully heated before baking.
What kind of frosting pairs best with Blue Velvet Cake?
Cream cheese frosting is a classic choice, but buttercream, whipped cream, or even chocolate ganache can work beautifully.
Summary
The Blue Velvet Cake is