Red Velvet Oreo Cake
Introduction
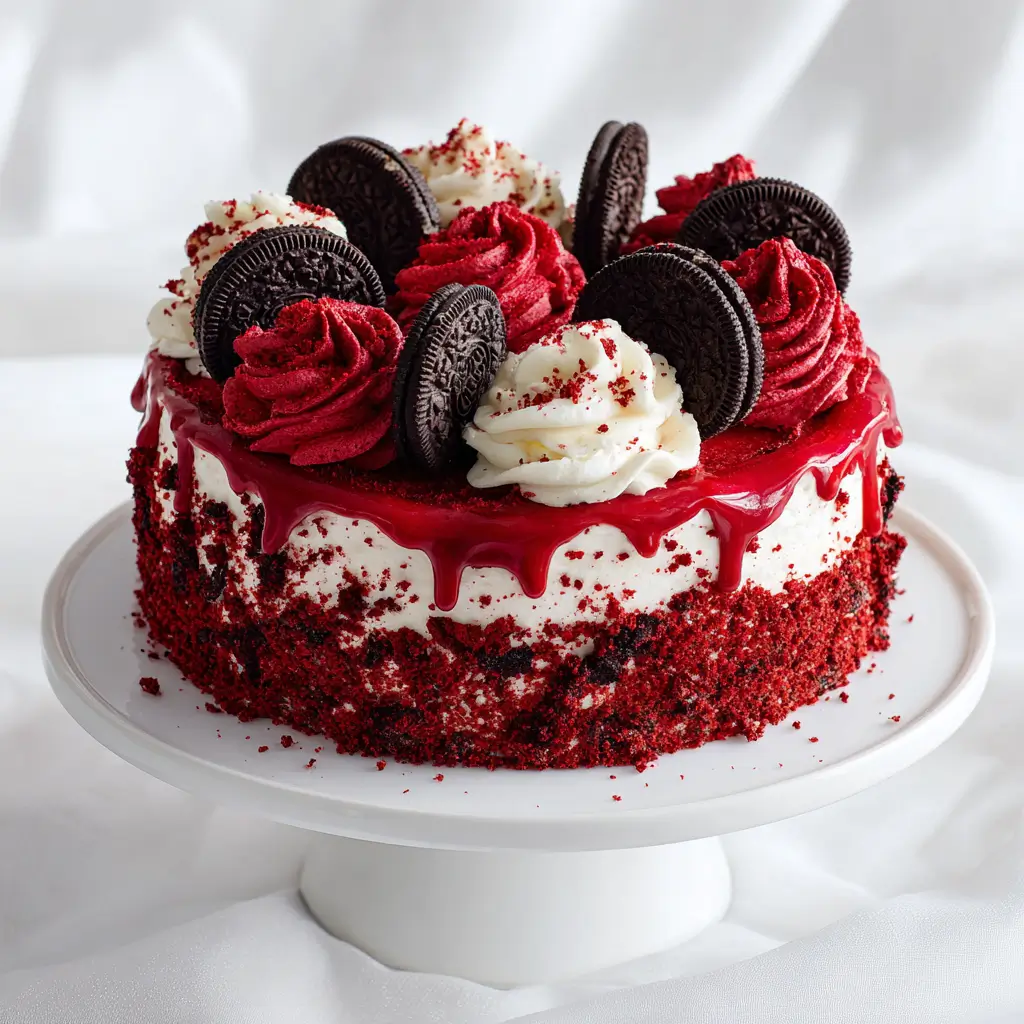
The Red Velvet Oreo Cake is a modern twist on the classic red velvet cake, combining rich cocoa flavors with vibrant red hues and the beloved crunch of Oreo cookies. This decadent dessert has become increasingly popular for birthdays, holidays, and special occasions due to its stunning appearance and irresistible taste. The blend of soft, moist cake layers and creamy frosting layered with crushed Oreos creates a perfect balance between texture and flavor. Whether you’re a die-hard red velvet fan or simply love all things chocolatey and sweet, this cake promises to be a crowd-pleaser.
The History
Red velvet cake traces its origins back to the early 20th century, gaining popularity in the United States during the Great Depression. Its signature red color comes from a chemical reaction between cocoa powder and acidic ingredients like buttermilk and vinegar, though today most recipes use food coloring for a more vivid hue. Oreo cookies, first introduced in 1912, have long been a favorite treat across generations. Combining these two iconic desserts into one was only a matter of time, and now the Red Velvet Oreo Cake stands as a contemporary fusion that celebrates both tradition and innovation in baking.
Ingredients Breakdown
This cake features a rich red velvet batter infused with cocoa and buttermilk, enhanced with the crunch and creaminess of Oreo cookies. The frosting is typically a tangy cream cheese variety, which complements the sweetness of the cake and Oreos perfectly. Key ingredients include flour, sugar, cocoa powder, baking soda, vinegar, eggs, oil, buttermilk, food coloring, vanilla extract, butter, cream cheese, and a generous helping of Oreo cookies—both whole and crushed.
Step-by-Step Recipe
- Preheat oven: Set to 350°F (175°C). Grease and flour two 9-inch round cake pans.
- Mix dry ingredients: In a large bowl, whisk together flour, sugar, cocoa powder, baking soda, and salt.
- Add wet ingredients: Stir in vegetable oil, eggs, buttermilk, vinegar, red food coloring, and vanilla extract until smooth.
- Bake: Pour batter evenly into prepared pans. Bake for 25–30 minutes or until a toothpick inserted in the center comes out clean.
- Cool: Let cakes cool completely before removing from pans.
- Prepare frosting: Beat butter and cream cheese until smooth. Gradually add powdered sugar and vanilla extract; mix until light and fluffy.
- Assemble cake: Place one layer on a serving plate. Spread frosting generously over the top, then sprinkle with crushed Oreos. Repeat with second layer, finishing with a final coat of frosting and whole Oreos around the edges if desired.
Tips
- To ensure a deep red color without using too much food coloring, opt for gel-based dyes instead of liquid ones.
- For extra moisture, don’t overbake the cake. Check for doneness starting at 25 minutes.
- Use room temperature eggs and buttermilk to achieve a smoother batter.
- Let the cake cool completely before frosting to prevent melting and sliding.
- Crush Oreos just before assembling to maintain their texture.
Variations and Customizations
- Gluten-free version: Substitute regular flour with a gluten-free all-purpose flour blend.
- Dairy-free option: Replace buttermilk with a dairy-free alternative like almond milk mixed with lemon juice, and use vegan cream cheese for frosting.
- Layered Oreo surprise: Insert a layer of Oreo cookie halves vertically between cake layers for visual flair.
- Chocolate lovers’ twist: Add mini chocolate chips to the batter for an extra chocolate kick.
- Themed decorations: Top with sprinkles, edible glitter, or fondant shapes depending on the occasion—birthdays, Valentine’s Day, etc.
Health Considerations and Nutritional Value
While undeniably delicious, the Red Velvet Oreo Cake is high in sugar, saturated fats, and calories due to the cream cheese frosting, butter, and Oreo cookies. A typical slice can contain anywhere from 400–600 calories, depending on portion size and ingredient choices. To make it slightly healthier, consider substituting some sugar with natural sweeteners like honey or maple syrup, using low-fat cream cheese, or reducing the amount of frosting used. Whole wheat flour or oat flour can also replace all-purpose flour for added fiber. However, moderation is key when indulging in this rich dessert.
Ingredients
- 2 and 1/2 cups (300g) all-purpose flour
- 1 and 1/2 cups (300g) granulated sugar
- 1 cup (90g) unsweetened cocoa powder
- 1 tsp baking soda
- 1/2 tsp salt
- 2 large eggs, at room temperature
- 1 and 1/2 cups (360ml) buttermilk
- 1/2 cup (120ml) vegetable oil
- 2 tbsp white vinegar
- 2 tsp vanilla extract
- 1–2 tbsp red food coloring (adjust to desired shade)
- 1 cup (2 sticks / 226g) unsalted butter, softened
- 8 oz (226g) cream cheese, softened
- 4 cups (500g) powdered sugar
- 1 tsp vanilla extract
- 16–20 Oreo cookies, crushed or whole for decoration
Directions
- Preheat oven: Preheat your oven to 350°F (175°C). Grease and flour two 9-inch round cake pans and line the bottoms with parchment paper.
- Mix dry ingredients: In a large mixing bowl, sift together the flour, sugar, cocoa powder, baking soda, and salt.
- Add wet ingredients: To the dry mixture, add the eggs, buttermilk, vegetable oil, vinegar, vanilla extract, and red food coloring. Mix on medium speed until everything is well combined and smooth, about 2–3 minutes.
- Bake the cakes: Divide the batter evenly between the two prepared pans. Bake for 25–30 minutes or until a toothpick inserted into the center comes out clean. Allow to cool completely in the pans on a wire rack (about 1 hour).
- Make the frosting: In a large bowl, beat the butter and cream cheese together until smooth and creamy. Gradually add powdered sugar and vanilla extract, beating on medium-high speed until light and fluffy, about 3–4 minutes. Chill briefly if the frosting becomes too soft.
- Assemble the cake: Once the cake layers are fully cooled, place one on a serving plate. Spread a thick layer of frosting over the top, then sprinkle with crushed Oreo cookies. Place the second cake layer on top and frost the top and sides of the entire cake. Decorate with additional crushed Oreos or whole cookies around the edges.
- Chill before serving: For best results, refrigerate the cake for at least 1 hour before slicing to help the layers set and enhance the flavors.
FAQ
Can I make this cake ahead of time?
Yes! You can bake the cake layers a day in advance and wrap them tightly in plastic wrap. Frosting can also be made ahead and stored in the fridge for up to two days—just bring it to room temperature and re-whip with a mixer before using.
How should I store the cake?
Store leftover cake covered in the refrigerator for up to 5 days. For longer storage, wrap individual slices in plastic wrap and freeze for up to 2 months. Thaw overnight in the fridge before serving.
Can I use a boxed red velvet cake mix?
Yes, you can substitute two boxes of red velvet cake mix following the package instructions. Add crushed Oreos to the batter or between layers for authentic flavor.
Why did my cake turn out dry?
Overmixing the batter or overbaking may cause dryness. Be sure to mix just until ingredients are combined and check the cake for doneness starting at 25 minutes.
Can I make cupcakes instead?
Absolutely! Fill