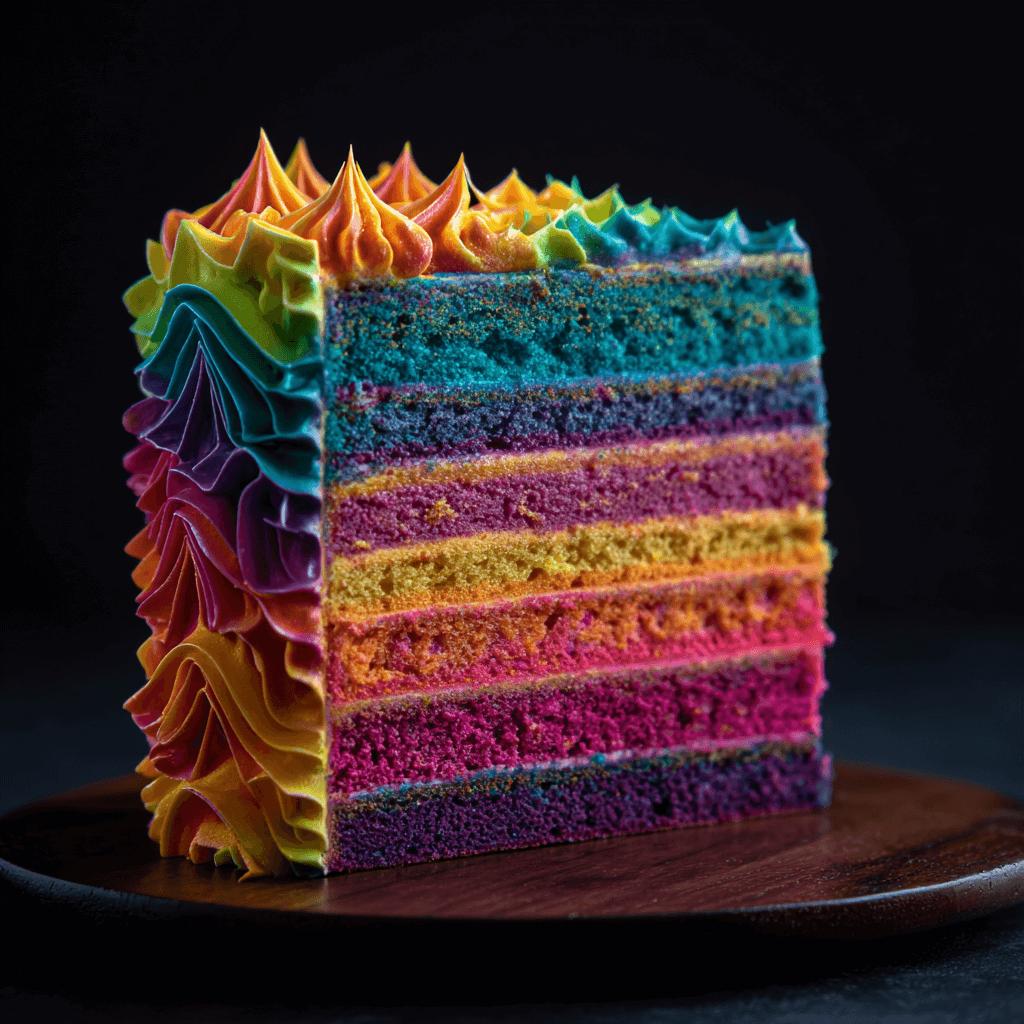
Neon Rainbow Wave Cake: A Vibrant Celebration of Color and Flavor
The Neon Rainbow Wave Cake is not just a dessert—it’s a visual masterpiece that dances with color and delights the senses. Originally inspired by the whimsical desserts seen in trendy bakeries and social media feeds, this cake combines bold neon hues with a soft wave design to create a showstopping centerpiece for any celebration. Whether it’s for birthdays, baby showers, or simply a creative baking project, this cake brings joy and excitement to every slice.
A Brief History of Rainbow Cakes
Rainbow cakes have been around for decades, often associated with childhood celebrations and festive occasions. The modern twist—using neon food coloring and intricate wave patterns—has gained popularity through platforms like Instagram and Pinterest, where aesthetics play a key role in food presentation. The “wave” technique mimics ocean waves or abstract art, adding a painterly effect to the cake layers. This evolution from the classic rainbow swirl to a fluid, colorful wave pattern represents the creativity and innovation in today’s home and professional baking scene.
Ingredients Breakdown
To achieve the signature look and taste of the Neon Rainbow Wave Cake, you’ll need:
- All-Purpose Flour: Provides structure to the cake layers.
- Baking Powder: Ensures a light and fluffy rise.
- Salt: Balances sweetness and enhances flavor.
- Unsalted Butter: Adds richness and moisture.
- Granulated Sugar: Sweetens and helps aerate the butter.
- Eggs: Bind the ingredients together and add density.
- Milk: Keeps the batter smooth and moist.
- Vanilla Extract: Enhances overall flavor profile.
- Neon Food Coloring (Pink, Blue, Green, Yellow, Purple): Creates vibrant, eye-catching colors.
- Buttercream Frosting: Used for crumb coat, layering, and final decoration.
- Optional Decorations: Sprinkles, edible glitter, or fondant accents.
Step-by-Step Recipe
- Preheat oven to 350°F (175°C) and prepare three 8-inch round cake pans by greasing and lining the bottoms with parchment paper.
- Cream butter and sugar until light and fluffy, about 3–4 minutes using an electric mixer.
- Add eggs one at a time, mixing well after each addition. Stir in vanilla extract.
- In a separate bowl, sift together flour, baking powder, and salt.
- Alternate adding dry ingredients and milk to the butter mixture, beginning and ending with the dry ingredients. Mix on low speed until just combined.
- Divide batter evenly into five bowls (or more if desired), and tint each with a different neon food coloring. Use gel-based colors for best vibrancy.
- Pour colored batters in sequence into cake pans, creating a striped or layered effect before baking.
- Bake for 25–30 minutes, or until a toothpick inserted in the center comes out clean. Let cool completely before frosting.
- Frost the cooled layers with buttercream, stacking them carefully to maintain the wave pattern.
- Create the wave design on the outside using offset spatulas and piping bags with neon-colored buttercream for a marbled or gradient effect.
- Decorate as desired with sprinkles, edible glitter, or themed toppers.
Pro Tips for Perfect Results
- Use gel food coloring instead of liquid for brighter, more intense colors without affecting the texture of the batter.
- For a smoother wave design, chill your crumb-coated cake for 20–30 minutes before applying the final layer of frosting.
- Layer the colors strategically when pouring into the pan—alternate shades for maximum visual impact.
- Keep cake layers level by tapping the pan gently on the counter before baking to release air bubbles.
- If making multiple batches, ensure all cake layers are completely cooled before stacking to avoid melting frosting or collapsing layers.
Variations and Customizations
- Flavor Variations: Swap vanilla for chocolate, lemon, strawberry, or funfetti base for added depth.
- Dietary Adaptations: Use gluten-free flour, dairy-free butter/milk, or vegan egg substitutes for allergy-friendly versions.
- Theme-Based Designs: Turn it into a galaxy cake, tropical sunset cake, or even a unicorn-themed cake with specific color palettes and decorations.
- Shape Changes: Try rectangular pans for a checkerboard effect or heart-shaped pans for romantic occasions.
- Texture Play: Add a layer of fruit filling, ganache, or cream cheese frosting between the layers for extra indulgence.
Health Considerations and Nutritional Value
While undeniably indulgent, the Neon Rainbow Wave Cake can be enjoyed responsibly. Each slice typically contains around 400–600 calories, depending on portion size and frosting amount. To make a healthier version:
- Replace half the flour with almond or oat flour.
- Use coconut sugar or maple syrup instead of refined sugar.
- Opt for Greek yogurt in place of some of the butter or oil.
- Choose natural food dyes (e.g., beet juice, spirulina) instead of artificial ones.
- Reduce frosting quantity or use a whipped avocado or cashew-based frosting alternative.
Be mindful of food coloring sensitivities—especially in children—and consider organic or plant-based options where possible.
Full Ingredient List
- 2 ½ cups all-purpose flour
- 2 ½ tsp baking powder
- ½ tsp salt
- 1 cup unsalted butter, softened
- 2 cups granulated sugar
- 4 large eggs
- 1 cup whole milk
- 1 tbsp vanilla extract
- Gel food coloring (neon pink, blue, green, yellow, purple)
- Buttercream frosting (homemade or store-bought)
- Sprinkles or edible glitter for decoration (optional)
Directions Recap
- Preheat oven and prepare pans.
- Cream butter and sugar until fluffy.
- Add eggs and vanilla.
- Mix dry ingredients separately.
- Combine wet and dry alternately with milk.
- Divide batter and add neon colors.
- Pour into pans in a pattern for wave effect.
- Bake and cool completely.
- Frost and decorate with neon buttercream designs.
- Add final touches and enjoy!
Frequently Asked Questions (FAQ)
Can I use liquid food coloring instead of gel?
Yes, but gel coloring offers more vibrant results without altering the cake’s texture. If using liquid, reduce the amount to avoid thinning the batter too much.
How do I store the cake?
Store covered at room temperature for up to 2 days, or refrigerate for up to 4 days. Bring to room temperature before serving for best texture.
Can I freeze the cake layers?
Absolutely! Wrap cooled layers tightly in plastic wrap and foil, then freeze for up to 2 months. Thaw overnight at room temperature before frosting.
Is this cake suitable for kids?
Yes! Just be cautious with artificial colors or opt for natural alternatives. You can also reduce the sugar content slightly for a healthier version.
What tools are needed for the wave design?
You’ll need offset spatulas, a turntable (optional but helpful), piping bags, and a bench scraper or palette knife to create the w