Colorblocked Birthday Cake
Introduction
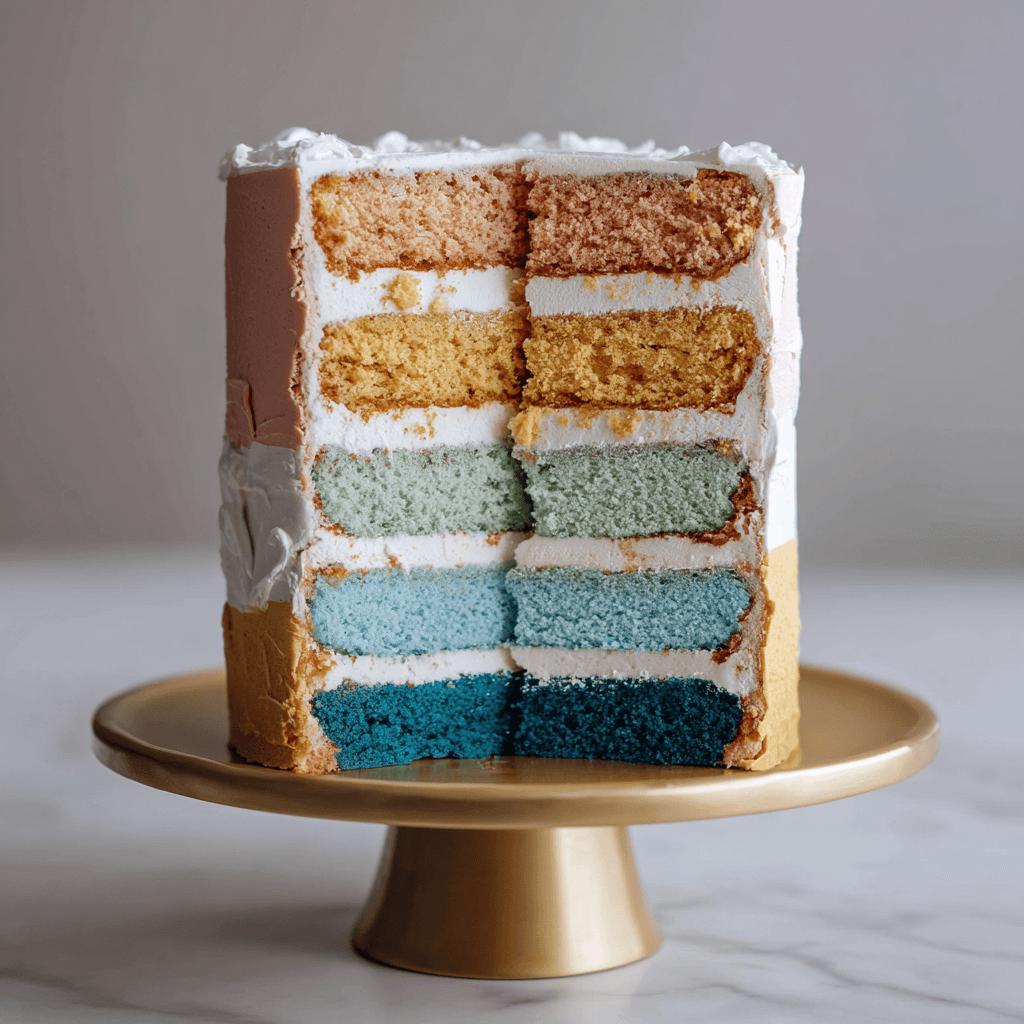
The Colorblocked Birthday Cake is a vibrant, eye-catching dessert that combines layers of beautifully colored sponge cake with smooth buttercream frosting. Perfect for birthdays, celebrations, or any event where you want to make a bold statement, this cake not only delights the taste buds but also doubles as a centerpiece. With its clean lines and contrasting colors, it’s a modern twist on traditional layer cakes.
The History
Layered cakes have been around for centuries, but the colorblocked style has become increasingly popular in recent years thanks to social media and the rise of visually stunning desserts. Inspired by fashion trends and minimalist design, bakers began experimenting with bright hues and geometric patterns to create cakes that are both delicious and Instagram-worthy. The trend has since taken off across bakeries and home kitchens alike.
Ingredients Breakdown
This cake uses simple, classic ingredients that can be customized to suit your preferences:
- All-purpose flour – provides structure
- Baking powder – helps the cake rise
- Butter – adds richness and flavor
- Sugar – sweetness and texture
- Eggs – bind and add moisture
- Milk – keeps the batter moist and tender
- Foldable food coloring gels – for vibrant color without affecting texture
- Vanilla extract – enhances overall flavor
- Buttercream frosting – for filling and covering the cake
Step-by-Step Recipe
- Preheat oven to 350°F (175°C). Prepare three 8-inch round cake pans by greasing and lining with parchment paper.
- In a large bowl, cream together 1 cup (2 sticks) unsalted butter and 2 cups granulated sugar until light and fluffy.
- Add 4 large eggs one at a time, mixing well after each addition. Stir in 2 teaspoons vanilla extract.
- In a separate bowl, sift together 3 cups all-purpose flour, 1 tablespoon baking powder, and ½ teaspoon salt.
- Alternately add the dry ingredients and 1¼ cups milk to the butter mixture, beginning and ending with the dry ingredients.
- Divide the batter evenly into 4 bowls (for four color layers), approximately 1⅓ cups per portion.
- Add different gel food colorings to each bowl—popular choices include pink, turquoise, yellow, and purple—and mix until fully incorporated.
- Pour each colored batter into prepared pans and bake for 20–25 minutes, or until a toothpick inserted in the center comes out clean.
- Allow the cakes to cool completely before removing from pans.
- Prepare buttercream frosting: Beat 1 cup butter until creamy, then gradually add 4 cups powdered sugar, 2–3 tablespoons milk, and 1 teaspoon vanilla extract.
- Place one cake layer on a serving plate and spread a thick layer of frosting on top. Repeat with remaining layers, stacking them carefully to align the colors neatly.
- Frost the top and sides of the cake with a crumb coat, chill for 15 minutes, then apply a final smooth coat of frosting.
- Use a bench scraper or cake smoother to achieve clean edges for the colorblocked effect.
Tips
- To keep colors vivid, use gel-based food coloring rather than liquid.
- Chill the frosted cake briefly between coats to set the frosting and reduce smudging.
- For perfectly even layers, use a cake leveler or serrated knife to trim domed tops.
- If you’re stacking more than three layers, consider adding a small amount of shortening to the buttercream to help support the weight.
- Use a ruler or template to ensure clean, straight color sections when applying frosting.
Variations and Customizations
- Flavor Variations: Add lemon zest, cocoa powder, or almond extract to individual layers for unique flavor profiles.
- Dietary Options: Substitute gluten-free flour or use vegan butter and egg replacers for alternative diets.
- Themed Colors: Match the color scheme to holidays (red/green for Christmas, pastels for Easter), baby showers (pink/blue), or gender-neutral shades like mint and gold.
- Fillings: Swirl in jams, chocolate ganache, or curds between layers for added depth of flavor.
- Decorations: Top with metallic sprinkles, edible glitter, or fondant accents for extra flair.
Health Considerations and Nutritional Value
While this cake is indulgent, it can still be enjoyed responsibly. Each slice (assuming 12 servings) contains approximately:
- Calories: ~450–550
- Total Fat: ~20g
- Carbohydrates: ~65g
- Protein: ~5g
- Sugar: ~40g
Consider using natural food dyes (like beet juice or spirulina) and reducing sugar content slightly for a healthier version. Whole wheat pastry flour and plant-based milks can also be used to increase fiber and reduce saturated fat.
Ingredients
Cake Layers:
- 3 cups all-purpose flour
- 1 tablespoon baking powder
- ½ teaspoon salt
- 1 cup (2 sticks) unsalted butter, softened
- 2 cups granulated sugar
- 4 large eggs
- 1¼ cups milk
- 2 teaspoons vanilla extract
- Gel food coloring (assorted colors)
Buttercream Frosting:
- 1 cup (2 sticks) unsalted butter, softened
- 4 cups powdered sugar
- 2–3 tablespoons milk or heavy cream
- 1 teaspoon vanilla extract
Directions
- Preheat oven to 350°F (175°C) and prepare three 8-inch round cake pans with parchment paper and non-stick spray.
- Whisk together flour, baking powder, and salt; set aside.
- In a stand mixer, beat butter and sugar until pale and fluffy (about 3–4 minutes).
- Add eggs one at a time, beating well after each addition. Mix in vanilla extract.
- Alternate adding flour mixture and milk to the butter mixture, starting and ending with flour.
- Divide batter into 4 equal portions and tint each with a different food coloring gel.
- Pour each colored batter into prepared pans and bake for 20–25 minutes. Let cool completely.
- Make buttercream: whip butter until creamy, gradually add powdered sugar, milk, and vanilla until smooth and spreadable.
- Stack cooled cake layers with a generous layer of frosting between each. Apply a crumb coat, chill, then frost again smoothly.
- Use a bench scraper or offset spatula to smooth sides and define the color blocks.
FAQ
Can I make this cake ahead?
Yes! Bake the layers up to two days in advance and store wrapped at room temperature. Frost the day of serving for best appearance.
How do I store leftover cake?
Store covered at room temperature for up to 2 days. For longer storage, refrigerate in an airtight container for up to 5 days. Bring to room temperature before serving.
Can I freeze the cake layers?
Absolutely. Wrap cooled layers tightly in plastic wrap and foil, then freeze for up to 2 months. Thaw at room temperature before assembling.
Will liquid food coloring work?
You can use it, but gel coloring offers more vibrant hues without altering the cake